
Customize Public Pages
Most organizations will want to edit and customize the look and feel of public-facing Gluu Server pages to match their own corporate branding. The following documentation provides the file locations of public facing pages, as well as instructions for adding custom HTML, CSS, and Javascript files to your Gluu Server.
Public pages include:
- All included sign-in pages
- Registration
- Password Recovery
- Error Pages
#Overview
The Gluu Server's public facing pages are xhtml files. Each Gluu Server component is deployed as a separate archive in WAR format. When any component's service is started, its archive is unpacked ("exploded") to Jetty's temporary file directory located under /opt/jetty-<VERSION>/temp/ before it'll be able to start serving requests for associated functionality.
To customize any files used by a component, they need to be changed either at that temporary location, or inside the corresponding archive itself. Note that changes made directly to unpacked files under /opt/jetty-<VERSION>/temp/ won't be persisted--each time a component's service is restarted its WAR archive will be re-exploded, overwritting the existing content on the disk.
A typical example would be customizing oxAuth's login page. There are two ways to achieve this:
Unpack the needed files from
/opt/gluu/jetty/oxauth/webapps/oxauth.warwith a tool likejar, update them and add them back to the archive with all required dependencies (not recommended);Put changed files under
/opt/gluu/jetty/oxauth/custom/directory, so they could be used instead of the standard files inoxauth.war. (Note: the same approach will work for oxTrust if files are placed under/opt/gluu/jetty/identity/custom/). The benefit of using this method is that your customizations won't be disturbed by any changes tooxauth.waroridentity.warlater on (for example, in case this Gluu instance will be patched or updated, and a component's WAR archive will get overwritten). More on this method below.
#Directory structure and mappings
New directories trees have been added inside the Gluu Server chroot to make page customizations easier.
Each such tree is placed in the configuration directory of the corresponding Gluu component (only
customization of oxAuth and oxTrust pages is supported at the moment by this feature).
The new directory structure can be illustrated as follows (only directories related to this feature are shown for clarity):
#oxAuth
/opt/gluu/jetty/oxauth/
|-- custom
|   |-- i18n
|   |-- libs
|   |-- pages
| `-- static#oxTrust
/opt/gluu/jetty/identity/
|-- custom
|   |-- i18n
|   |-- libs
|   |-- pages
| `-- static#Subdirectories
Customized i18n should be placed in the following directories:
/opt/gluu/jetty/identity/custom/i18n
/opt/gluu/jetty/oxauth/custom/i18nResources from this folder will be loaded at the next service restart.
Sub-directory custom/pages have a special purpose. They enable overriding exploded xhtml pages from the unpacked WAR archive. The path to the exploded WAR conforms to following scheme:
/opt/jetty-<VERSION>/temp/jetty-localhost-<PORT_NUMBER>-<COMPONENT_NAME>.war-_<COMPONENT_NAME>-any-<RANDOM_TAG>.dir/webapp/So, for example, the path to an exploded oxAuth's WAR archive directory may look like this (and may be changed the next time the corresponding service is restarted):
/opt/jetty-9.4/temp/jetty-localhost-8081-oxauth.war-_oxauth-any-9071517269463235631.dir/webapp/Thus, a modified login.xhtml page put under custom/pages/ will be used instead of the webapp/login.xhtml file from the exploded archive. You can use files unpacked there as a base for your own customized files.
Customized libs used by oxAuth should be placed in the following directories:
/opt/gluu/jetty/identity/custom/libs
/opt/gluu/jetty/oxauth/custom/libsAdditional libs/plugins should be registered in /opt/gluu/jetty/oxauth/webapps/oxauth.xml or /opt/gluu/jetty/identity/webapps/identity.xml in attribute <Set name="extraClasspath"></Set>
Custom CSS or images should be placed under custom/static directory. To avoid collisions with static resources from WAR files, Gluu maps this folder to the URL's path like this: /{oxauth|identity}/ext/resources
So, for example, a CSS file placed at this path:
/opt/gluu/jetty/oxauth/custom/static/stylesheet/theme.css...will be externally available at a URL similar to this:
https://your.gluu.host/oxauth/ext/resources/stylesheet/theme.css...and should be referenced from inside of source codes of customized files by path like this:
/oxauth/ext/resources/stylesheet/theme.cssAll images should be placed under:
/opt/gluu/jetty/oxauth/custom/static/img
And all CSS are inside:
/opt/gluu/jetty/oxauth/custom/static/stylesheet
#Full customization
If the above customization approach does not help to resolve customization issues, it's possible to explode WAR files and instruct Jetty to use the exploded folder instead of a WAR file. The following is a sample for oxAuth:
Unpack oxauth.war into
/opt/gluu/jetty/oxauth/webapps/oxauthfolderPut updated
/opt/gluu/jetty/oxauth/webapps/oxauth.xmlwith next content:<Configure class="org.eclipse.jetty.webapp.WebAppContext"> <Set name="contextPath">/oxauth</Set> <Set name="war"> <Property name="jetty.webapps" default="." />/oxauth/ </Set> </Configure>
#Location of key webpage source files
The default public-facing pages can be a good base for your organization's customized ones. Aside from extracting them directly from a corresponding WAR file, they can be found at Jetty's temp directory to which they are unpacked each time a corresponding service starts.
#oxAuth
oxAuth is the core Gluu CE component, handling all authentication in the framework and implementing OpenID Connect and UMA flows. Most of the web UI pages displayed to end users belong to oxAuth (login/logout/authorization flows).
Base directory:
/opt/jetty-<VERSION>/temp/jetty-localhost-8081-oxauth.war-_oxauth-any-<RANDOM_TAG>.dir/webapp/
- Default login page:
./login.xhtml - Authorization page:
./authorize.xhtml - Logout page:
./logout.xhtml - Error page:
./error.xhtml - Custom authentication scripts; XHTML files under:
./webapp/auth/
#oxTrust:
oxTrust is responsible for displaying the Gluu Server's default registration page, as well as the administrator web UI's pages.
Base directory:
/opt/jetty-<VERSION>/temp/jetty-localhost-8082-identity.war-_identity-any-<RANDOM_TAG>.dir/webapp/
- Registration page:
./register.xhtml
#Applying changes
To apply the customizations just set, restart the oxauth and oxtrust services.
#Customizing SAML IDP pages
Many organizations will want to edit and customize the look and feel of IDP pages to match their own corporate branding. The Gluu Server includes a custom folder that will override existing IDP pages. The IDP pages use the vm file type. To customize the pages, follow these steps:
- Find the desired file inside the chroot at
/opt/shibboleth-idp/views - Copy and edit the file, then move it to
/opt/gluu/jetty/idp/custom/pages
Now, the customized page will override the default one.
#An Example: Removing the Gluu copyright
For a good practical example, let's consider a task of removing the Gluu copyright at the bottom of oxAuth's login page. You can follow these steps to achieve this:
Log in to the Gluu container
Create a new directory structure under
custom/pages/to accomodate new customized page:# mkdir -p /opt/gluu/jetty/oxauth/custom/pages/WEB-INF/incl/layout/`Get a default template page from the exploded WAR archive and put it in the path under
custom/pagesdirectory, which will allow it to override the original page (your path to the exploded WAR will differ from the one used here):# cp /opt/jetty-9.3/temp/jetty-localhost-8081-oxauth.war-_oxauth-any-9071517269463235631.dir/webapp/WEB-INF/incl/layout/template.xhtml /opt/gluu/jetty/oxauth/custom/pages/WEB-INF/incl/layout/template.xhtmlModify the new file by removing or editing the following snippet in it:
<s:fragment rendered="#{not isLogin}"> <div class="footer"> <p>Copyright <a href="http://www.gluu.org">Gluu</a> All rights reserved.</p> </div> </s:fragment>Assign appropriate permissions to new directories and files:
# chown -R jetty:jetty /opt/gluu/jetty/oxauth/custom/pages/ && chmod -R a-x+rX /opt/gluu/jetty/oxauth/custom/pages/
You may opt to copy the default oxAuth login page (login.xhtml) to the custom files
directory as well, and add some customizations to it:
cp /opt/jetty-9.3/temp/jetty-localhost-8081-oxauth.war-_oxauth-any-9071517269463235631.dir/webapp/login.xhtml /opt/gluu/jetty/oxauth/custom/pages/ Don't forget to apply appropriate file system permissions if needed. Restart the oxauth service inside the chroot.`
#Custom oxAuth Login Page Example in Cloud Native edition
This guide will show how to customize HTML pages and CSS in oxAuth for Gluu Server cloud native edition.
As an example, we're going to:
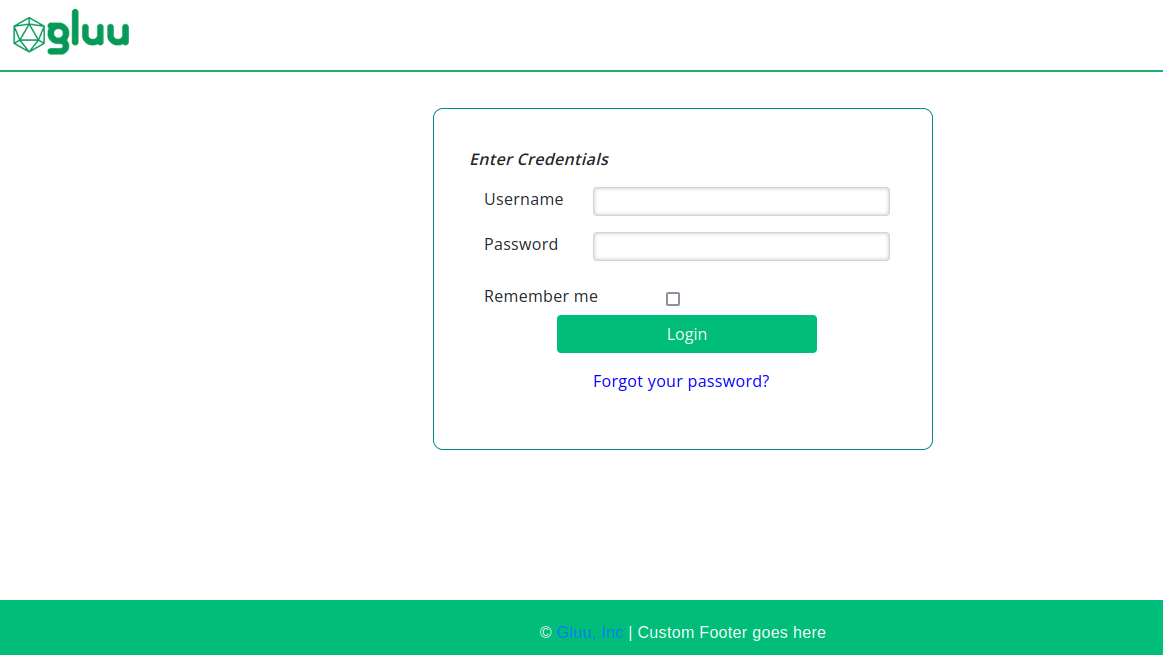
- add text to the top of the login form (and apply styling)
- add text in the footer
#Preparing custom files for oxAuth
Locate the directory contains exploded oxAuth WAR
kubectl -n gluu exec oxauth -- ls /opt/jetty/tempOutput example:
jetty-0_0_0_0-8080-oxauth_war-_oxauth-any-6467019887303284828Get the
login.xhtmlfrom oxAuth pod:kubectl -n gluu cp oxauth:/opt/jetty/temp/jetty-0_0_0_0-8080-oxauth_war-_oxauth-any-6467019887303284828/webapp/login.xhtml ./login.xhtmlModify the file locally:
<h:form id="loginForm" style="padding:30px;"> <!-- customization --> <div class="row"><p id="creds-title">Enter Credentials</p></div> <!-- end of customization --> <div class="row"> <div class="col-sm-3 col-md-3"> <h:outputText value="#{msgs['login.username']}" /> </div>Get the
login-template.xhtmlfrom oxAuth pod:kubectl -n gluu cp oxauth:/opt/jetty/temp/jetty-0_0_0_0-8080-oxauth_war-_oxauth-any-6467019887303284828/webapp/WEB-INF/incl/layout/login-template.xhtml ./login-template.xhtmlModify the file locally:
<h:head> <link type="text/css" rel="stylesheet" href="https://fonts.googleapis.com/css?family=Open+Sans:300,400,600" /> <!-- customization --> <link rel="stylesheet" href="/oxauth/ext/resources/stylesheet/custom.css" /> <!-- end of customization --> </h:head> <footer class="footer" id="appFooter"> <div class="row" style="margin-top: 20px;"> <div class="col-sm-6 centered" style="text-align: center;"> <p class="centered"> © <a target="_blank" href="https://github.com/GluuFederation/oxAuth/blob/master/LICENSE"> <h:outputText value="#{msgs['common.gluuInc']}" escape="false" /> </a> | <a target="_blank" escape="false">Custom Footer goes here</a> </p> </div> </div> </footer>Copy the following text and save it as
custom.css:#creds-title { font-style: italic; font-weight: bolder; }Use
configmapsorjackrabbitto upload customization.
Create a config file to store the content of modified
login.xhtml,login-template.xhtml, andcustom.css.kubectl -n gluu create cm oxauth-custom-html --from-file=login.xhtml kubectl -n gluu create cm oxauth-custom-layout-html --from-file=login-template.xhtml kubectl -n gluu create cm oxauth-custom-css --from-file=custom.cssMount file in your
values.yamlunderoxauth.volumesandoxauth.volumeMounts:oxauth: volumeMounts: - name: oxauth-pages-volume mountPath: /opt/gluu/jetty/oxauth/custom/pages # login.xthml will be mounted under this directory - name: oxauth-layout-volume mountPath: /opt/gluu/jetty/oxauth/custom/pages/WEB-INF/incl/layout # login-template.xthml will be mounted under this directory - name: oxauth-static-volume mountPath: /opt/gluu/jetty/oxauth/custom/static/stylesheet # custom.css will be mounted under this directory volumes: - name: oxauth-pages-volume configMap: name: oxauth-custom-html - name: oxauth-layout-volume configMap: name: oxauth-custom-layout-html - name: oxauth-static-volume configMap: name: oxauth-custom-cssRun helm install or helm upgrade if Gluu has been already installed.
helm upgrade gluu gluu/gluu -n gluu --version=1.7.x -f values.yaml
Connect to your Jackrabbit
After connecting to Jackrabbit create the following directories:
opt/gluu/jetty/oxauth/custom/pages/WEB-INF/incl/layoutandopt/gluu/jetty/oxauth/custom/static/stylesheet.Put
login.xhtmlunderopt/gluu/jetty/oxauth/custom/pagesdirectory.Put
login-template.xhtmlunderopt/gluu/jetty/oxauth/custom/pages/WEB-INF/incl/layoutdirectoryPut
custom.cssunderopt/gluu/jetty/oxauth/custom/static/stylesheetdirectory.Custom files will be pulled by oxAuth pod after few minutes.
Here's the screenshot of customized oxAuth login page.
#Custom oxTrust Logout Page Example in Cloud Native edition
This guide will show examples of how to customize HTML pages and CSS in oxTrust for Gluu Server cloud native edition.
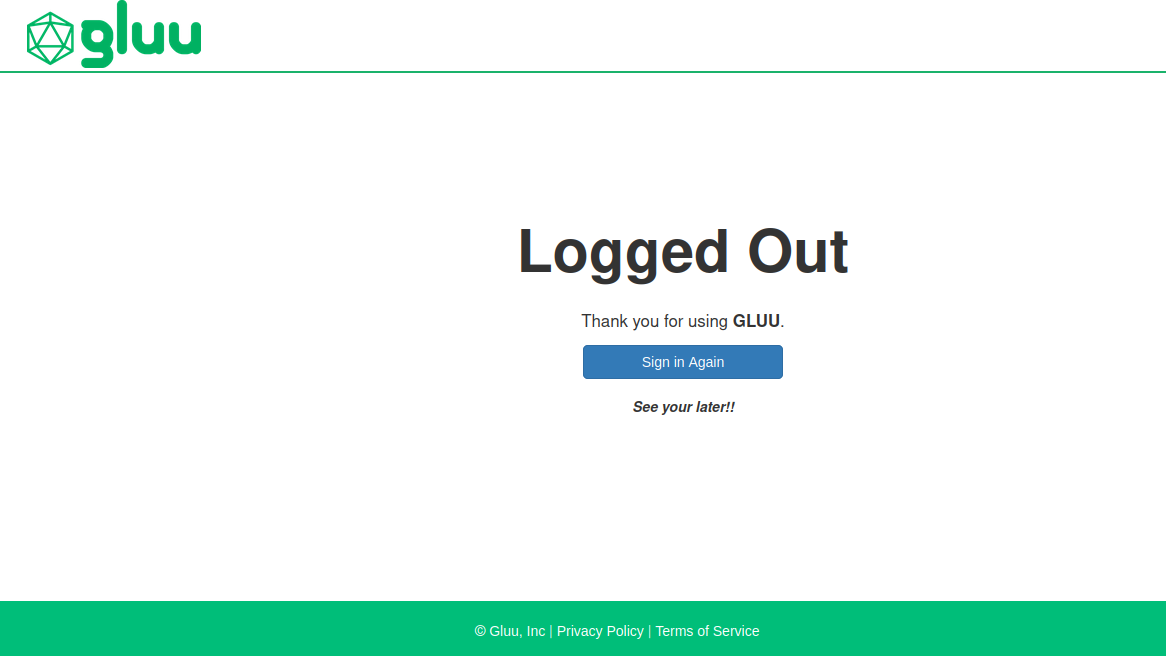
As an example, we're going to add text to the logout form.
#Preparing custom files for oxTrust
Locate the directory contains exploded oxTrust WAR
kubectl -n gluu exec oxtrust -- ls /opt/jetty/tempOutput example:
jetty-0_0_0_0-8080-identity_war-_identity-any-6467019887303284828Get the
finishlogout.xhtmlfrom oxTrust pod:kubectl -n gluu cp oxtrust:/opt/jetty/temp/jetty-0_0_0_0-8080-identity_war-_identity-any-6467019887303284828/webapp/finishlogout.xhtml ./finishlogout.xhtmlModify the file locally:
<ui:define name="body"> <div class="lockscreen-wrapper" style="text-align: center;"> <div class="lockscreen-name" style="text-align: center; font-size: 1.2em !important; margin-top: 10px; margin-bottom: 10px;"> Thank you for using <b>GLUU</b>. </div> <a class="btn btn-block btn-primary" href="login.htm" style="width: 50%;">#{msgs['finishLogout.signIn']}</a> <!-- customization --> <div style="font-style: italic; font-weight: bolder; margin-top: 20px;">See your later!!</div> <!-- end of customization --> </div> </ui:define>Use
configmapsorjackrabbitto upload customization.
Create a config file to store the contents of
finishlogout.xhtml.kubectl -n gluu create cm oxtrust-custom-html --from-file=finishlogout.xhtmlMount file in your
values.yamlunderoxtrust.volumesandoxtrust.volumeMounts:oxtrust: volumeMounts: - name: oxtrust-pages-volume mountPath: /opt/gluu/jetty/identity/custom/pages # finishlogout.xthml will be mounted under this directory volumes: - name: oxtrust-pages-volume configMap: name: oxtrust-custom-htmlRun helm install or helm upgrade if Gluu has been already installed.
helm upgrade gluu gluu/gluu -n gluu --version=1.7.x -f values.yaml
Connect to your Jackrabbit
After connecting to Jackrabbit create the following directories:
opt/gluu/jetty/identity/custom/pages.Put
finishlogout.xhtmlunderopt/gluu/jetty/identity/custom/pagesdirectory.Custom files will be pulled by oxTrust pod after few minutes.
Here's the screenshot of customized oxTrust logout page.
#Custom SAML IDP Pages Example in Cloud Native edition
This guide will show examples of how to customize pages in oxShibboleth (SAML IDP) for Gluu Server cloud native edition.
Locate the directory contains web pages
kubectl -n gluu exec oxshibboleth -- ls /opt/shibboleth-idp/viewsOutput example:
error.vm logout.vmGet the
error.vmfrom oxShibboleth pod:kubectl -n gluu cp oxshibboleth:/opt/shibboleth-idp/views/error.vm ./error.vmModify the copied
error.vmlocal fileCreate a config file to store the contents of modified
error.vm.kubectl -n gluu create cm oxshibboleth-custom-vm --from-file=error.vmMount file by adding to the
values.yamlunderoxshibboleth.volumesandoxshibboleth.volumeMounts:oxshibboleth: volumeMounts: - name: oxshibboleth-pages-volume mountPath: /opt/gluu/jetty/idp/custom/pages # error.vm will be mounted under this directory volumes: - name: oxshibboleth-pages-volume configMap: name: oxshibboleth-custom-vmRun helm install or helm upgrade if Gluu has been already installed.
helm upgrade gluu gluu/gluu -n gluu --version=1.7.x -f values.yaml