
This article will guide you through how to use SCIM to provision users on a Gluu 4 instance and configure Single-Sign-On (SSO) with Amazon Web Services.
Requirements
- A working Gluu 4 instance
- An AWS account with administrative priviledges
- An email address associated with an AWS account that you want to SSO with
- A way to craft SCIM requests for an endpoint protected by OAuth 2.0.
Preparing the Gluu Server
To begin, ensure the Shibboleth IDP and SCIM are installed and enabled on your Gluu installation. These are both installed by default.
Next, we need to enable the SCIM API. Log onto the oxTrust GUI, go to Organization > Organization Configuration and check the tick mark for SCIM Support.

After that, navigate to
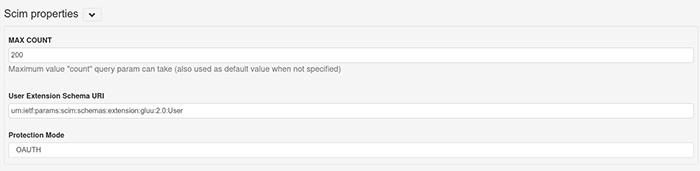
Configuration > JSON Configuration > OxTrust Configuration, locate the Scim Properties section (use Ctrl + F and search for Scim) and set the protection mode to OAUTH. Then save the configuration at the bottom of the page.
- This article assumes that we are using the OAuth 2.0 protection scheme. For testing purposes, you may use the
TESTscheme, which is unprotected and can be queried without any authentication; however, this is not recommended in a production environment.
Our Gluu server is now ready to accept authorized SCIM requests.
Next, we need to add two custom attribute types to our Gluu LDAP.
-
SSH into your Gluu server, and open
/opt/opendj/config/schema/77-customAttributes.ldifwith your favorite editor. -
Add the following
attributeTypes, and then modify yourgluuCustomPerson objectClassto add those twoattributeTypes. Here is a part of our schema doc after modification:Warning: Do NOT replace your... attributeTypes: ( 1.3.6.1.4.1.48710.1.3.1003 NAME 'RoleEntitlement' EQUALITY caseIgnoreMatch SUBSTR caseIgnoreSubstringsMatch SYNTAX 1.3.6.1.4.1.1466.115.121.1.15 X-ORIGIN 'Gluu - AWS Assume Role' ) attributeTypes: ( 1.3.6.1.4.1.48710.1.3.1004 NAME 'RoleSessionName' EQUALITY caseIgnoreMatch SUBSTR caseIgnoreSubstringsMatch SYNTAX 1.3.6.1.4.1.1466.115.121.1.15 X-ORIGIN 'Gluu - AWS Assume Role Session Name' ) objectClasses: ( 1.3.6.1.4.1.48710.1.4.101 NAME 'gluuCustomPerson' SUP ( top ) AUXILIARY MAY ( telephoneNumber $ mobile $ RoleEntitlement $ RoleSessionName ) X-ORIGIN 'Gluu - Custom persom objectclass' )objectClasseswith the example above. Simply add" $ RoleEntitlement "and" $ RoleSessionName "without the quotes to theMAYfield, as shown in the example. Be careful of spacing; there must be 2 spaces before and 1 after every entry (i.e. DESC), or your custom schema will fail to load properly because of a validation error. You cannot have line spaces between attributeTypes: or objectClasses:. This will cause failure in schema. Please check the error logs in/opt/opendj/logs/errorsif you are experiencing issues with adding custom schema. In addition, make sure the attributeTypes LDAP ID number is unique. - Save the file, and restart the opendj service.
-
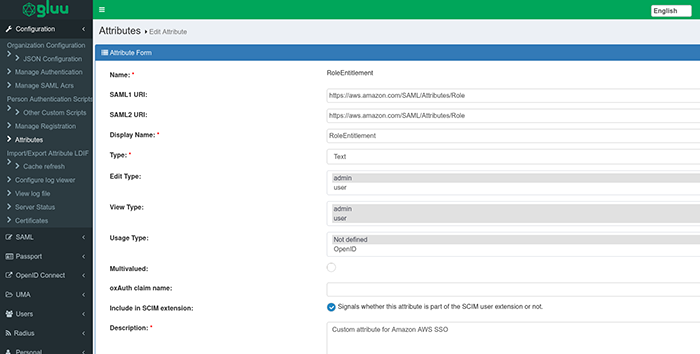
Now, we need to register two attributes in oxTrust corresponding to the LDAP attributes we just added. Log onto the web GUI, navigate to
Configuration>Attributes>Register Attribute. -
For the first attribute:
-
Name:
RoleEntitlement -
SAML1 URI:
https://aws.amazon.com/SAML/Attributes/Role -
SAML2 URI:
https://aws.amazon.com/SAML/Attributes/Role -
Display Name:
RoleEntitlement - Type: Text
-
Edit type:
admin -
View type:
admin,user(use Ctrl+click to select multiple) - Usage type: Not Defined
- Multivalued: False
-
Tick the box next to
Include in SCIM extension: -
Description:
Custom attribute for Amazon AWS SSO - Status: Active
-
Click
Register
-
Name:
For the second attribute:
- Name:
RoleSessionName - SAML1 URI:
https://aws.amazon.com/SAML/Attributes/RoleSessionName - SAML2 URI:
https://aws.amazon.com/SAML/Attributes/RoleSessionName - Display Name:
RoleSessionName

-
If everything is successful, these two attributes will successfully be saved and will show up under the
Attributestab. If you get an error saying the attributes don’t exist, there was probably an error in your custom schema doc. Refer to the logs for more information.
Configuring AWS to accept SAML requests
-
Navigate to
https://<hostname>/idp/shibbolethon your Gluu server and download the page as an XML file. - Log into the AWS Management Console with an administrator account. Find and navigate to the IAM module.
-
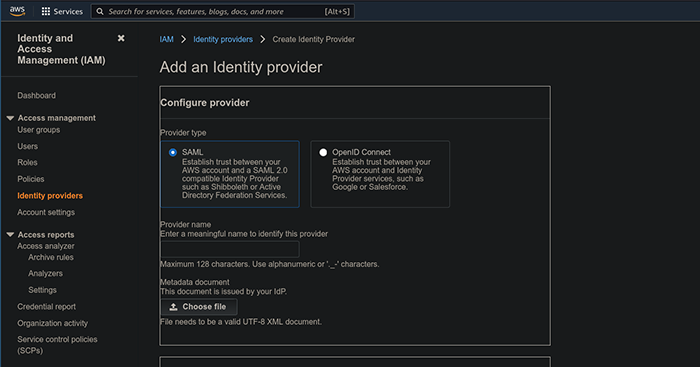
Create an IDP on your AWS account with the following steps:
- On the left hand pane, choose
Identity Providers - Click on
Add Provider - Provider type:
SAML - Provider name:
Shibboleth - Metadata document: Upload the XML file you downloaded.
- Click
Add Providerat the bottom.
- On the left hand pane, choose
-
Create a role associated with the new IDP with the following steps:
-
On the left hand pane, choose
Roles -
Trusted Entity Type:
SAML 2.0 Federation -
SAML 2.0 Based Provider:
Shibboleth(or what you chose for provider name previously) from the drop down menu. -
Tick
Allow programmatic and AWS Management Console Access - The rest of the fields will autofill.
-
On the left hand pane, choose
-
-
Click
Next. Here you may choose policies to associate with this role. Refer to AWS documentation for further information. For this example, we are not choosing any policies, and instead clickingNext. -
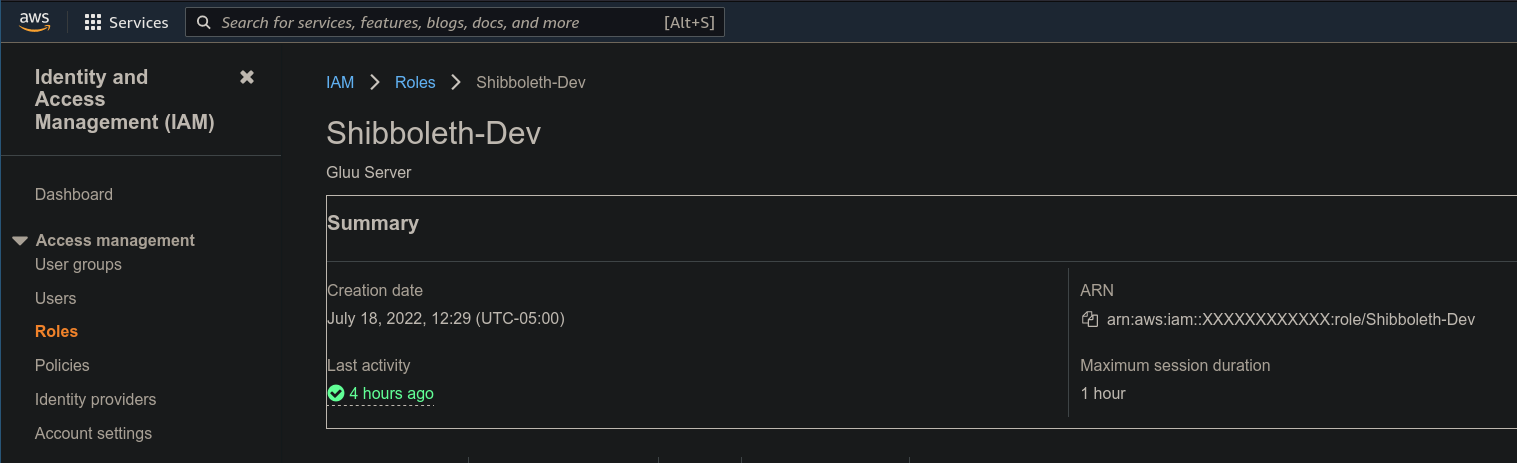
Role name:
Shibboleth-Dev - Role description: Choose a meaningful description.
-
Verify that the Role Trust JSON looks like this (the X’s will be some unique string):
{ "Version": "2012-10-17", "Statement": [ { "Effect": "Allow", "Action": "sts:AssumeRoleWithSAML", "Principal": { "Federated": "arn:aws:iam::xxxxxxxxxxxx:saml-provider/Shibboleth" }, "Condition": { "StringEquals": { "SAML:aud": [ "https://signin.aws.amazon.com/saml" ] } } } ] } -
Finally, click on
Create Role.
-
Click
Create Trust Relationship in Gluu Server
Now we need to create an outbound SAML trust relationship from the Gluu Server to AWS.- Log onto the web GUI
- Navigate to
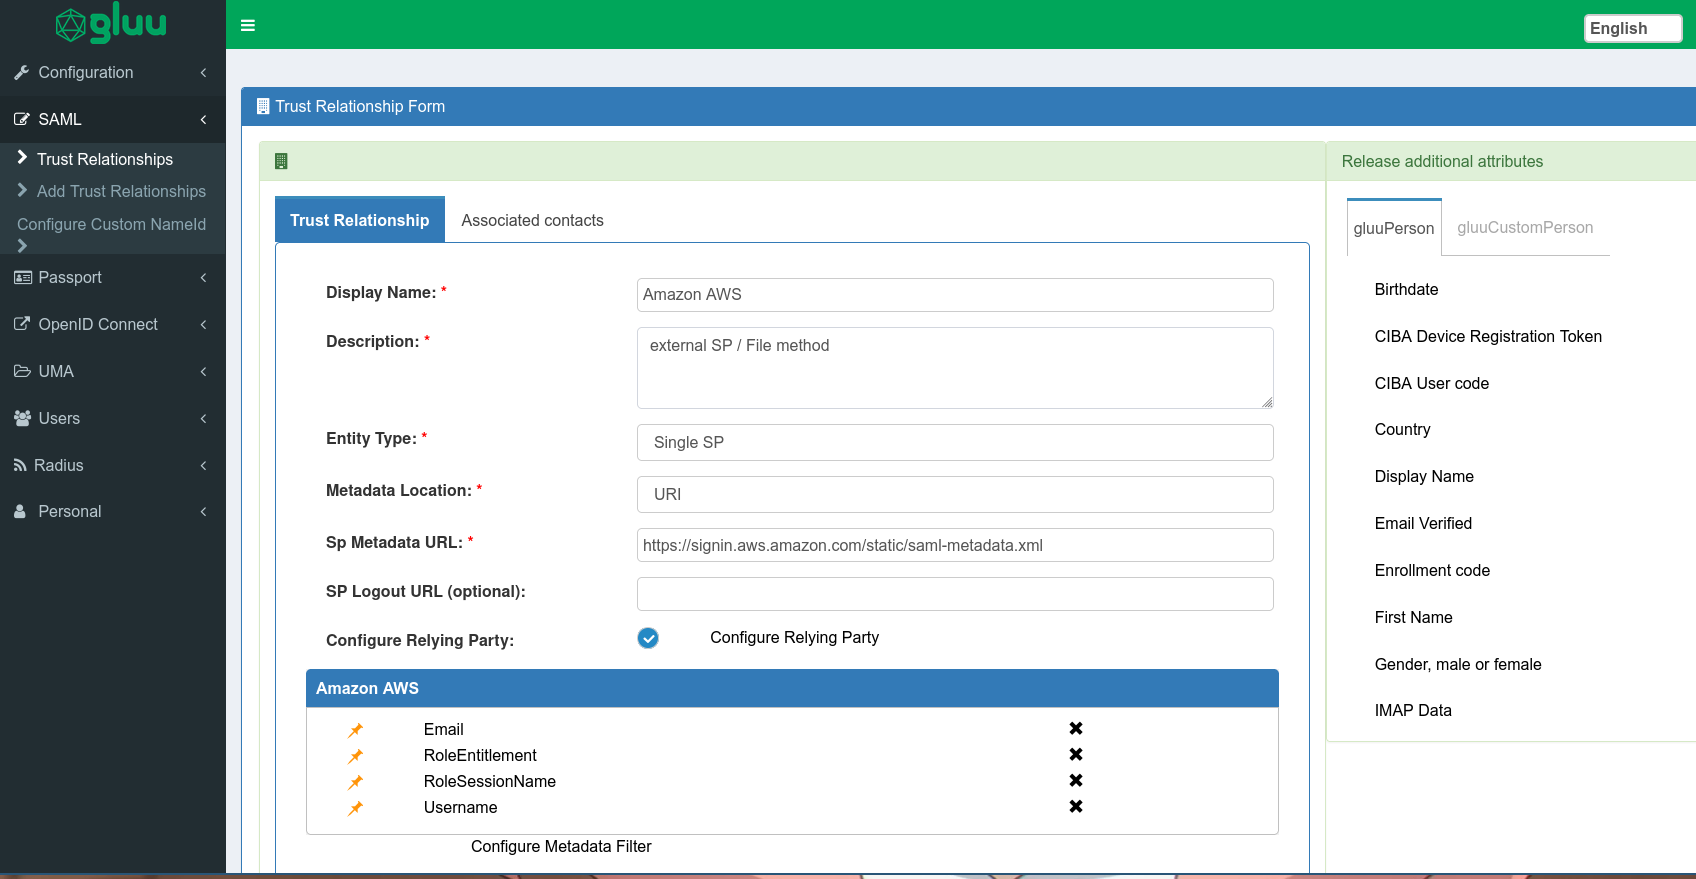
SAML>Add Trust Relationship - Use the following values:
- Display Name:
Amazon AWS - Description:
external SP / File method - Entity Type:
Single SPfrom the dropdown - Metadata location:
URIfrom the dropdown - SP metadata URL:
https://signin.aws.amazon.com/static/saml-metadata.xml - Check the box next to
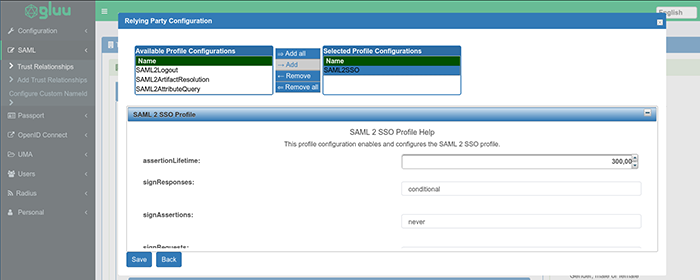
Configure relying partyand an additional box will pop up.-
Click on
SAML2SSOand click Add; then expand the SAML2 SSO Profile menu.
-
Click on
- Display Name:
Use the following values:
-
-
includeAtributeStatemen: yes -
assertionLifetime: 300000 -
signResponses: conditional -
signAssertions: never -
signRequests: conditional -
encryptAssertions: never -
encryptNameIds: never -
Click
Save
-
- On the right hand side, under
Release additional attributes, there is a list of attributes that can be released to this relationship. From those, choose the following:- From
gluuPerson, click onEmailandUsername - From
gluuCustomPerson, click onRoleEntitlementandRoleSessionName
- From
- Save this trust relationship. It will take some time to fully load, so please wait.
Create the test user manually
Now we will create a test user on the Gluu server to check whether the outbound SAML works. Later, we will do this via SCIM requests. This user needs to have an email that is authorized to access the AWS account we want to sign on to. For this example, we will use dummy details. You will want to use your own details. First, we need to get some values from our AWS account. Log onto AWS.-
For the first value, navigate to
Rolesand click on the role you created for the SAML relationship. Copy the ARN, which for us is in the formatarn:aws:iam::XXXXXXXXXXXX:role/Shibboleth-Dev, with numbers replacing the Xs. Note this down.
For the second value, navigate to
Identity providers and click on the provider you created. Copy the ARN, which should be in a similar format. For us it is arn:aws:iam::XXXXXXXXXXXX:saml-provider/Shibboleth, with numbers replacing the Xs. Note this down as well. 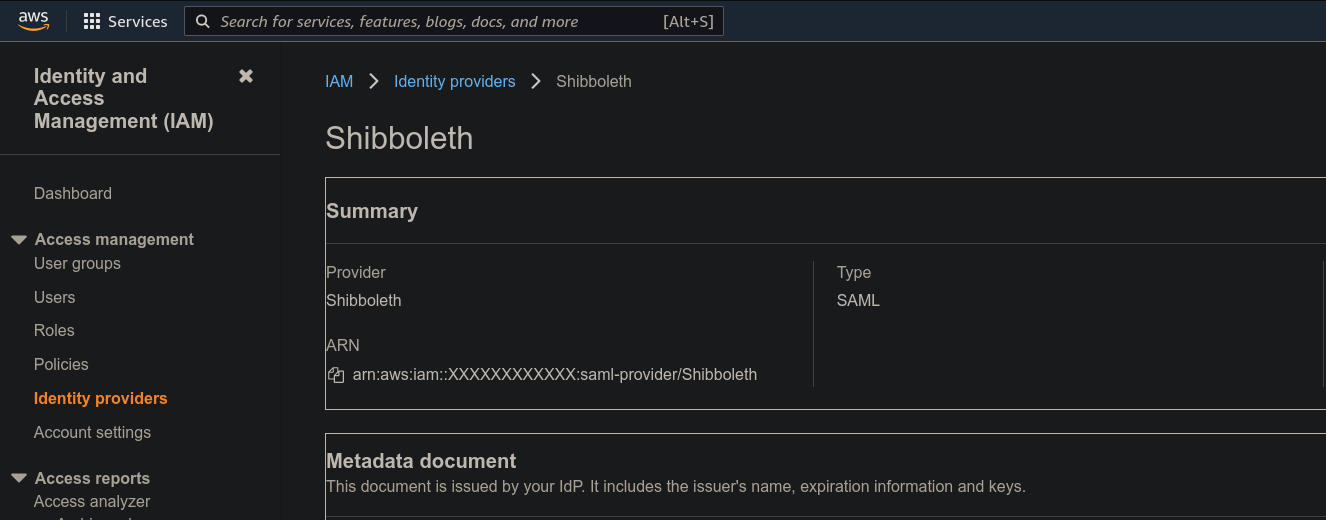
For the second value, navigate to
Identity providers and click on the provider you created. Copy the ARN, which should be in a similar format. For us it is arn:aws:iam::XXXXXXXXXXXX:saml-provider/Shibboleth, with numbers replacing the Xs. Note this down as well.-
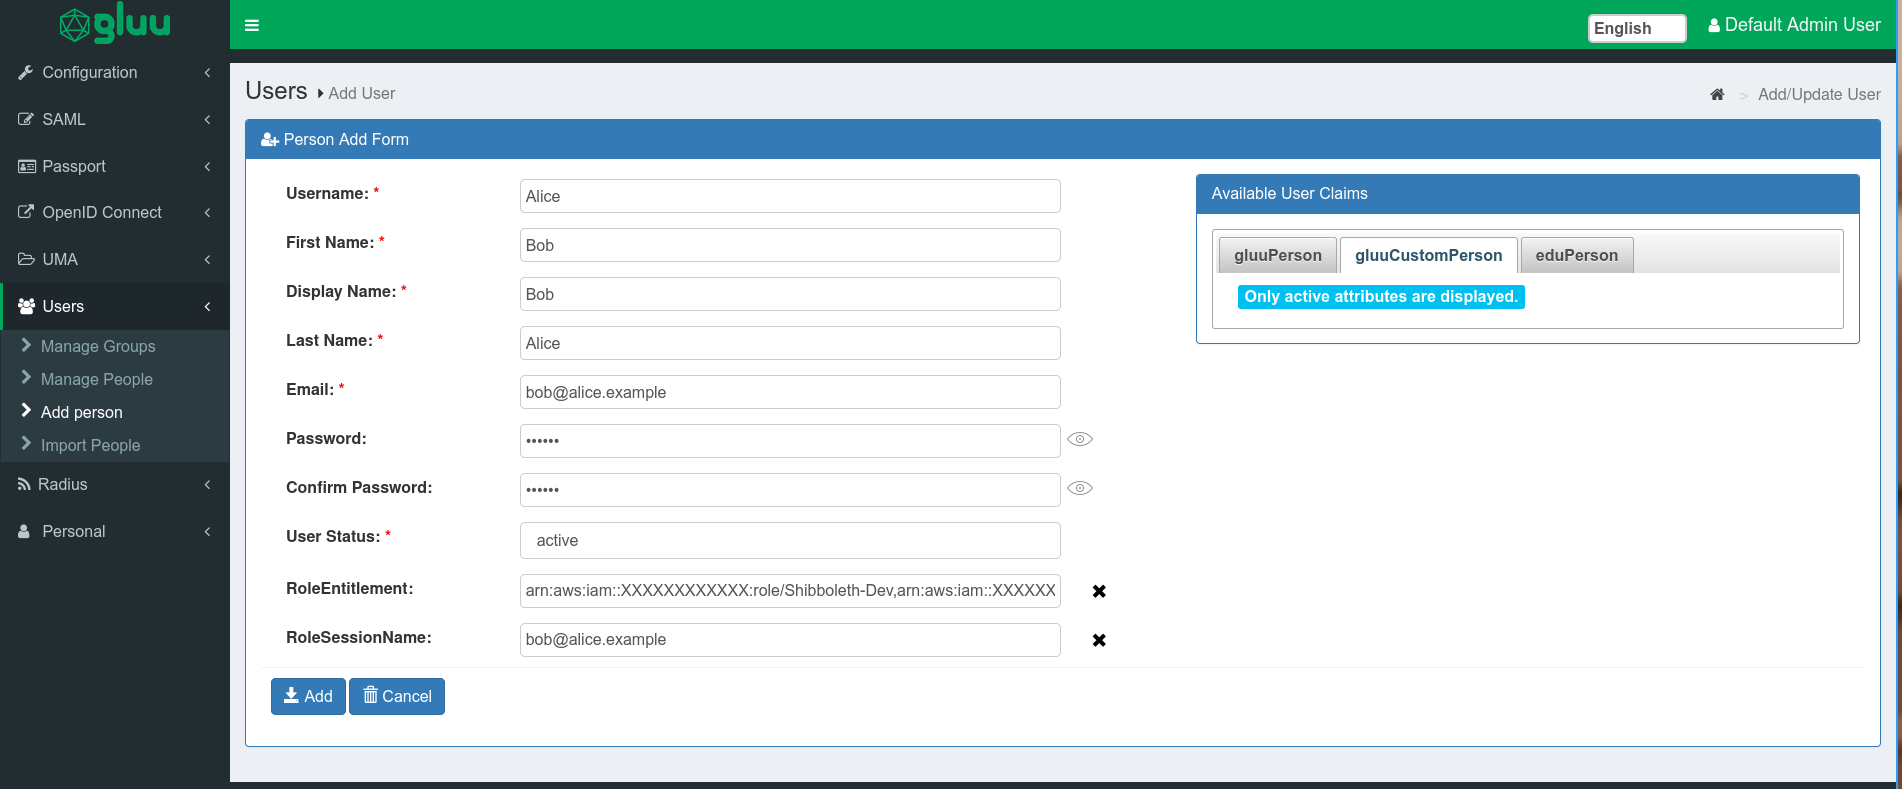
From the oxTrust GUI, navigate to
Users>Add person -
Our example values are as follows:
Username: AliceFirst Name: BobDisplay Name: BobLast Name: AliceEmail: bob@alice.examplePassword: any passwordConfirm Password: repeat the passwordUser Status: Active- From the right hand side, click on the
gluuCustomPersonclass and click on the two custom attributes. They will show up as entry fields in the form to the left. RoleEntitlement: The first value and the second value from steps 1 and 2, separated by a comma. For us it isarn:aws:iam::XXXXXXXXXXXX:role/Shibboleth-Dev,arn:aws:iam::XXXXXXXXXXXX:saml-provider/Shibboleth.- RoleSessionName: The email address that will be used to log onto AWS. We will use a dummy value,
bob@alice.example.
Testing SSO
Before using SCIM, we recommend testing out the SAML flow to SSO onto Amazon. To do this, simply visithttps:///idp/profile/SAML2/Unsolicited/SSO?providerId=urn:amazon:webservices and use your new Gluu user. This will start an IDP initiated SAML flow, which will allow you to log onto AWS without any additional steps.
Steps involving a SCIM query
Communicating with a SCIM endpoint that is protected by OAuth is not a trivial setup. There are several authentication steps involved due to security concerns. The process is simplified to the following steps:- If this is the first time a query is being made, the requesting party registers a new client with the Gluu server using OpenID Connect dynamic client registration with the appropriate scopes. The RP will choose an OAuth authorization flow to obtain access tokens. The client_credentials flow is the easiest to use and so this is the recommended option.
- The client requests an OAuth access token using some OpenID Connect authentication method. Supported methods are
client_secret_basic,client_secret_post,client_secret_jwt, andprivate_key_jwt. For more security, asymmetric key authentication is recommended. Please refer to OpenID Connect Client Authentication for more details. - This access token is used to make SCIM queries.
scim-client with client_credentials and private_key_jwt. Please choose a method that is suitable for your production environment. If you are using your own client, please refer to Gluu SCIM documentation.
Setup for scim-client
- An RS256 key pair and an associated certificate for our client and the Gluu server to communicate through.
- A keystore file that contains the private key and the associated certificate (or chain). You may use PKCS12 or JKS.
- The public key of the key pair in JSON web key format, preferably saved to a file.
- The SSL certificate of our Gluu server, which can be found at
/opt/gluu-server/etc/certs/httpd.crt. You can obtain this by usingscp.
Generating keys
You will need Java 11 (and keytool) along with OpenSSL installed on your machine. Run the following command in a new directory to generate a private key; enter a passcode when prompted and remember it.openssl genrsa -des3 -out private-key.pem 2048
openssl rsa -in private-key.pem -pubout -out public-key.pem
openssl req -new -x509 -key private-key.pem -out cert.pem -days 360
- private-key.pem
- public-key.pem
- cert.pem
Creating new keystore
First we need to concatenate the private key and certificate to one file.cat private-key.pem cert.pem > import.pem
openssl pkcs12 -export -in import.pem -name bob > client-keystore.pkcs12
bob with some name you can remember. It will prompt you for the private key password, then a new password for the PKCS12 keystore.
Creating a JSON web key set
- Visit https://russelldavies.github.io/jwk-creator/.
- Fill in the following details:
- Public Key Use: Signing
- Algorithm: RS256
- Key ID: The alias you chose. For us it is
bob. - PEM encoded key: The public key you generated, from
public-key.pem.
- Click
Convert, and save the output on the right to a file. Name itclient-key.jwks.
client-keystore.pkcs12client-key.jwks
Dynamic Client Registration using OpenID connect
For your convenience, I have created a Python script for you which can automate this process. Visit https://github.com/SafinWasi/gluu_openid_python and follow the instructions in the README. The script can either use a JWKS and set the authentication method toprivate_key_jwt, or it may not and use client_secret_basic. Once it’s done, you should have a client.json file that contains the Client ID and secret. Do not share this information.
If you wish to do this manually, please refer to Dynamic Client Registration.
Allowing the new client access to SCIM
By default, the new client does not have access to SCIM scopes. To allow this:- Login to oxTrust and locate the client created for interaction with SCIM. This should be easy to do by searching for the client name you provided.
- Click the “Add Scope” button.
- Tick the scopes prefixed by
https://gluu.org/scim. The kind of access every scope grants is displayed on the right column. It may be helpful to sort the scopes list by name.
Scopes in oxTrust. For our example, we will add https://gluu.org/scim/users.read, which is for querying and searching user resources.
Setting up scim-client
For this article, we will be using scim-client version 4.4.0.Final. Ideally, you will want to use the version that is the same as your Gluu server. Requisites for using scim-client in OAuth mode are as follows:- Entry-level knowledge of Java is enough. Make sure you have Java 11 or higher installed. The use of Maven as a build tool is recommended.
-
Add the SSL certificate of your Gluu server to the cacerts keystore of your local Java installation. If you are using a self-signed certificate, you can find it at
/opt/gluu-server/etc/certs/httpd.crt. You can add this to your cacerts keystore with the following command:# keytool -importcert -trustcacerts -cacerts -file httpd.crt -
Online Java-docs for scim-client are available here. You can generate java-docs locally too using Maven; just run
mvn javadoc:javadoc -pl scim-client. -
Create a simple project in your Java IDE. There are two ways of using scim-client: obtain the JAR file here, or use Maven. If you choose to obtain the JAR file, import it as an external dependency. If you’re using Maven, add the following snippets to your
pom.xml:Then run<properties> <scim.client.version>4.4.0.Final</scim.client.version> </properties> ... <repositories> <repository> <id>gluu</id> <name>Gluu repository</name> <url>https://maven.gluu.org/maven</url> </repository> </repositories> ... <dependency> <groupId>org.gluu</groupId> <artifactId>scim-client</artifactId> <version>${scim.client.version}</version> </dependency>
mvn installin your project directory. This will download and build the necessary dependencies. We will also be using Apache Log4j2, so be sure to obtain it either directly or through maven. Set up log4j to log to console for all log levels. Refer to the documentation on how to do this. Warning: The current build of scim-client on maven contains a bug that causes operation in OAuth mode with private JWK pair authentication impossible. This has been fixed on the master branch of the source code. A possible workaround is to clone the repository and build scim-client locally, then import the JAR. For this example we are using version 4.4.0.Final. -
To begin testing, we will query our “Alice” user. Set up a new class named
TestOauthClientand fill in the class as follows:import gluu.scim2.client.factory.ScimClientFactory; import gluu.scim2.client.rest.ClientSideService; import org.apache.logging.log4j.LogManager; import org.apache.logging.log4j.Logger; import org.gluu.oxtrust.model.scim2.BaseScimResource; import org.gluu.oxtrust.model.scim2.ListResponse; import org.gluu.oxtrust.model.scim2.user.UserResource; import org.gluu.oxtrust.model.scim2.user.Name; import org.gluu.oxtrust.model.scim2.user.Email; import javax.ws.rs.core.Response; import java.util.List; public class TestOauthClient { private String domainURL = "https:///identity/restv1"; private String OIDCMetadataUrl = "https:///.well-known/openid-configuration"; private String clientId = ""; private String keyPath = ""; Path path = Paths.get(keyPath); private String keyStorePassword = ""; private String keyId = ""; private Logger logger = LogManager.getLogger(getClass()); private void simpleSearch() throws Exception { ClientSideService client = ScimClientFactory.getOAuthClient(domainURL, OIDCMetadataUrl, clientId, path,keyStorePassword, keyId); String filter = "userName eq \"Alice\""; Response response = client.searchUsers(filter, 1, 1, null, null, null, null); List<BaseScimResource> resources = response.readEntity(ListResponse.class).getResources(); logger.info("Length of results list is: {}", resources.size()); UserResource admin = (UserResource) resources.get(0); logger.info("First user in the list is: {}", admin.getDisplayName()); client.close(); } public static void main(String[] args) { TestOauthClient client = new TestOauthClient(); try { client.simpleSearch(); } catch(Exception e) { System.out.println(e); } } }
- Then run the main class. If everything runs properly, the logger should log the entire authentication process and output a single user, with the “Alice” username.
Creating user for SSO through SCIM
The SCIM API provides request verbs similar to HTTP requests for operation. The verbs are as follows:GET, POST, PUT, PATCH, DELETE. A summary of these verbs can be found here. For the scim-client implementations of these requests, you can check the javadocs. For creating a new user, we will be using the POST request.
While creating a user for SSO to AWS, the user needs to have two custom attributes, RoleSessionName and RoleEntitlement. For this, the client we’re using will need access to the https://gluu.org/scim/users.write scope, so grant it in oxTrust. We can use scim-client libraries to create a new user and add those attributes. For us, the code stands as such:
private void createUser() throws Exception {
    ClientSideService client = ScimClientFactory.getOAuthClient(domainURL, OIDCMetadataUrl, clientId, path, keyStorePassword, keyId);

    // Creating a new user
    UserResource user = new UserResource();

    Name name = new Name();
    name.setGivenName("John");
    name.setFamilyName("Doe");
    user.setName(name);

    user.setActive(true);
    user.setUserName("JohnDoe");
    // Do not do this in a production environment:
    user.setPassword("changeit");

    List<Email> emailList = new ArrayList<Email>();
    Email email = new Email();
    email.setPrimary(true);
    email.setType("work");
    email.setValue("johndoe@example.com");
    emailList.add(email);
    user.setEmails(emailList);

    /*  Use the URI associated with the custom extension of these attributes. You can find this in oxTrust
        under Configuration > JSON Configuration > OxTrust Configuration > Scim properties
    */
    CustomAttributes attributes = new CustomAttributes("urn:ietf:params:scim:schemas:extension:gluu:2.0:User");
    // This needs to have access to AWS
    attributes.setAttribute("RoleSessionName", "johndoe@example.com");
    // Replace Xs with your ARN numbers
    attributes.setAttribute("RoleEntitlement", "arn:aws:iam::XXXXXXXXXXXX:role/Shibboleth-Dev,arn:aws:iam::XXXXXXXXXXXX:saml-provider/Shibboleth");
    user.addCustomAttributes(attributes);

    // This is the POST request
    Response response = client.createUser(user, null, null);
    logger.info("response HTTP code = {}", response.getStatus());
    client.close();
}
Users > Manage People in oxTrust. You might need to search for the username.
Finally, visit https:///idp/profile/SAML2/Unsolicited/SSO?providerId=urn:amazon:webservices and log on with this new user. You should be able to log on to AWS with this new account.
Updating a user
There are two requests that can update a user,PUT and PATCH. PUT is suitable for replacements using non-null values, while PATCH is suitable for addition, removal and localized updates of a user resource. Refer to updateUser() and patchUser() of the scim-client documentation for more information.
Deleting a user
For deleting a user, only the ID (theinum attribute in LDAP) is required. You can check this by either going to oxTrust and getting the inum of the user or by inspecting the JSON of the response right after the user is created. You will need a way to convert the Java Response object to a JSON representation if you want to do this. A primitive way to do this is String output = response.readEntity(String.class);.
Response response = client.deleteUser("ID");
assertEquals(Response.Status.NO_CONTENT.getStatusCode(), response.getStatus());