
Super Gluu
#Overview
Super Gluu is a push-notification two-factor authentication (2FA) mobile app built to work with the Gluu Server.
#FIDO Security
Super Gluu uses public-key encryption as specified in the FIDO U2F authentication standard. Upon device enrollment, Super Gluu registers its public key against the Gluu Server's FIDO U2F endpoint. When authentication happens, there is a challenge response to ensure that the device has the corresponding private key.
#User and Developer Guides
User and Developer Guides can be found on the Super Gluu docs site.
#Prerequisites
An Internet accessible (non-internal or localhost) Gluu Server with DNS pointing at the public Internet address of the server (installation instructions)
Super Gluu interception script (included in the default Gluu Server distribution)
An Android or iOS device with Super Gluu installed
If the Gluu Server is using a self-signed certificate,
Trust Allmust be enabled in Super Gluu (open the app, navigate toMenu>Trust all (SSL)and enable)
#Authentication Workflows
The authentication workflow for Super Gluu is defined in the Super Gluu interception script linked above in the prerequisites. By default, users are put through a two-step, two-factor authentication process with username and password first, and then push notification via Super Gluu second. Alternative authentication worklows, for instance passwordless authentication, can be configured by adjusting the script as needed.
#Properties
The Super Gluu authentication script has the following properties:
| Property | Description | Example |
|---|---|---|
| authentication_mode | Determine factor of authentication | two_step |
| credentials_file | JSON file for SuperGluu | /etc/certs/super_gluu_creds.json |
| label | The name of the application | Super Gluu |
| notification_service_mode | Service used to enable push notifications | gluu |
| qr_options | Size of the QR code that is used for enrollment and/or authentication | { size: 500, mSize: 0.05 } |
| registration_uri | Registration endpoint of the IDP | https://idp.example.com/identity/register |
| supergluu_android_download_url | Android app download link, used in the login page | https://play.google.com/store/apps/details?id=gluu.super.gluu |
| supergluu_ios_download_url | iOS app download link, used in the login page | https://itunes.apple.com/us/app/super-gluu/id1093479646 |
#Enable Super Gluu
Follow the steps below to enable Super Gluu authentication:
- In oxTrust, navigate to
Configuration>Person Authentication Scripts - Find the Super Gluu script
- Enable the script by checking the box
- Scroll to the bottom of the page and click
Update
Now, Super Gluu is an available authentication mechanism for your Gluu Server. This means that, using OpenID Connect acr_values, applications can now request Super Gluu authentication for users.
#Make Super Gluu the Default
If Super Gluu should be the default authentication mechanism for all authentication events, follow these instructions:
Navigate to
Configuration>Manage AuthenticationSelect the
Default Authentication MethodtabIn the Default Authentication Method window you will see two options:
Default acrandoxTrust acr
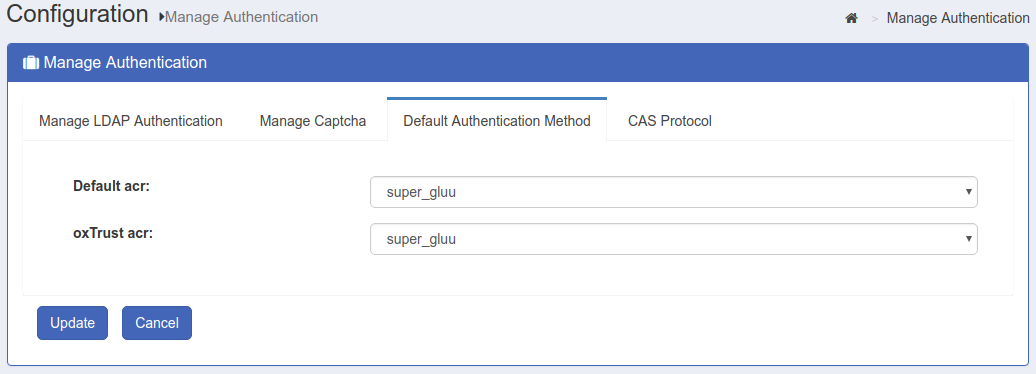
oxTrust acrsets the authentication mechanism for accessing the oxTrust dashboard GUI (only managers should have acccess to oxTrust)Default acrsets the default authentication mechanism for accessing all applications that leverage your Gluu Server for authentication (unless otherwise specified)
If Super Gluu should be the default authentication mechanism for all access, change both fields to Super Gluu.
#Super Gluu Login Pages
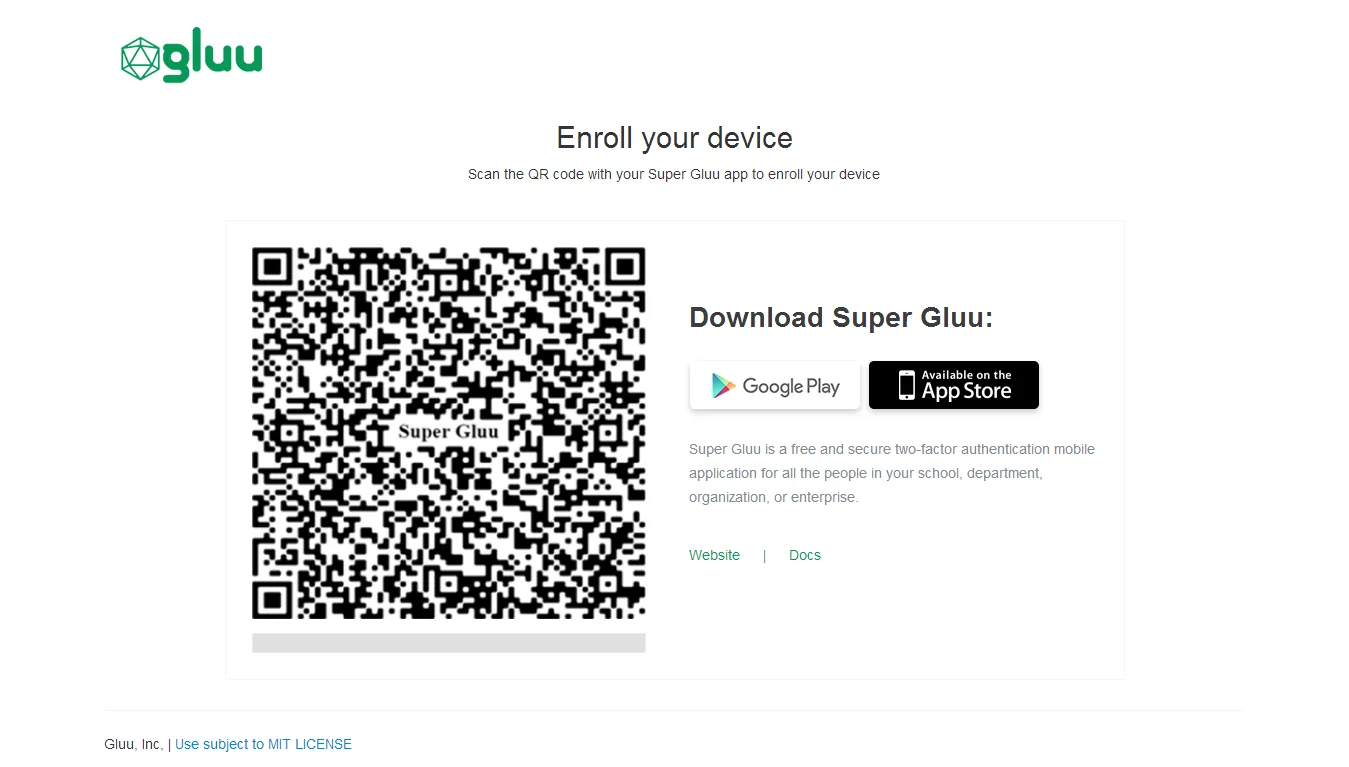
The Gluu Server includes two default public-facing pages for Super Gluu:
An enrollment page that is displayed the first time a user is prompted for Super Gluu authentication
A login page that is displayed for all subsequent Super Gluu authentications
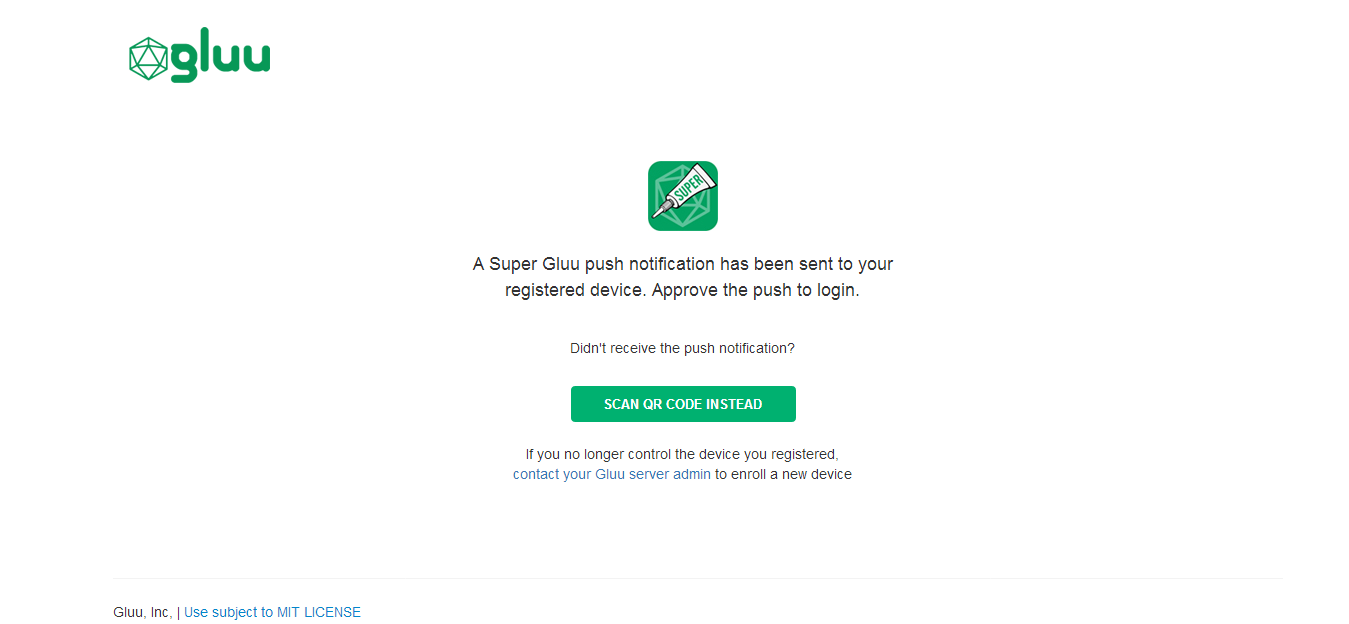
The designs are being rendered from the Super Gluu xhtml page. To customize the look and feel of the pages, follow the customization guide.
#First-time Device Enrollment
Super Gluu device enrollment happens during the first authentication attempt. The initial enrollment page displays a QR code that needs to be scanned with the Super Gluu app.
#Subsequent Logins
If you use the default Super Gluu interception script, all subsequent authentications will trigger a push notification to the enrolled device, which can be approved or denied as needed.
#Credential Management
#Self-service
To offer end-users a portal where they can manage their own account security preferences, including two-factor authentication credentials like Super Gluu, check out our new app, Gluu Casa.
#Manual Device Management
A user's Super Gluu device(s) can be removed by a Gluu administrator either via the oxTrust UI in Users > Manage People, or in LDAP under the user entry:
Find the
DNof the user in LDAPFind the
oxID DNassociated with the userRemove the
oxID DN
For example, let's say user abc loses their device and wants to enroll a new device to use Super Gluu.
The Gluu Server admin will do the following:
Get the DN of user
abcwhich will be something like this:dn: inum=@!ABCD.1234.XXX.XXX.YYYY.8770,ou=people,o=@!DEFG.5678.XXX.XXX.ZZZ,o=gluu”Now find the
oxIDDN which is associated with this user’s DN. It might be something like:dn: oxId=1487683146561,ou=fido,inum=@!ABCD.1234.XXX.XXX.YYYY.8770,ou=people,o=@!DEFG.5678.XXX.XXX.ZZZ,o=gluu objectClass: oxDeviceRegistration objectClass: top oxDeviceData: {"uuid":"b82abc-a1b2-3abc-bcccc-2222222222222","type":"normal","platform":"android","name":"zico","os_name":"kitkat","os_version":"4.4.4","push_token":"dddddddddd:aaaaaa_58_cccccc_4t_bbbbbbbbbbbbb_aaaaaaaaaaaaaa_ggggggggg"} oxDeviceKeyHandle: fyyyyyyyyyyyyy_jaaaaaaaaaaaa_mKJw oxStatus: active oxApplication: https://test.gluu.org/identity/authentication/authcode oxCounter: 2 creationDate: 20170221131906.559Z oxId: 11111111111111111 oxDeviceRegistrationConf: {"publicKey":"BIGbwF…………….","attestationCert":"MIICJjCCAcygAwIBAgKBgQDzLA-......L5ztE"} oxLastAccessTime: 20170Delete the oxID DN
Now the old device is gone and the user can enroll a new device following the above instructions for registering a new device.
#Using SCIM
See the SCIM documentation for a discussion on how to manage FIDO devices, including Super Gluu, using the SCIM protocol.