SCIM 2.0 User Management#
SCIM is a specification designed to reduce the complexity of user management operations by providing a common user schema and the patterns for exchanging such schema using HTTP in a platform-neutral fashion. The aim of SCIM is achieving interoperability, security, and scalability in the context of identity management.
Developers can think of SCIM merely as a REST API with endpoints exposing CRUD functionality (create, read, update and delete).
For your reference, the current version of the standard is governed by the following documents: RFC 7642, RFC 7643, and RFC 7644.
API Protection#
Clearly, this API must not be anonymously accessed. However, the basic SCIM standard does not define a specific mechanism to prevent unauthorized requests to endpoints. There are just a few guidelines in section 2 of RFC 7644 concerned with authentication and authorization.
Gluu Server CE allows you to protect your endpoints with UMA (a profile of OAuth 2.0). This is a safe and standardized approach for controlling access to web resources. For SCIM protection, we strongly recommend its usage.
Alternatively, for testing purposes you can temporarily enable the test mode. In this mode, some complexity is taken out so that it serves as a quick and easy way to start interacting with your service, as well as learning about SCIM.
Protection Using UMA#
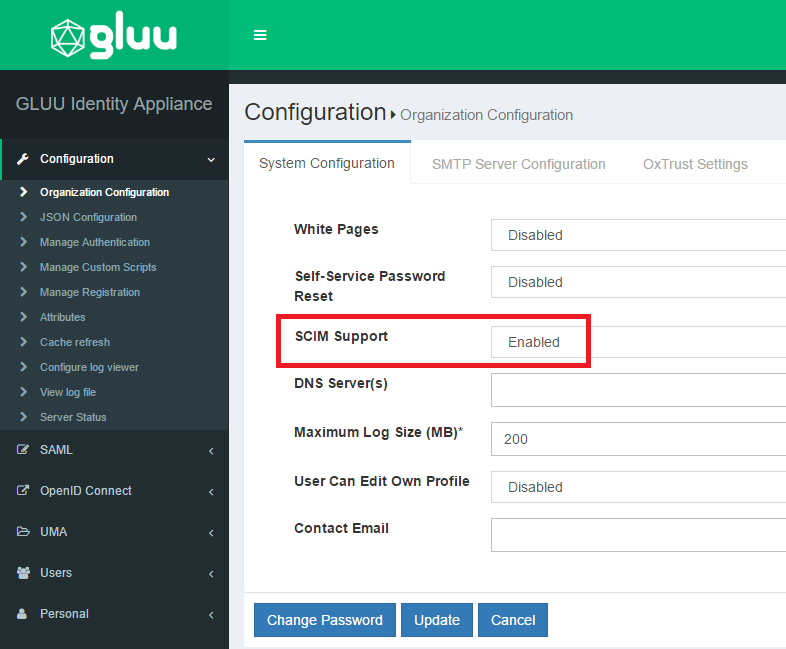
By default, the API is not active, so the first step is just to enable it:
-
Log into the oxTrust GUI
-
Go to
Configuration>Organization Configurationand choose "enabled" for the SCIM support property
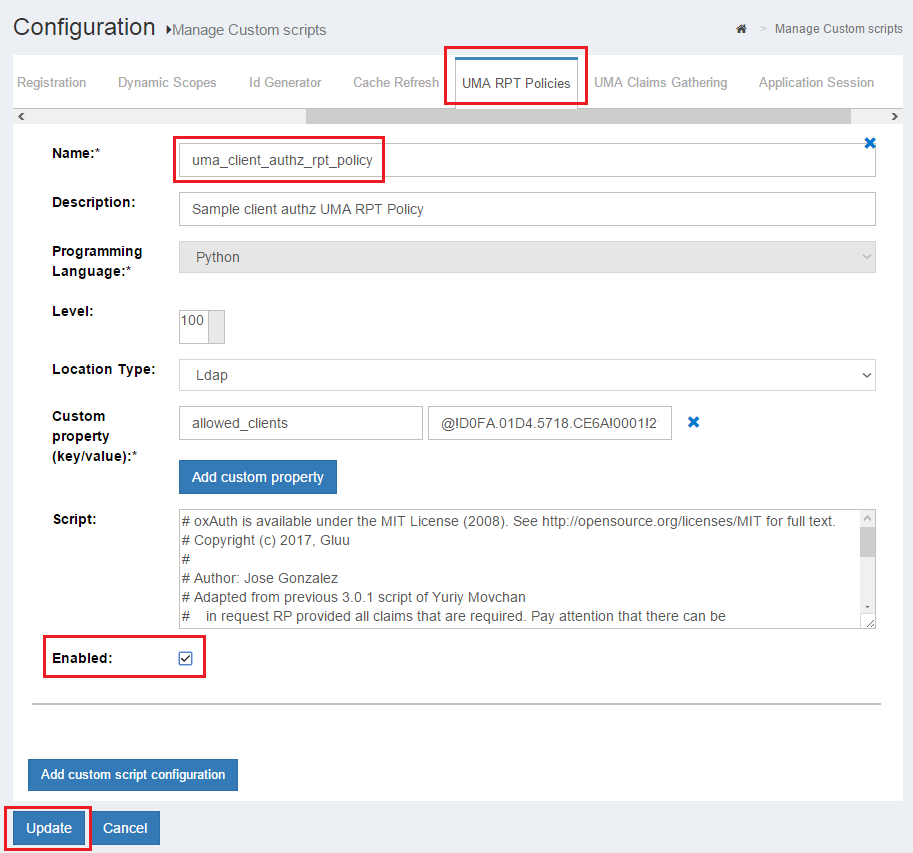
Then, enable UMA protection mode:
- Activate the UMA SCIM custom script in oxTrust admin GUI: Go to
Configuration>Manage Custom Scripts, and in the tab forUMA RPT policiescheck "Enabled" for the script labeled "Sample client authz UMA RPT Policy". Finally press the "Update" button
Protection Using Test Mode#
By default the API is not active, so the first step is just to enable it:
-
Log into the oxTrust GUI
-
Go to
Configuration>Organization Configurationand choose "enabled" for the SCIM support property
Then, enable test mode:
-
Navigate to
Configuration>JSON Configuration>OxTrust Configuration, scroll down and set thescimTestModeproperty to true -
Click the Save Configuration button at the bottom
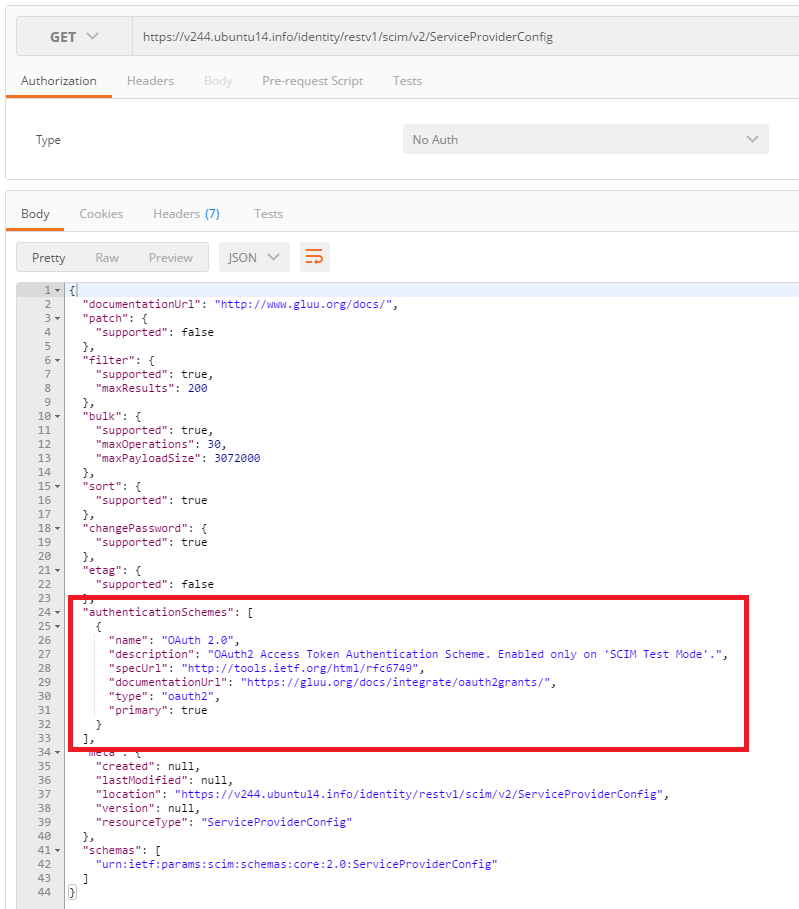
You can verify the current authentication scheme by querying the /ServiceProviderConfig endpoint:
To exit test mode, just set scimTestMode back to false and then click the Save Configuration button.
Working in Test Mode#
Warning
Test mode provides little security to protect your service. The way this feature operates in Gluu Server can change in future releases.
To interact with the service in test mode, you will have to:
-
Activate test mode via oxTrust
-
Create an OpenID client
-
Request an access token to the token endpoint
-
Extract the token from the response
-
Send requests to SCIM endpoints passing the token
-
Obtain a new access token for subsequent requests if needed
Important Notes:
-
When in trouble, check Gluu Server logs. These files usually reveal the source of problems when things are going wrong: SCIM service implementation resides in oxTrust, so that's the first place to look. Authorization issues (access tokens problems, for instance) are on the side of oxAuth (the authorization server)
-
oxTrust log is located at
/opt/gluu/jetty/identity/logs/oxtrust.log -
oxAuth log is at
/opt/gluu/jetty/oxauth/logs/oxauth.log -
It's convenient to set the logging level for both applications to TRACE while in Test Mode. See the log management page for more information
-
-
If acquainted with Gluu's SCIM service, quickly glance at this section to contrast the current approach employed in test mode with the older one (3.0.2 and earlier)
-
If familiar with the Java programming language, skip the steps listed above and simply use the SCIM-Client: a Java library developed by Gluu. Those steps are already implemented in the library, so usage of the service is more straightforward
Create an OpenID Client#
In this step, we will create an OpenId Connect client that will allow us to request valid access tokens to interact with the service.
There are two ways to create a client. One consists of issuing an HTTP POST to the already existing client registration endpoint of your Gluu Server and parsing the received response. Another, more end-user oriented approach is via oxTrust.
If you want to follow the first approach (direct interaction with registration endpoint), locate its endpoint URL by visiting https://<your-gluu-host>/.well-known/openid-configuration and inspect the property registration_endpoint. To know how to structure a payload, refer to section 3 of the OpenID Connect Dynamic Client Registration 1.0 spec.
The more pleasant second alternative is using the Gluu server administration web interface. Just follow these steps:
-
Log in to
https://<your-gluu-host>/identityusing the admin credentials -
Go to
OpenId connect>Clientsand click the Add client button -
Fill out the form using the following values. Most of the default values are OK:
-
Client Name: SCIM-Client. You may enter a different name
-
Client secret: Think of it as a password. Choose something safe but comfortable for your testing exercise
-
Application type: Native
-
Persist Client Authorizations: true
-
Subject type: pairwise
-
Authentication method for the Token Endpoint: client_secret_basic
-
Require Auth Time: false
-
Logout Session Required: false
-
Include Claims In ID Token: false
-
Client Secret Expires: Choose a future date (one week ahead is fine)
-
-
Scroll down to the bottom of the page and click the "Add Scope" button, type openid in the text field, and press search. Select the row whose "display name" is openid, and click OK
-
Repeat the previous step to add the permission scope
-
Click the "Add Response Types" button. In the list choose token and click OK
-
Click the "Add Grant Type" button, then select client_credentials
-
At the bottom press the "Add" button to finish creating your OpenId client
Request an Access Token to the Token Endpoint#
Note
This section requires basic knowledge of HTTP at programming or scripting (eg. bash) level.
The client_credentials grant chosen allows us to obtain a token very easily: just make a POST to the token endpoint passing the recently-created client credentials. Do the following:
-
Locate the token endpoint of Gluu server: visit
https://<your-gluu-host>/.well-known/openid-configurationand search the property labeled token_endpoint -
Create a text string to encode the credentials of your client. Here you have an algorithm to do so:
-
Let
authUsernamebe the identifier (inum) of the recently created client -
Let
authPasswordbe the client secret -
Create a new string concatenating
authUsername, the colon (:) character, andauthPasswordin that exact order -
Obtain the underlying array of bytes for the string created. Use
UTF-8if you need to supply code to transform the string to bytes -
Create a base64-encoded string representation of the array of bytes (most programming languages feature this functionality out of the box)
-
Create a new string concatenating the word "Basic" (do not include quotes), a space, and the string created in previous step. This is the resulting string of encoded credentials
-
-
Submit an HTTPS POST to the token endpoint using the following data:
-
Authorization header. Use the encoded credentials as the value
-
Content-Type header. Use
application/x-www-form-urlencodedas the value -
grant_type parameter. Use
client_credentials
-
Here is an example:
     POST /oxauth/restv1/token HTTP/1.1
     Host: your.host.com
     Authorization: Basic czZCaGRSa3F0MzpnWDFmQmF0M2JW
     Content-Type: application/x-www-form-urlencoded

     grant_type=client_credentials
In curl jargon, issue a command like this to achieve the same effect:
$ curl -u '<authUsername>:<authPassword>' \
       -d grant_type=client_credentials \
       https://<host-name>/oxauth/restv1/token
If you have problems creating your request, see section 4.4.2 of OAuth 2.0 for a deeper insight.
Extract Token from Response#
Once the POST is executed you will get a response from server in Json format. Validate you are receiving a successful response (HTTP code 200). If something went wrong (malformed request), you will see a bad request error (HTTP code 400).
The following is an example of a successful response:
HTTP/1.1 200 OK
Content-Type: application/json;charset=UTF-8
Cache-Control: no-store
Pragma: no-cache

{
    "access_token":"2YotnFZFEjr1zCsicMWpAA",
    "token_type":"Bearer",
    "expires_in":3600
}
Extract the access token from the response.
Send Requests to SCIM Endpoints#
Now, you can start interacting with your service!
To know the protocol, ie. the endpoints available in the service and the information those endpoints accept as input and return as output, see the protocol spec. However, to make it easier for you, we have compiled some representative examples of CRUD (create, read, update and delete) with SCIM in the section Raw HTTP requests that you may see at a later time.
For now, start with a basic query: say we need to find the users whose userName contains the sequence of letters "mi".
We need to know:
-
The SCIM endpoint for user retrieval, which is
https://<host-name>/identity/restv1/scim/v2/Usersin Gluu Server 3.1.0+ -
Write a filter for a search: In this case, it's fairly easy, the filter we need is
filter=userName co "mi"wherecostands for contains. To learn more about filters see section 3.4.2.2 of protocol spec -
Pass the token: Since test mode uses a bearer token approach, we just pass the word "Bearer" followed by a single space as the Authorization header's value, followed by the access token we already have. Do not include quotes
Here is an example of our request. Note the usage of HTTP GET:
GET /Users?count=10&filter=userName co "mi"
   Host: your.host.com
   Authorization: Bearer h480djs93hd8
So with curl it should look like this:
curl -G -H 'Authorization: Bearer ...access token...' -d count=10
      --data-urlencode 'filter=userName co "mi"' https://<host-name>/identity/restv1/scim/v2/Users
After execution, you will get JSON content with the results matching the criteria (at most 10 items).
Note
Always pay attention to the HTTP response code. If you are getting 401, ie. unauthorized, your token may have expired. If that's the case, proceed to the next section immediately to learn how to cope with this situation.
Remember that in section Raw HTTP requests below, there are more curl examples on how to interact with SCIM endpoints.
Obtain New Access Token for Subsequent Requests#
An access token lifetime is around 5 minutes, so after a short period you will start getting a small JSON response saying you are not authorized (HTTP 401) for all subsequent invocations made. This means it's time to request for a newer token.
To do this, just do the same as in this section above where we were issued the access token for the first time. Extract the token from the response and you can continue playing around with the SCIM API endpoints.
Note
To request an access token, the OpenId client acting on your behalf must be current: its password expiration also counts. Update your client expiration or create a new client if necessary. Just proceed as you did the first time.
Differences between current (3.1.x) and Older Test Mode#
Versions 3.0.x and earlier employed a (very) long-lived OAuth2 access token to send requests to the service. The current Gluu server uses a safer short-lived token approach in combination with an OpenId Connect client.
That token was previously passed as an extra query parameter. We have changed this to using the Authorization header, which is a more standard and safer practice.
If you are still interested in how the older approach worked, visit the 3.0.2 page.
In version 3.1.0 onwards the root endpoint has been shortened: now, your service is exposed at https://<your-host>/identity/restv1/scim/v2/.
Raw HTTP Requests#
To lower the barrier to start with SCIM, some raw HTTP sample requests are presented throughout this section. These requests exemplify how to do very basic CRUD on SCIM resources. While only users are covered, you can extrapolate to groups and other kind of resources if any.
If you are a Java developer, you already have at your disposal a library to interact with your SCIM endpoints so there is no need to craft requests by hand.
Examples shown here cover very little of what's possible to achieve with the SCIM REST API. For more involved or advanced use cases, you may like to glance at the spec. The SCIM API page offers a condensed and more readable reference to compose your requests.
Requisites#
-
To undertake this exercise, test mode must be enabled. Ensure you have a mechanism to automate the process of requesting access tokens since they are short lived
-
Examples will make use of
curl, so ensure it's available in your environment. Starter knowledge ofcurlis more than enough -
Ensure you have a text editor at hand
-
It is required that you can inspect your LDAP contents as you proceed with the examples. If you are not comfortable issuing Open LDAP commands, a GUI client such as Apache DS makes a pleasant experience
Creating Resources#
Let's start creating a dummy user. Open a text editor and paste the following:
{
    "schemas":["urn:ietf:params:scim:schemas:core:2.0:User"],
    "userName":"ajsmith",
    "name":{
        "familyName":"Smith",
        "givenName":"Joe"
    },
    "displayName":"Average Joe"
}
Save it to your local disk as input.json and open a command line interface (you don't need to login to Gluu's chroot). Issue this command, replacing with proper values between the angle brackets:
$ curl -H 'Authorization: Bearer ...access token...' -H 'Content-Type: application/scim+json'
  -d @input.json -o output.json https://<host-name>/identity/restv1/scim/v2/Users`
If your Gluu server is protected by a self-signed certificate (as in the default installation), add the following switch:
--cacert /opt/gluu-server-<glu-version>/etc/certs/httpd.crt
After execution open the file output.json. You should see a response like this (some contents have been supressed for readability):
{
  "id": "...",
  "meta": {
    "created": "...",
    "lastModified": "...",
    "location": "https://.../scim/v2/Users/@!..."
    "resourceType": "User"
  },
  "schemas": [ "urn:ietf:params:scim:schemas:core:2.0:User" ],
  "userName": "ajsmith",
  "name": {
    "formatted": "Joe Smith",
    "familyName": "Smith",
    "givenName": "Joe"
  },
  "displayName": "Average Joe",
  ...
}
This new user has been given an id. If possible, inspect your ou=people branch and find the entry whose inum matches the id given. An easier option would be to log in via oxTrust and go to Users > Manage People and search "Joe" to see the recently created user.
Please note that SCIM will only allow you to create users with HTTP POST verb.
Retrieving Information for a User#
One of the simplest ways to test retrieval is querying all information about a single user. Check in your LDAP the inum for Average Joe and do the following request with curl passing, as usual, your access token in the headers:
curl -G -H 'Authorization: Bearer ...access token...' 'https://<host-name>/identity/seam/resource/restv1/scim/v2/Users/<user-inum>'
!!! Note:
In the Gluu Server, inums are long strings consisting of alphanumeric characters and typically start with @!, include these two characters as well. Note that the URL was surrounded with single quotes: bang characters might be misleading to your command line interpreter.
As a response, you will get a JSON document with all of the attributes in the user schema and their corresponding values. Note that only non-null attributes are present in the output:
{
  "id": ...,
  "meta": {...},
  "schemas": [...],
  "userName": "ajsmith",
  "name": {
    "formatted": "Joe Smith",
    "familyName": "Smith",
    "givenName": "Joe",
    ...
  },
  "displayName": "Average Joe",
  ...
  "emails": [ ... ],
  ...
  "phoneNumbers": [ ... ],
  ...
  "addresses": [ ... ]
  ...
}
Retrieval with Filtering#
The SCIM protocol defines a standard set of parameters that can be used to filter, sort, and paginate resources in a query response (see section 3.4.3 of RFC 7644). Filtering capabilities are very rich and enable developers to build complex queries.
So let's elaborate a bit more on the example already shown in the test mode section: let's create a query to return the first 2 users whose userName contains the sequence of letters "mi". Results should be sorted alphabetically by givenName.
$ curl -G -H 'Authorization: Bearer ...access token...'  -o output.json
      --data-urlencode 'filter=userName co "mi"'
      -d startIndex=1 -d count=2 -d sortBy=name.givenName
      https://<host-name>/identity/restv1/scim/v2/Users
As the response, you will have a JSON file that looks like this:
{
    "totalResults": 2,
    "itemsPerPage": 2,
    "startIndex": 1,
    ...
    "Resources": [
        {
        ...
        attributes of first user matching criteria
        ..
        },
        {
        ...
        attributes of second user matching criteria
        ..
        }
    ]
}
Updating a User (PUT)#
Note
The SCIM spec defines two ways to update resources: HTTP PUT and PATCH.
Overwrite your input.json with the following. Replace content in angle brackets accordingly:
{
    "schemas":["urn:ietf:params:scim:schemas:core:2.0:User"],
    "id": <joe's-inum>,
    "userName":"ajsmith",
    "name":{
        "familyName":"Smith",
        "givenName":"Joe"
    },
    "displayName":"Joe Smith",
    "emails": [{
        "value": "jsmith@example.com",
        "type": "work",
        "primary": true
    }]
}
And issue the PUT with curl:
$ curl -X PUT -H 'Authorization: Bearer ...access token...'
       -H 'Content-Type: application/scim+json'
       -d @input.json -o output.json
       'https://<host-name>/identity/restv1/scim/v2/Users/<user-inum>'
Response (output.json) will show the same contents of a full retrieval.
Please verify changes were applied whether by inspecting LDAP or issuing a GET. If you have followed the steps properly, you should notice a new e-mail added and the change in displayName attribute.
Updating a User (PATCH)#
With patching, you can be very precise about the modifications you want to apply. Patching syntax follows JSON Patch spec (RFC 6902) closely. While it's not a must to read the RFC to learn how patch works, see section 3.5.2 of SCIM protocol (RFC 7644) to get the grasp.
If you prefer reading code, patch test cases found in the Java SCIM-Client project are worth to look at.
The following is a simple example that illustrates the kind of modifications developers can achieve via PATCH. Overwrite your input.json with the following:
{
  "schemas": [
    "urn:ietf:params:scim:api:messages:2.0:PatchOp"
  ],
  "Operations": [
    {
      "op": "replace",
      "value": {
        "name": { "givenName": "Joey" }
      }
    },
    {
      "op": "replace",
      "path" : "emails[type eq \"work\" or primary eq false].value",
      "value": "jsmith@example.com"
    },
    {
      "op": "add",
      "value": {
        "name": { "middleName": "Jhon" }
      }
    },
    {
      "op": "add",
      "value": {
        "emails" : [
          { "primary": true, "value" : "my@own.mail" }
        ],
        "phoneNumbers" : [
          { "type" : "home", "value": "5 123 8901"},
          { "value": "5 123 8902"}
        ]
      }
    },
    {
      "op": "remove",
      "path": "name.middleName"
    },
    {
      "op": "remove",
      "path": "phoneNumbers[value ew \"01\"].type"
    },
  ]
}
A collection of modification are provided under "Operations". They are processed in order of appearance. Also, every operation has a type; patching supports add, remove and replace.
The first operations states the following: replace the value of givenName subattribute (that belongs to complex attribute name) with the string "Joey".
Operations are easier to understand when using a "path". The second operation replaces the value subattribute inside the complex multi-valued attribute emails. Inside the square brackets, we find a filter expression, so the replacement does not apply to all emails in the list but only to those matching the criterion.
So the second operation can be read as "set the value of value subattribute to string jsmith@example.com where the type subattribute of the email equals to string "work" or if primary attribute is false".
The third operation is similar to the first. It sets the value of a subattribute which was unassigned (null). You could have used "replace" operation in this case and results would have been identical.
The fourth operation is more interesting. It adds to the current list of emails a new one. It supplies a couple of subattributes for the email to include: primary and value. Additionally, we set the value of (previously unassigned) phoneNumbers multi-valued attribute passing a list of elements.
In the fifth operation, we remove the middleName attribute that was set in operation three. Note how we make explicit the path of data to nullify: "name.middleName".
The sixth operation allows us to remove a specific subattribute of phoneNumbers. The aim is to nullify the "type" of the item whose phone number value ends with "01". The remove operation can also be used to remove a complete item from a list, or empty the whole list by providing a suitable value for "path".
Now let's see it in action:
$ curl -X PATCH -H 'Authorization: Bearer ...access token...'
       -H 'Content-Type: application/scim+json'
       -d @input.json -o output.json
       'https://<host-name>/identity/restv1/scim/v2/Users/<user-inum>'
So far, our resource should look like:
{
  "schemas": [ "urn:ietf:params:scim:schemas:core:2.0:User" ],
  "userName": "ajsmith",
  "name": { "familyName": "Smith", "givenName": "Joey" },
  "displayName": "Joe Smith",
  "emails": [
    {
      "value": "jsmith@foodmafia.com",
      "type": "work",
      "primary": true
    },
    {
      "value": "my@own.mail",
      "primary": false
    }
  ],
  "phoneNumbers": [
    { "value": "5 123 8901" }, { "value": "5 123 8902" }
  ]
}
Note the primary subattribute accompanying email "my@own.mail" is false but when inserted we provided true. This is because the SCIM specification states that after modifications are applied to resources (PUT or PATCH), there cannot be more than one item in a multi-valued attribute with primary value set as true.
To see more sample JSON payloads, check the .json files used by the SCIM-Client test cases referenced above.
In conjunction with bulk operations, patch becomes a very powerful tool to transform data.
Deleting Users#
For deleting, the DELETE method of HTTP is used.
No input file is used in this case. A delete request could be the following:
$ curl -X DELETE -H 'Authorization: Bearer ...access token...'
        'https://<host-name>/identity/seam/resource/restv1/scim/v2/Users/<user-inum>'
Use the inum of our dummy user, Average Joe.
Check your LDAP or via oxTrust to see that Joe is gone.
Testing with the SCIM-Client#
If you code in Java, you can take advantage of the ready-to-use client library SCIM-Client developed by Gluu. With this client, you will be able to interact with your SCIM endpoints with no need to craft requests by hand, creating clients or requesting/refreshing access tokens. You can even use the client when your endpoints are protected by UMA: all authorization steps are handled for you.
Requisites#
-
Entry-level knowledge of Java is enough. Make sure you have Java Standard Edition installed. The use of Maven as a build tool is recommended
-
Ensure you have enabled SCIM and test mode as shown above
-
Add the SSL certificate of your Gluu server to the
cacertskeystore of your local Java installation. There are lots of articles around the Web on how to import a certificate to the keystore. An utility called Key Store Explorer makes this task super easy. If you are using a self-signed certificate, you can find it at/opt/gluu-server-<gluu-version>/etc/certs/httpd.crt -
Online Java-docs for SCIM-Client are available here. You can generate java-docs locally too using Maven; just run
mvn javadoc:javadoc
Start a Simple Project#
Create a project in your favorite IDE, and if using Maven, add the following snippet to your pom.xml file:
<properties>
    <scim.client.version>3.1.3.Final</scim.client.version>
</properties>
...
<repositories>
  <repository>
    <id>gluu</id>
    <name>Gluu repository</name>
    <url>http://ox.gluu.org/maven</url>
  </repository>
</repositories>
...
<dependency>
  <groupId>gluu.scim.client</groupId>
  <artifactId>scim-client2</artifactId>
  <version>${scim.client.version}</version>
</dependency>
Ideally, the SCIM-Client you use should match your Gluu version. For example, if you are running Gluu Server CE v3.1.3, you should also use SCIM-Client v3.1.3.
If you don't want to use Maven, you can download the jar file for SCIM-Client here: https://ox.gluu.org/maven/gluu/scim/client/SCIM-Client. This may require you to add other libraries (jar files dependencies) manually.
Simple Retrieval#
Create a Java class using the code shown below. Replace with proper values between the angle brackets for private attributes:
import gluu.scim2.client.factory.ScimClientFactory;
import gluu.scim2.client.rest.ClientSideService;
import org.apache.logging.log4j.LogManager;
import org.apache.logging.log4j.Logger;
import org.gluu.oxtrust.model.scim2.BaseScimResource;
import org.gluu.oxtrust.model.scim2.ListResponse;
import org.gluu.oxtrust.model.scim2.user.UserResource;

import javax.ws.rs.core.Response;
import java.util.List;

public class TestScimClient {

    private String domainURL="https://<host-name>/identity/restv1";
    private String OIDCMetadataUrl="https://<host-name>/.well-known/openid-configuration";

    private Logger logger = LogManager.getLogger(getClass());

    private void simpleSearch() throws Exception {

        ClientSideService client=ScimClientFactory.getTestClient(domainURL, OIDCMetadataUrl);
        String filter = "userName eq \"admin\"";

        Response response = client.searchUsers(filter, 1, 1, null, null, null, null);
        List<BaseScimResource> resources=response.readEntity(ListResponse.class).getResources();

        logger.info("Length of results list is: {}", resources.size());
        UserResource admin=(UserResource) resources.get(0);
        logger.info("First user in the list is: {}" + admin.getDisplayName());

        client.close();

    }

}
The first line of method simpleSearch is getting an object that conforms to the ClientSideService interface. This interface is a "mashup" of several interfaces and gives access to a rich number of methods that will allow you to do all CRUD you may need. Other methods in ScimClientFactory class allow to supply a specific interface class and so get an object that adheres to that interface.
Create a main method for class TestScimClient and call simpleSearch from there. When running, you will see the output of retrieving one user (admin) and see his displayName on the screen or wherever you have configured your logs to be written to. Here we are using log4j2 as framework, but you may use the any other logging framework.
Note the usage of close in the last statement. While it's not a requirement, it is recommended to call close whenever you know there will not be any other request associated to the client you obtained.
The SCIM protected by UMA section contains examples for adding and deleting users. The only actual difference in coding for test mode or UMA-protected service is the way in which you initially get a ScimClient object instance. For test mode, just call ScimClientFactory.getTestClient as shown in the previous example.
Under the Hood#
When running the code, in LDAP you will see one or more new entries under the clients branch (ou=clients). Those are new OpenID clients created by the Java client and they are employed to request short-lived tokens to access the service.
In oxTrust, you can see them easily too: navigate to OpenId Connect > Clients and notice the column Display Name; they are named as "SCIM-Client".
These clients won't clutter your LDAP, they are also short-lived (one day) so they are cleaned up automatically for you.
SCIM Protected by UMA#
User-managed access (UMA) is a profile of OAuth2.0 and is focused on defining standardized flows and constructs for coordinating the protection of an API or existing web resource.
For more information on UMA please visit the corresponding page in the docs - the specification can be found at the Kantara website.
Gluu Server CE supports UMA protection for SCIM endpoints from version 2.4.0 onwards. This functionality is built-in and does not require any special package or installation.
Note
Gluu server 3.1.0 and later supports UMA 2.0 - the latest version of the standard. UMA 1.0.1 is not supported any longer.
Actors Involved in Protection#
This section condenses some important concepts of UMA. It's good to familiarize yourself with the different parties interacting in the process, namely a resource owner, a client, a resource server and an authorization server.
-
For the case of SCIM, the "resource" is what we are intended to protect, i.e. our database of users and groups stored in LDAP. More precisely, we are interested in protecting the set of URLs that expose our data, in other words, the so-called "SCIM endpoint" - something that looks like this:
http://<your_host>/identity/restv1/scim/v2/ -
The resource owner is normally a legal entity (e.g. your company), or someone acting on its behalf (the administrator of Gluu CE installation). The owner should be capable of granting access to protected resources
-
Requesting party is generally an end-user that seeks access to a protected resource. Only in certain use cases the requesting party and resource owner are the same person. To achieve the task, the requesting party uses a client
-
The client is usually an application capable of making requests for protected resources on the requesting party's behalf. A good example is the SCIM-client
-
The resource server hosts the resources to be protected, and thus is capable of dealing with requests for them. We can think of oxTrust as the resource server (at least as a front-end resource server because users and groups are not hosted per se by oxTrust though it has functionalities to able to access and modify data stored in LDAP)
-
The authorization server is where real protection takes place. This server issues authorization data according to policies of protection set by the resource owner. In this scenario, it maps directly to oxAuth
Now you may have a richer perspective of what the protection process entails, so let's proceed with a real setup.
Testing with the SCIM-Client (UMA)#
The following instructions show how to interact with the UMA-protected SCIM service using the SCIM-Client Java library.
Requisites#
-
In the following we will use Java as programming language. Entry-level knowledge is enough. Make sure you have Java Standard Edition installed. The use of Maven as a build tool is recommended
-
Copy the requesting party JKS file to your local machine (inside the Gluu server chroot, it is located at
/install/community-edition-setup/output/scim-rp.jks) -
Have the requesting party client ID and password at hand. You can find this info in the file
/install/community-edition-setup/setup.properties.last. Try runningcat setup.properties.last | grep "scim_rp_client". The default password issecret -
Ensure you have enabled SCIM and UMA as shown above
-
Add the SSL certificate of your Gluu server to the
cacertskeystore of your local Java installation. There are lots of articles around the Web on how to import a certificate to the keystore. An utility called Key Store Explorer makes this task super-easy. If you are using a self-signed certificate, you can find it at/opt/gluu-server-<gluu-version>/etc/certs/httpd.crt -
Online Java-docs for SCIM-Client are available here. You can generate java-docs locally using Maven; just run
mvn javadoc:javadoc
Start a Simple Project#
Create a project in your favorite IDE, and if using maven add the following snippet to your pom.xml file:
<properties>
    <scim.client.version>3.1.3.Final</scim.client.version>
</properties>
...
<repositories>
  <repository>
    <id>gluu</id>
    <name>Gluu repository</name>
    <url>http://ox.gluu.org/maven</url>
  </repository>
</repositories>
...
<dependency>
  <groupId>gluu.scim.client</groupId>
  <artifactId>scim-client2</artifactId>
  <version>${scim.client.version}</version>
</dependency>
Ideally the SCIM-Client you use should match your Gluu version. For example, if you are running Gluu Server CE v3.1.3, you should also use SCIM-Client v3.1.3.
If you don't want to use Maven, you can download the jar file for SCIM-Client here: https://ox.gluu.org/maven/gluu/scim/client/SCIM-Client. This may require you to add other libraries (jar files dependencies) manually.
Simple Retrieval#
Create a Java class using the code shown below. Replace with proper values between the angle brackets for private attributes:
import gluu.scim2.client.factory.ScimClientFactory;
import gluu.scim2.client.rest.ClientSideService;
import org.apache.logging.log4j.LogManager;
import org.apache.logging.log4j.Logger;
import org.gluu.oxtrust.model.scim2.BaseScimResource;
import org.gluu.oxtrust.model.scim2.ListResponse;
import org.gluu.oxtrust.model.scim2.user.UserResource;

import javax.ws.rs.core.Response;
import java.util.List;

public class TestScimClient {

    private String domainURL="https://<host-name>/identity/restv1";
    private String umaAatClientId = "<requesting-party-client-id>";
    private String umaAatClientJksPath = "<path-to-RP-jks>/scim-rp.jks";
    private String umaAatClientJksPassword = "<jks-password>";
    private String umaAatClientKeyId = "";

    private Logger logger = LogManager.getLogger(getClass());

    private void simpleSearch() throws Exception {

        ClientSideService client = ScimClientFactory.getClient(domain, umaAatClientId, umaAatClientJksPath, umaAatClientJksPassword, umaAatClientKeyId);
        String filter = "userName eq \"admin\"";

        Response response = client.searchUsers(filter, 1, 1, null, null, null, null);
        List<BaseScimResource> resources = response.readEntity(ListResponse.class).getResources();

        logger.info("Length of results list is: {}", resources.size());
        UserResource admin = (UserResource) resources.get(0);
        logger.info("First user in the list is: {}", admin.getDisplayName());

        client.close();

    }

}
You can supply an entry alias from scim-rp.jks for umaClientKeyId. The first key from the file is used automatically when this value is left empty. When providing umaClientKeyId explicitly, ensure it is associated to an RSA algorithm.
Create a main method for class TestScimClient and call simpleSearch from there. When running, you will see the output of retrieving one user (admin) and see his displayName on the screen.
Adding a User#
There are two ways to add users:
The following table summarizes some of the parameters you may wish to pass:
| Parameter | Description |
|---|---|
| userName | The intended username for the end-user |
| givenName | The first name of the end-user |
| familyName | The last name of the end-user |
| displayName | The name of the user, suitable for display to end-users |
| groups | Optional parameter if the user is added to any specific group |
JSON String#
A user can be added by supplying a JSON string representation with appropriate attributes. The following is an example of such JSON written to a properties file:
json_string = { \
  "schemas": ["urn:ietf:params:scim:schemas:core:2.0:User"],    \
  "externalId": "12345",    \
  "userName": "newUser",    \
  "name": { "givenName": "json", "familyName": "json"}, \
  "displayName": "json json",   \
  "nickName": "json",   \
  "profileUrl": "http://www.gluu.org/", \
  "emails": [   \
    {"value": "json@gluu.org", "type": "work", "primary": true},    \
    {"value": "json2@gluu.org", "type": "home", "primary": false}   \
  ],    \
  "addresses": [{"type": "work", "streetAddress": "621 East 6th Street Suite 200", "locality": "Austin", "region": "TX", "postalCode": "78701", "country": "US", "formatted": "621 East 6th Street Suite 200  Austin , TX 78701 US", "primary": true}], \
  "phoneNumbers": [{"value": "646-345-2346", "type": "work"}],  \
  "ims": [{"value": "test_user", "type": "Skype"}], \
  "userType": "CEO",    \
  "title": "CEO",   \
  "preferredLanguage": "en-us", \
  "locale": "en_US",    \
  "active": true,   \
  "password": "secret", \
  "roles": [{"value": "Owner"}],    \
  "entitlements": [{"value": "full access"}],   \
  "x509Certificates": [{"value": "MIIDQzCCAqy...blah...blah}]   \
}
Here, backslashes "\" allow us to span the contents across several lines.
Assuming you named the file above as scim-client.properties, the following Java code will create the new user:
Properties p = new Properties();
p.load(new FileInputStream("scim-client.properties"));
Response response = client.createUser(p.getProperty("json_string"), null, null);
UserResource user=response.readEntity(UserResource.class);
User Object#
You may also use an "objectual" approach to dealing with users. The following code snippet employs the class org.gluu.oxtrust.model.scim2.User of SCIM-Client.
UserResource user = new UserResource();

Name name = new Name();
name.setGivenName("Given Name");
name.setFamilyName("Family Name");
user.setName(name);

user.setActive(true);
user.setUserName("newUser_" + System.currentTimeMillis());
user.setPassword("secret");
user.setPreferredLanguage("US_en");
user.setDisplayName("Dummy human");

List<Email> emails = new ArrayList<Email>();
Email email = new Email();
email.setPrimary(true);
email.setValue("a@b.com");
email.setType("work");
emails.add(email);
user.setEmails(emails);

List<PhoneNumber> phoneNumbers = new ArrayList<PhoneNumber>();
PhoneNumber phoneNumber = new PhoneNumber();
phoneNumber.setPrimary(true);
phoneNumber.setValue("123-456-7890");
phoneNumber.setType("work");
phoneNumbers.add(phoneNumber);
user.setPhoneNumbers(phoneNumbers);

List<Address> addresses = new ArrayList<Address>();
Address address = new Address();
address.setPrimary(true);
address.setType("work");
address.setStreetAddress("My Street");
address.setPostalCode("12345");
address.setCountry("RU");
addresses.add(address);
user.setAddresses(addresses);

Response response = client.createUser(user, null, null);
logger.info("response HTTP code = {}", response.getStatus());
Delete a User#
To delete a user, only his ID (the inum LDAP attribute) is needed. You can see the id of the user just created by inspecting the JSON response.
Response response=client.deleteUser("id");
assertEquals(Response.Status.NO_CONTENT.getStatusCode(), response.getStatus());
Replacing expired keys#
To properly implement the UMA 2.0 workflow, your Gluu server requires a number of configurations. These are all applied at installation time. Particularly, Java Keystore files generated have an expiration time of one year. After this period of time you will have to update those files and a couple of configurations. To learn more about this topic, visit this page.
Using a Different Programming Language#
Coding service interactions when SCIM endpoints are being protected by UMA is more involved than using test mode. If you are planning to code for a SCIM service protected by UMA, it is advisable to check the flow depicted in section 3 of the UMA 2.0 spec. Focus only on the interactions of client vs. another party (resource server or authorization server). In a previous section, we talked about the actors involved in UMA protection; this will save you time when reading the specification.
As a guideline for your own implementation, you can take ideas from the Java class UmaScimClient found in SCIM-Client. Starting at the authorize method, you will see how steps in the spec flow are being followed there.
Check the metadata URL of UMA 2 to discover the oxAuth endpoint that issues tokens. Visit https://<host-name>/.well-known/uma2-configuration.
Creating your Own Attributes: Extensions#
RFC 7643 defines the schema for resource types in SCIM (see section 3.3). In other words, it defines structures in terms of attributes to represent users and groups as well as attribute types, mutability, cardinality, and so on.
Although the schema covers many attributes one might think of, at times you will need to add your own attributes for specific needs. This is where user extensions pitch in, they allow you to create custom attributes for SCIM. To do so, you will have to:
-
Add an attribute to LDAP schema
-
Include the new attribute in an LDAP's objectclass such as gluuPerson or preferably, gluuCustomPerson
-
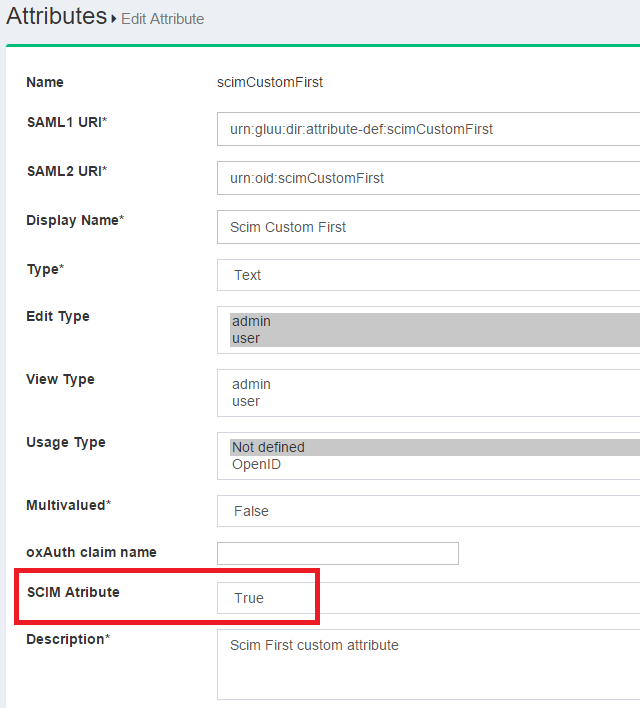
Register and activate your new attribute through oxTrust GUI
Please visit this page for a more detailed explanation. When registering the attribute in the admin GUI, please ensure you have set the SCIM Attribute parameter to true.
Note
Only the following data types for extended attributes are supported in SCIM server implementation: string, numeric, and date.
Once you submit this form, your attribute will be part of the User Extension. You can verify this by inspecting the Schema endpoint:
https://<host-name>/identity/restv1/scim/v2/Schemas/urn:ietf:params:scim:schemas:extension:gluu:2.0:User
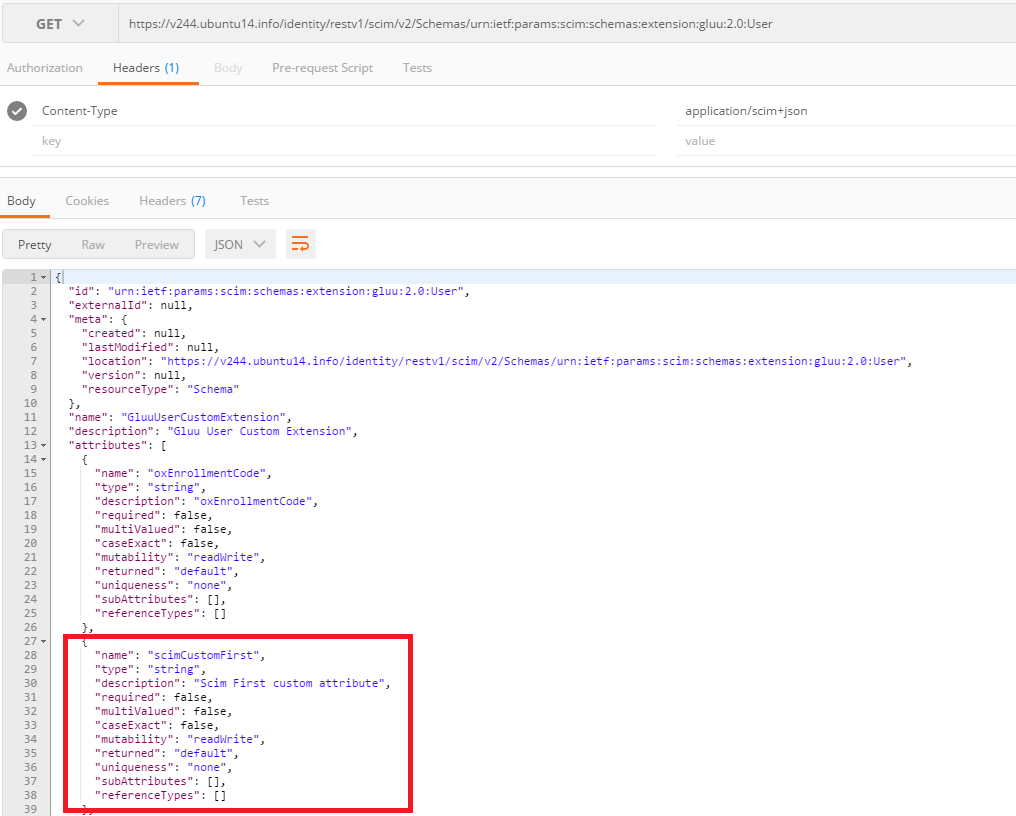
In the JSON response, your new added attribute will appear.
Handling Custom Attributes in SCIM-Client#
To access the name/values of custom attributes please use the getCustomAttributes method of your SCIM resource and pass the URI of the extension that these custom attributes are associated to. Likewise, to set the values for your custom attributes, call the addCustomAttributes and pass a CustomAttributes instance.
The following test cases contain illustrative examples:
Error Handling#
When something happens that prevents an operation from working properly, you can do some post-processing and show meaningful errors to your users. The strategy is simple:
- Detect if the status code of the response is what you expect: 201 for creations, 204 for removals, and 200 for updates and searches
- If not, parse the response contents according to the error format of SCIM spec (section 3.12 of RFC 7644)
- Do your custom processing using the
scimTypeanddetailproperties of the error (again see section 3.12 of RFC 7644)
The following are sample response errors:
- A GET for a non-existent resource:
{
    "schemas": ["urn:ietf:params:scim:api:messages:2.0:Error"],
    "detail":"Resource @!3245.DF39.6A34.9E97!0001!0000!B2B4.52F0.88EA not found",
    "status": "404"
}
- A POST in an attempt to create a user with an already assigned username:
{
    "schemas": ["urn:ietf:params:scim:api:messages:2.0:Error"],
    "detail": ""Duplicate UID value: admin",
    "scimType" : "uniqueness",
    "status": "409"
}
Custom Error Handling using SCIM-Client#
The following snippet sends a user creation request and shows how to check if the status code is appropriate. If not, the error details are parsed using the ErrorResponse class.
...

public void failedCreate() {

        UserResource u = new UserResource();
        u.setUserName("admin");

        Response r = client.createUser(u, null, null);
        Status status = Status.fromStatusCode(r.getStatus());

        switch (r.getStatusInfo().getFamily()) {
            case SUCCESSFUL:
                //2xx HTTP sucess, add your processing logic here...
                break;
            case CLIENT_ERROR:
                //4xx HTTP error
                ErrorResponse error = r.readEntity(ErrorResponse.class);
                if (status.equals(Status.BAD_REQUEST)) {
                    handleError("The request is syntactically incorrect", error.getDetail(), error.getScimType());
                }
                else
                if (status.equals(Status.CONFLICT)) {
                    handleError("An attempt to create an already existing user occurred", error.getDetail(), error.getScimType());
                }
                break;
            case SERVER_ERROR:
                //5xx HTTP error
                break;
        }

}

public void handleError(String title, String description, String scimType) {
    //Do your custom processing...
    //For a list of possible values of scimType, see table 9 of RFC7644
}
Former SCIM-Client versions used to deal with BaseClientResponse<T> objects and it was not possible to read the entity as an instance of a class other than T (usually T being User or Group) because the response was already fully consumed. This usually led to errors like "Stream closed". Newer client allows you to read the response as many times as you need without restriction of type parameter T as the underlying response stream is buffered by default.
Additional Features of SCIM Service#
FIDO Devices#
SCIM standard is concerned with two types of resources, namely, Users and Groups. However, according to spec, the service can be extended to add new resource types. Particularly, Gluu Server implementation of SCIM contains a resource type called "FIDO device".
A FIDO device represents a user credential stored in the Gluu Server LDAP that is compliant with the FIDO standards. These devices are used as a second factor in a setting of strong authentication. Examples of FIDO devices are u2f security keys and Super Gluu devices.
Having FIDO devices as one of resource types allow application developers querying, updating and deleting already existing (added) devices. Addition of devices do not take place through the service since this process requires direct end-user interaction, ie. device enrolling.
The following is a summary of features of a Fido Device SCIM resource:
-
Schema URN:
urn:ietf:params:scim:schemas:core:2.0:FidoDevice -
Name of resource: FidoDevice
-
Endpoint URL (relative to base URL of service):
/scim/v2/FidoDevices -
Device attributes: Attributes pertaining to this resource type are listed by visiting the URL
https://<host-name>/identity/restv1/scim/v2/Schemas/urn:ietf:params:scim:schemas:core:2.0:FidoDevice
Currently the service supports only:
-
Devices search and retrieval (via GET and POST)
-
Single device deletion via DELETE
-
Single device update via PUT or PATCH
Note
Given the nature of this resource, most of its attributes are not modifiable. Editing is limited to the following attributes: displayName and description.
The following subsection shows an example of FIDO device retrieval using filters.
Example: Querying Enrolled Super Gluu Devices#
Say we are interested in having a list of Super Gluu devices users have enrolled and whose operating system is iOS. In a setting of test mode, we may issue a query like this:
curl -G -H 'Authorization: Bearer ...access token...' --data-urlencode 'filter=deviceData co "ios"'
-d count=10 -o output.json https://<host-name>/identity/seam/resource/restv1/scim/v2/FidoDevices/
Your result list might look like this:
{
  "totalResults": ...,
  "itemsPerPage": ...,
  "startIndex": 1,
  "schemas": [
    "urn:ietf:params:scim:api:messages:2.0:ListResponse"
  ],
  "Resources": [
    {
      "id": "...",
      "meta": {...},
      "schemas": ["urn:ietf:params:scim:schemas:core:2.0:FidoDevice"],
      "userId": "...",
      ...
      "deviceData": "{\"uuid\":\"ABC123\", \"type\":\"iPhone\", \"platform\":\"ios\", \"name\":\"Someone's iPhone\", \"os_name\":\"iOS\", \"os_version\":\"10.0.1\"}",
      "displayName": ...,
    },
    ...
  ]
}
Supporting a User Registration Process with SCIM#
SCIM service has many use cases. One interesting and often arising is that of coding your own user registration process. With your SCIM endpoints you can build a custom application to enter users to your LDAP directory.
Important Considerations#
Here, you have some useful tips before you start:
-
Choose a toolset you feel comfortable to work with. Keep in mind that you have to leverage the capabilities of your language/framework to issue complex HTTPS requests. Be sure that:
-
You will be able to use at least the following verbs: GET, POST, PUT, and DELETE
-
You can send headers in your requests as well as reading them from the service response
-
-
If not supported natively, choose a library to facilitate JSON content manipulation. As you have already noticed we have been dealing with Json for requests as well as for responses. Experience shows that being able to map from objects (or data structures) of your language to Json and viceversa helps saving hours of coding
-
Shape your data model early. List the attributes your application will operate upon and correlate with those found in the SCIM user schema. You can learn about the schema in RFC 7644. At least, take a look at the JSON-formatted schema that your Gluu Server shows: visit
https://<host-name>/identity/restv1/scim/v2/Schemas/urn:ietf:params:scim:schemas:core:2.0:User. -
You will have to check your LDAP contents very often as you develop and run tests. You may have to delete attributes or whole entries as your application evolves. Thus, use a suitable tool for LDAP manipulation: Use oxTrust to manipulate your users' attributes or setup a LDAP GUI client to have more control.
-
Always check your logs. In test mode section above you can find some guidelines in this regard.
-
In this user management guide with SCIM, we have already touched upon the fundamentals of SCIM in Gluu Server and shown a good amount of sample requests for manipulation of user information. However, keep in mind the SCIM spec documents are definitely the key reference to build working request messages, specially RFC 7643, and RFC 7644.
Summary of Tasks#
In this section, we will summarize the tasks you need to undertake in order to code your application. We will not go into details of any programming language or technology to build user interfaces.
For coding an app or script that implements a user registration process, you should:
-
Code authorization routines
-
Code a dummy insertion routine
-
Create a form to grab new users' data
-
Code routines to process the HTTP POST
-
Create a feedback page
-
Do adjustments in the attribute set
-
Enhance your form
Code Authorization Routines#
This task has to do with creating utility code that will allow you to obtain tokens (whether an "access token" for test mode or a "requesting party token" - rpt - when using UMA). This code requires sending HTTPS requests to a few URLs.
In previous sections, we covered thoroughly what needs to be done for test mode for UMA basic guidelines were given. Ensure you have already enabled the protection for your preference in oxTrust.
If you are unsure of how to code a particular step, take a look at the Java client. These two classes do the job:
To test your authorization code, use a simple GET retrieval request.
Code a Dummy Insertion Routine#
Use the information given in the section Creating resources to make a hardcoded POST to the user endpoint.
In summary, make sure the following works for you:
POST /identity/restv1/scim/v2/Users
Host: host-name...
Accept: application/scim+json
Content-Type: application/scim+json
Authorization: Bearer ...

{
    "schemas":["urn:ietf:params:scim:schemas:core:2.0:User"],
    "userName":"ajsmith",
    "name":{
        "familyName":"Smith",
        "givenName":"Joe"
    },
    "displayName":"Average Joe"
}
Create a Form to Grab and Send New Users' Data#
Design your form according to the set of attributes you are targeting. Keep it as simple as possible and include enhancements only after you are seeing progress.
Develop the code required to take the data entered in the fields of your form to build up a JSON structure the service can understand. Ensure your code creates well-formed JSON in all cases. A good number of errors stem from the fact the payload cannot be parsed by the service implementation.
Code Routines to Process the HTTP POST#
Take the code used for the dummy insertion and do the arrangements to be able to post an arbitary payload. Develop the required code to parse the response given by the server. It's important to be able to read:
-
The response code. Upon a successful user creation, you have to get a 201 code
-
The response header. Of particular interest is the "Location" header: it contains the URL that you can use to do a full (GET) query of the recently create resource. In our case it should look like
https://<host-name>/identity/restv1/scim/v2/Users/<new-user-inum> -
The response body. It contains the full user representation in JSON format
While testing, it's important to compare that you are receiving in the body the contents you have sent. You will additionally receive other valuable information such as the creation timestamp.
Create a Feedback Page#
Create a success/failure page that shows the result of the operation based on the response received.
Adjust Attribute Set#
With your now-working application, do the adjustments to include attributes that may enrich your process. A common attribute could be status. This attribute (that maps to LDAP attribute gluuStatus) determines whether your created user is active or not.
Enhance your Form#
Polish your form and add mechanisms to prevent abuse - a malicious user may end up creating lots of dummy entries. Add validations, captchas, etc. that may control indiscriminate submissions.