SAML IDP#
Overview#
The Gluu Server bundles the free open source Shibboleth SAML IDP to support outbound SAML single sign-on (SSO). To include Shibboleth in any Gluu Server deployment, opt in when prompted during Gluu Server installation.
In an outbound SAML SSO transaction a website or application (known as a Service Provider, or "SP") redirects a user to a designated identity provider (IDP) for authentication and authorization. The IDP will authenticate the user and upon successful authentication, the user is sent back to the SP with an active session.
Trust must be pre-established between the IDP (Gluu Server) and SP (target application) in order for the transaction to work. The following section of the docs cover how to configure the Gluu SAML IDP for SSO.
Note
If you need to support inbound SAML to integrate with external partner or customer IDPs, review the inbound SAML authentication guide.
Trust Relationship Requirements#
In the Gluu Server, the SAML IDPs SSO configuration is called a Trust Relationship (TR). Each TR requires the infomation listed below.
Metadata of the SP#
Metadata is an XML file which has configuration data used to establish trust between the website (SP) and IDP (Gluu Server). Websites (SP) can provide metadata via a URL or as a separate file. Metadata can change, so a static URL typically requires the least amount of ongoing maintenance.
Metadata of the Gluu Server#
The Gluu Server's SAML metadata may be needed from time to time. It can be found at https://hostname/idp/shibboleth.
Attribute Release#
Each SP may require one or more user attributes from the IDP in order to grant a person access to a protected resource. Required attributes vary depending on the application, and should be explicitly specified in the target application's documentation. The administrator can use the oxTrust interface to release the necessary attributes to the SP as described below.
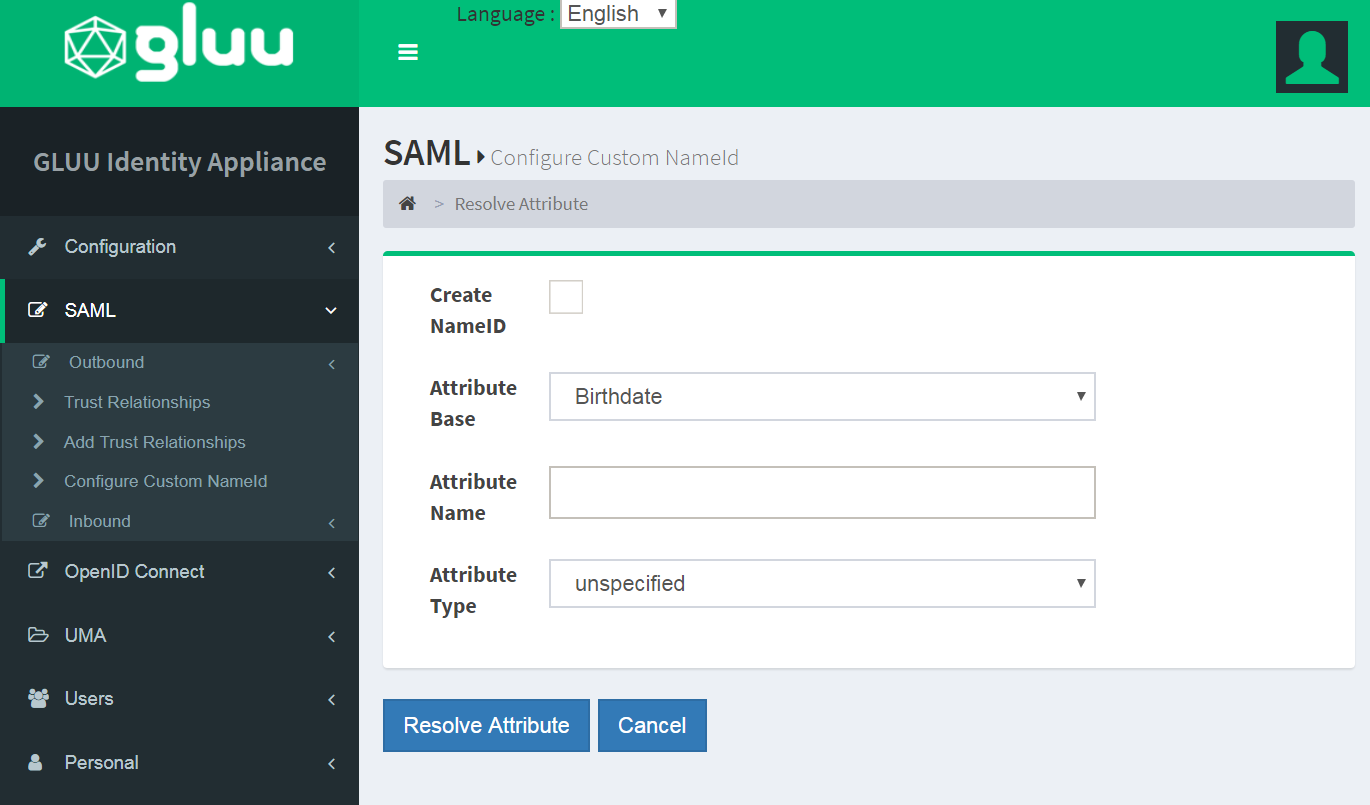
Configure NameID#
A NameID or Name Identifier is used to identity the 'subject' of a SAML assertion. The format of nameID can be anything but is typically emailAddress.
oxTrust GUI#
Here is how to configure NameID in oxTrust:
- Create your custom attribute by following this guide.
- Go to SAML -> 'Configure Custom NameID'
- 'Enable'
Create NameID - 'Attribute Base': Attribute value to calculate name Identifier.
- 'Attribute Name': Custom attribute name which we created earlier here.
- 'Attribute Type': Type of name identifier.
- Restart
identityandidpservices by: service identity stop/startservice idp stop/start
Manual Configuration#
It's also possible to configure NameID through configuration file / velocity templates. The template file for NameID definitions are located in the attribute-resolver.xml.vm file under /opt/gluu/jetty/identity/conf/shibboleth3/idp/.
The example below adds customTest, which we created earlier here, as NameID based on UID attribute. The following are put into the attribute-resolver.xml.vm file.
- Add declaration for the new attribute
#if( ! ($attribute.name.equals('transientId') or $attribute.name.equals('persistentId') or $attribute.name.equals('customTest') ) ) - Add definition for the new attribute
<resolver:AttributeDefinition id="customTest" xsi:type="Simple" xmlns="urn:mace:shibboleth:2.0:resolver:ad" sourceAttributeID="mail"> <resolver:Dependency ref="siteLDAP"/> <resolver:AttributeEncoder xsi:type="SAML2StringNameID" xmlns="urn:mace:shibboleth:2.0:attribute:encoder" nameFormat="urn:oasis:names:tc:SAML:2.0:nameid-format:email" /> </resolver:AttributeDefinition> - Update /opt/shibboleth-idp/conf/saml-nameid.xml to generate SAML 2 NameID content
    <bean parent="shibboleth.SAML2AttributeSourcedGenerator"
          p:format="urn:oasis:names:tc:SAML:2.0:nameid-format:email"
          p:attributeSourceIds="#{ {'customTest'} }"/>
service identity/idp stop
service identity/idp start
Create a Trust Relationship#
Follow these instructions to create a SAML TR in your Gluu Server:
- Go to
SAML>Trust Relationships - Click on
Add Trust Relationship - A new page will appear where you can provide all the required information to create a Trust Relationship(TR).
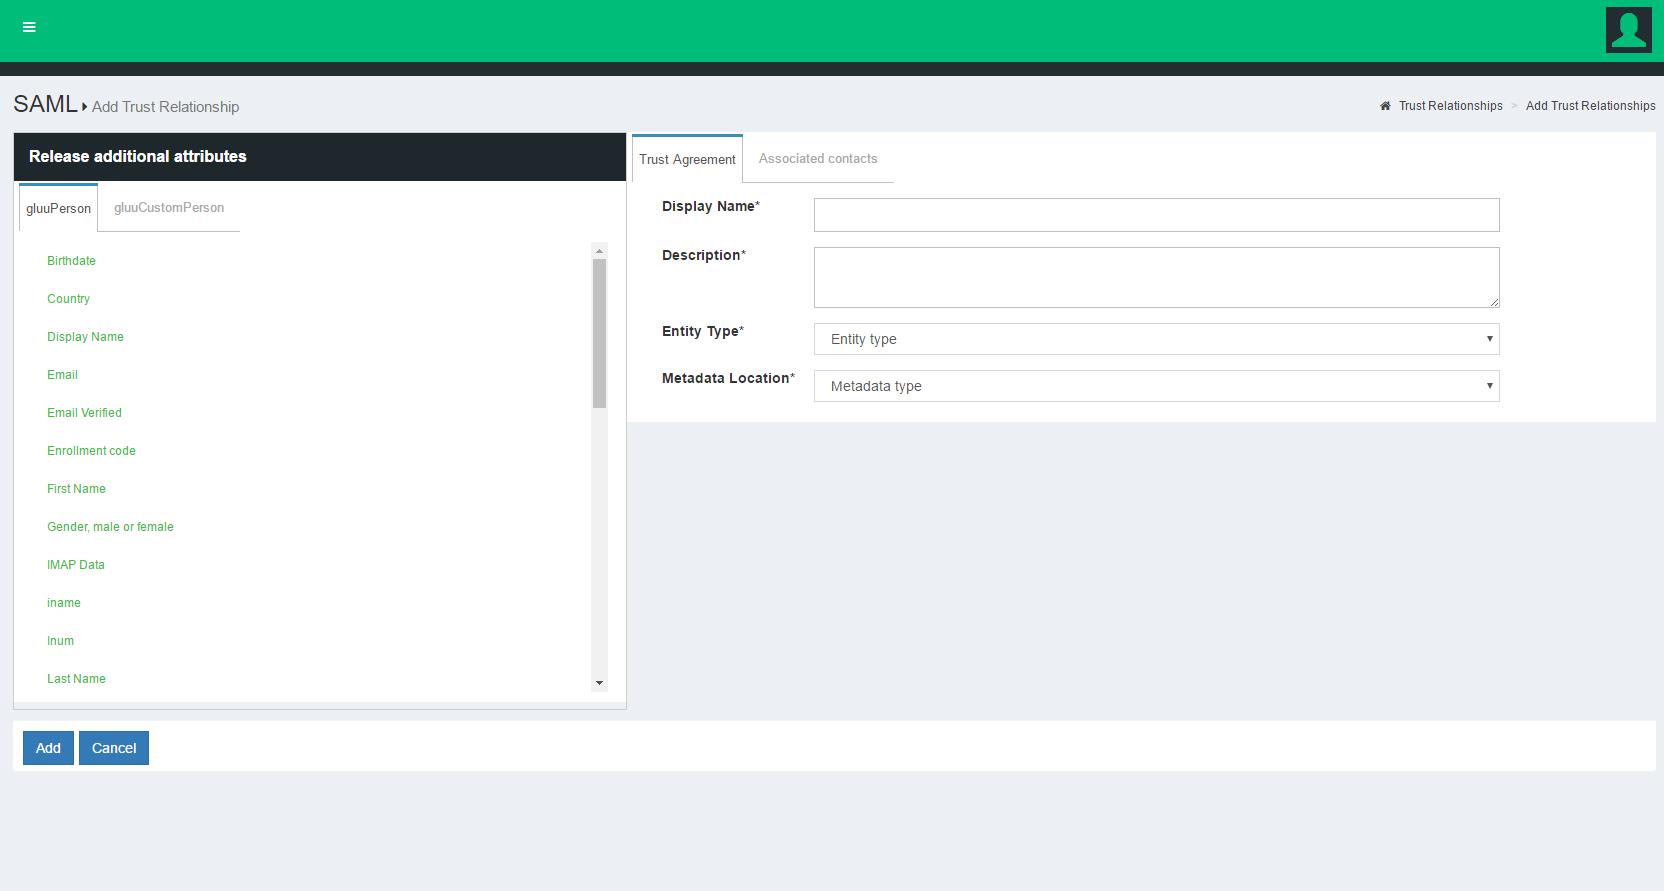
A description of each field follows:
- Display Name: Name of the Trust Relationship (it should be unique for every TR);
-
Description: Purpose of the TR and an SSO link can be added here;
-
Metadata Type: There are four available options to choose from. The correct Type depends on how the SP is delivering Metadata to your IDP.
- File: Choose
Fileif the SP has provided an uploadable metadata document in XML format. - URI: Chose
URIif the SP metadata is hosted on a URI that is accessible from the Internet. - Generate: Choose
Generateif the SP is an "in-house application" or the “Shibboleth SP” is going to be installed in the target application (SP). This option will generate a how-to guide for installing the Shibboleth SP. - Federation: Choose this option if the target application (SP) is affiliated with a federation service (e.g. InCommon, NJEdge etc.). Fedeartion's TR must be created first for it to appear in this list. Learn more about working with a federation below.
- File: Choose
Note
If you plan on using the Generate method, please note the following:
- The URL is the hostname of the SP.
- You must provide a non password protected public certificate, which is a Base64 encoded ASCII file, and contain "-----BEGIN CERTIFICATE-----" and "-----END CERTIFICATE-----".
- After creating the Trust Relationship, download the generated configuration files from the
Download Shibboleth2 configuration fileslink and place these configuration files inside your SP configuration.
-
Released: The SPs required attributes must be added to this panel. The required attributes can be selected from the menu on the left with the heading “Release Additional Attributes”.
-
Entity Type: You have two options to choose for entity type.
- Single SP:
- Federation/Aggregate
The Trust Relationship (TR) can be added by clicking the Add button located in the lower left side of the page.
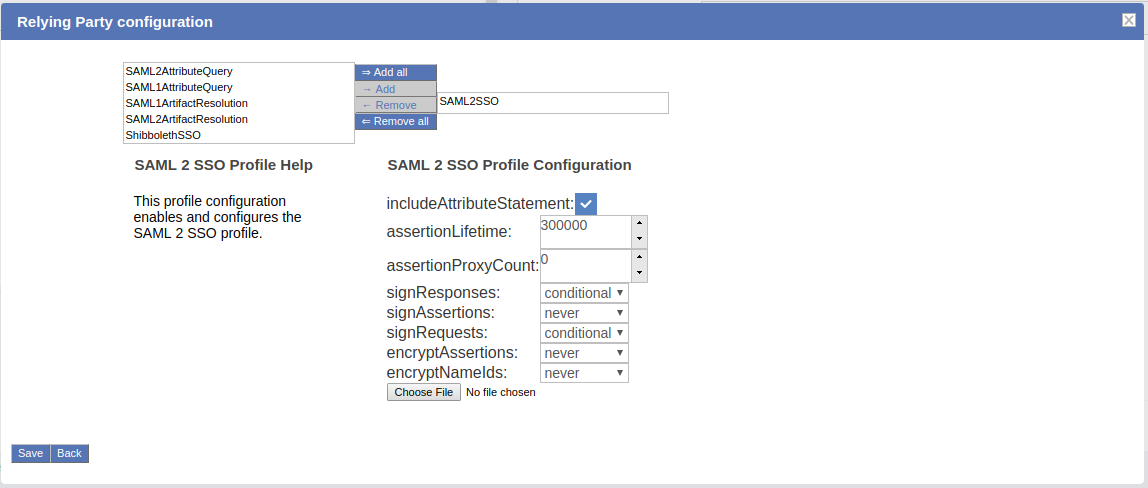
Relying Party Configuration#
Through the Relying Party configuration you can customize how different IDP profiles will respond to requests received from the SP, including encryption and digital signature options. The underlying IDPs functionality is described in the Shibboleth wiki.
oxTrust allows you to tweak a limited subset of profiles mentioned in the Shibboleth wiki. The SAML2SSO profile is the most commonly used browser SSO profile.
The "Configure Relying Party" checkbox is accessible on the TR creation page and must be enabled with a specific profile(s) selected as active for this TR to generate a valid configuration. In most cases, just adding the SAML2SSO profile with default settings will suffice.

Setting the checkbox will result in a link which, if clicked, will summon a list of profiles currently available for customization. Each entry in the list has a brief description of its purpose and a selection of settings for which custom values may be chosen, as can be seen on image below.
Modifying Shib Templates#
Gluu Server loads most of its Shibboleth-related configuration from Gluu-generated templates. Sometimes a Gluu Server administrator might need to configure those templates to achieve a specific result. The location of those templates for both examples is: [inside_container]/opt/gluu/jetty/identity/conf/shibboleth3/idp
Here are two use cases where you might need to play with the Shib templates:
Manually-created custom NameID#
If a Gluu Server administrator prefers to manually create a custom nameID, then the following procedure can be followed:
- Create a custom attribute by following the "Creating Custom Attribute" document: https://gluu.org/docs/ce/3.1.3/admin-guide/attribute/#custom-attributes
- Go to the template location (as mentioned above)
- Open 'attribute-resolver.xml.vm'
- Add this attribute definition:
#if( ! ($attribute.name.equals('transientId') or $attribute.name.equals('persistentId') or $attribute.name.equals('customAttribute') ) ) - Declare it:
<resolver:AttributeDefinition id="customAttribute" xsi:type="Simple" xmlns="urn:mace:shibboleth:2.0:resolver:ad" sourceAttributeID="source_attribute_which_will_use_to_generate"> <resolver:Dependency ref="siteLDAP"/> <resolver:AttributeEncoder xsi:type="SAML2StringNameID" xmlns="urn:mace:shibboleth:2.0:attribute:encoder" nameFormat="urn:oasis:names:tc:SAML:2.0:nameid-format:TYPE_OF_NAMEID" /> </resolver:AttributeDefinition> - Save the file
- Go to
/opt/shibboleth-idp/conf/ - Modify
saml-nameid.xml:<bean parent="shibboleth.SAML2AttributeSourcedGenerator" p:format="urn:oasis:names:tc:SAML:2.0:nameid-format:TYPE_OF_NAMEID" p:attributeSourceIds="#{ { 'customAttribute' } }" /> - Save this file
- After that, restart the
identityandidpservices.
Add / modify the domain scope in IDP metadata#
There might be a situation where an organization needs to modify the automatically generated shibmd:Scope in the IDP's metadata. By default, it's the hostname of the Gluu Server, but the organization might need it to be different (i.e. only the domain or to add more domains.) To achieve this:
- Go to the template location (as mentioned above)
- Open the
idp-metadata.xml.vmtemplate - Modify / add the domain(s), as in the below snippet:
<Extensions> <shibmd:Scope regexp="false">gluu.org</shibmd:Scope> <shibmd:Scope regexp="false">gluu.com</shibmd:Scope> </Extensions> - Save the file
- Restart the
identityandidpservices
Federation Configuration#
If the SP is part of an identity federation such as InCommon, the Gluu administrator has option to establish a Trust Relationship with it based on the federation's metadata. To achieve this he must add TR for the federation in the Gluu Server first. This will enable the administrator to more easily create TRs with SPs in the federation.
The example below shows how an administrator would add a TR for the InCommon Federation.
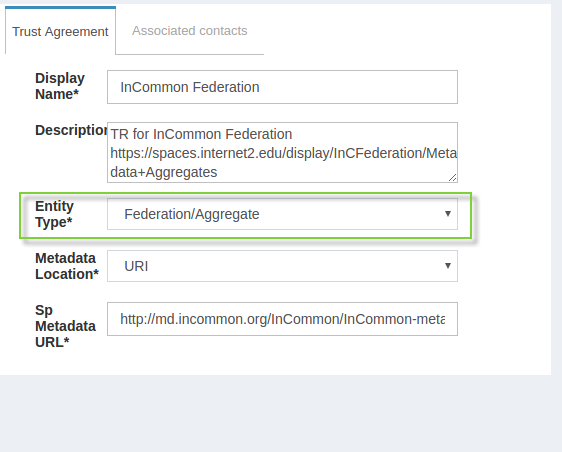
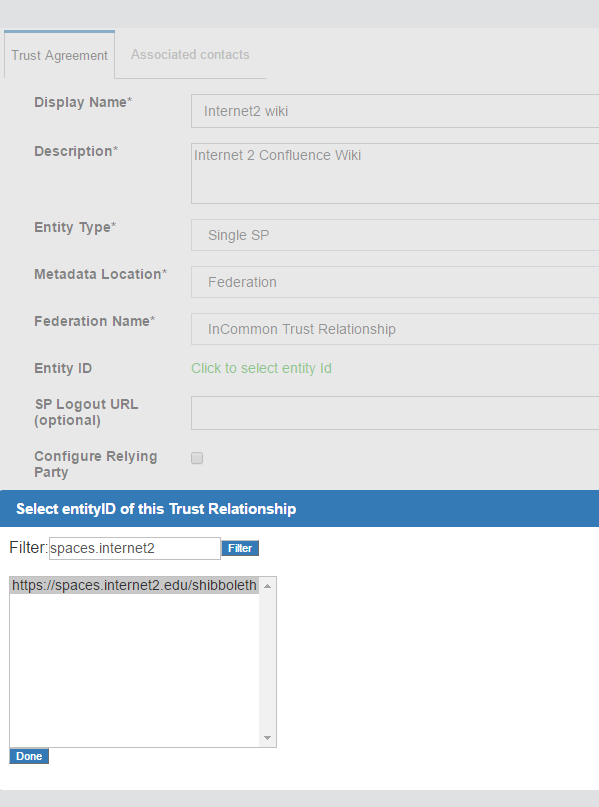
Once a TR has been established with the federation, the Gluu Server administrator can easily create TRs with any SP included in the federation by selecting the federation from the Federation Name drop down menu and selecting the entity-id for the SP.
In the example below we are creating a TR for the 'Internet2 Wiki', which is an InCommon Federation affiliated SP (meaning, the SPs entityID is available in InCommon metadata).
SAML SP#
If your target application (SP) does not already support SAML, we recommend using the Shibboleth SP web server filter to secure and integrate the application with your Gluu SAML IDP.