AppAuth Android#
Overview#
AppAuth for Android is a client SDK for communicating with OAuth 2.0 and OpenID Connect providers.
It strives to directly map the requests and responses of those specifications, while following the idiomatic style of the implementation language. In addition to mapping the raw protocol flows, convenience methods are available to assist with common tasks like performing an action with fresh tokens.
The library follows the best practices set out in
OAuth 2.0 for Native Apps
including using
Custom Tabs
for the auth request. For this reason,
WebView is explicitly not supported due to usability and security
reasons.
The library also supports the PKCE extension to OAuth which was created to secure authorization codes in public clients when custom URI scheme redirects are used. The library is friendly to other extensions (standard or otherwise) with the ability to handle additional parameters in all protocol requests and responses.
Gluu server is certified OpenId Provider and supports Native Apps either through custom URI scheme redirects, or App Links.
Download#
You can download (or clone) project from Github Repository
Specification#
Supported Android Versions#
AppAuth supports Android API 16 (Jellybean) and above.
When a Custom Tabs implementation is provided by a browser on the device (for example by Chrome), Custom Tabs are used for authorization requests. Otherwise, the default browser is used as a fallback.
Both Custom URI Schemes (all supported versions of Android) and App Links (API 23+) can be used with the library.
Building the Project#
Prerequisites#
The project requires the Android SDK for API level 26 (Oreo) to build, though the produced binaries only require API level 16 (Jellybean) to be used.
Building from Android Studio#
Android Studio is an official IDE for Android.
You can find Android Studio, it's features, docs, user guide etc. from Official Android Website for developers.
There are two ways to build existing project either download source code zip file or clone repository.
If you have downloaded source code zip file then follow below steps to import project in Android Studio:
-
Extract the source code zip file in your desired folder in your computer's file system.
-
Open Android Studio, Go to File -> New -> Import project. It will prompt to select existing project from your computer.
-
Browse the folder where you extracted source code file and select the build.gradle file of the project.

-
Click OK and it will start building project.
Another way if you don't want to download source code manually and want to clone repository then follow below steps:
-
Open Android Studio, Go to File -> New -> Project from Version Control -> Git.
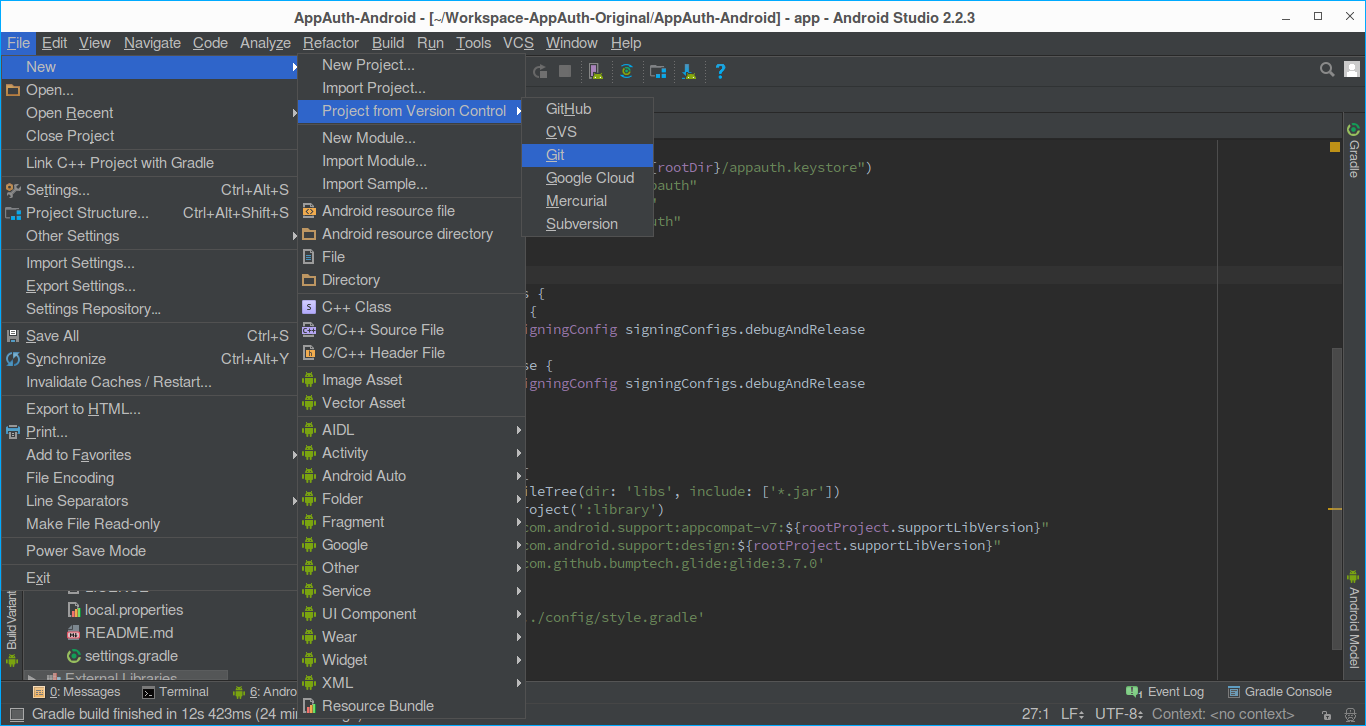
-
It will prompt in which you need to provide following details and then click Clone.
- Git Repository URL: Repository URL which you want to clone
- Parent Directory: Folder location in which you want to store
- project in your computer
- Directory Name: Project Name
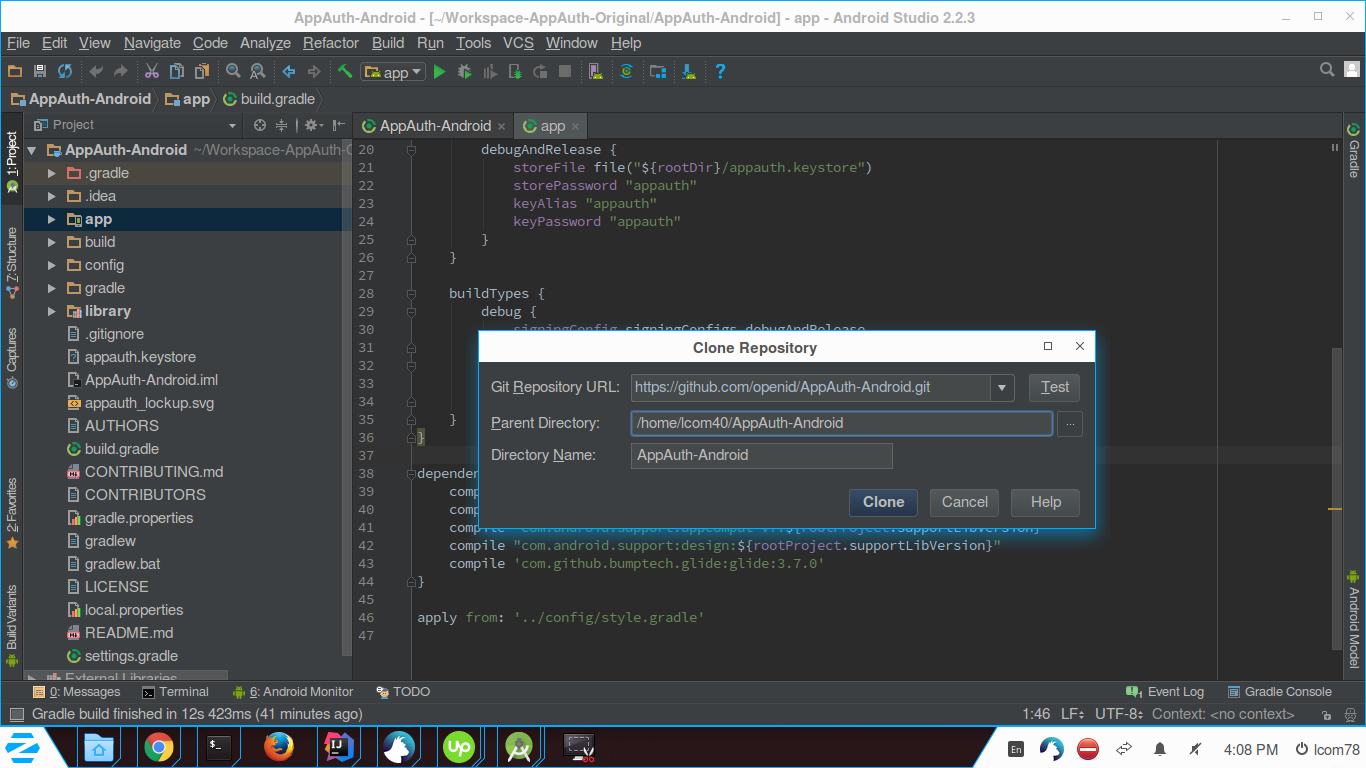
-
It will Clone repository into the folder you mentioned in Parent Directory above and start building the project.
If you get an error like: "Error:Could not find com.android.support:customtabs:26.0.1." then be sure you have installed the Android Support Library from the Android SDK Manager. Follow the Android Studio prompts to resolve the dependencies automatically.
Once the project build successfully, you can see that there are two modules in the project.
-
app(Demo app which use AppAuth library)
-
library(AppAuth library project)
Configure the Client#
In order to configure client you need to specify following:
issuer#
Here Gluu server is the issuer hence configuration will be discovered from Gluu server discovery uri. so your discover url will be like this "(IDP hostname).well-known/openid-configuration"
.well-known/openid-configuration is the standard suffix for open-id issuers.
clientId#
Can be obtained after client registration. You can either manually create a client in oxTrust or register dynamically through app but it is recommended you should manually register client in oxTrust.
Here is the example of client id which will be return from client registration process :- @!7469.0167.60D3.F85F!0001!951A.0E33!0008!5406.D19F
Manual client registration (Recommended)#
To create client manually in oxTrust, follow the Gluu Server's OpenID Connect client registration documentation.
After successful registration, it will return client id which will use for Authorization.
Here you need to set none for Authentication method for the Token Endpoint option.
Otherwise you will be needed to use client secrete in AppAuth for Token refresh which is
not recommended to store client secrete in Android app.
If you still want to use client secrete in you app for Authentication method for the Token Endpoint
you can check official doc by AppAuth
Dynamic client registration (Optional)#
New client registration request can be constructed for dispatch:
RegistrationRequest registrationRequest = new RegistrationRequest.Builder(
    serviceConfig,
    Arrays.asList(redirectUri))
    .build();
Requests are dispatched with the help of AuthorizationService. As this
request is asynchronous the response is passed to a callback:
service.performRegistrationRequest(
    registrationRequest,
    new AuthorizationService.RegistrationResponseCallback() {
        @Override public void onRegistrationRequestCompleted(
            @Nullable RegistrationResponse resp,
            @Nullable AuthorizationException ex) {
            if (resp != null) {
                // registration succeeded, store the registration response
                AuthState state = new AuthState(resp);
                //proceed to authorization...
            } else {
              // registration failed, check ex for more details
            }
         }
    });
RedirectUri#
RedirectUri is the Uri where browser will be redirected called by after successful login to openid.
Define redirectURI#
As Authorization request will be made using custom tab, redirectURI will provide redirection back to the app from custom tab after request get performed successfully.
It is recommended to use a custom scheme as redirectURI.You can simply use any custom scheme you want and need to declare it in app's manifest file.
You will find more about custom scheme from IETF Document
You can also prefer Android's officail doc on applink for more details Android doc
For example, if you declare custom scheme myscheme and host client.example.com then
redirectURL will look like: myscheme://client.example.com
The library configures the RedirectUriReceiverActivity to
handle a custom scheme and need to declare this activity into
your AndroidManifest.xml file by adding following:
    <activity android:name="net.openid.appauth.RedirectUriReceiverActivity">
        <intent-filter>
            <action android:name="android.intent.action.VIEW"/>
            <category android:name="android.intent.category.DEFAULT"/>
            <category android:name="android.intent.category.BROWSABLE"/>
            <data android:scheme="YOUR_CUSTOM_SCHEME"
                android:host="YOUR_REDIRECT_HOST"/>
        </intent-filter>
    </activity>
After completing authorization in custom tab, above custom scheme will redirect back to app.
Configure the Demo App#
Replace following auth_config.json file of app located at app/res/raw/auth_config.json
with following content:
{
  "client_id": "Put ClientId obtained from registration here",
  "redirect_uri": "Put custom scheme redirect_uri here",
  "authorization_scope": "openid email profile",
  "discovery_uri": "<IDP hostname>.well-known/openid-configuration",
  "authorization_endpoint_uri": "",
  "token_endpoint_uri": "",
  "registration_endpoint_uri": "",
  "https_required": true
}
If you keeps client_id blank it will Automatically initialize "Dynamic client registration" process mentioned above.
And need to add a new intent-filter to the
net.openid.appauth.RedirectUriReceiverActivity activity section
of the AndroidManifest.xml
<!-- Callback from authentication screen -->
<activity android:name="net.openid.appauth.RedirectUriReceiverActivity">

!-- redirect URI for your new IDP -->
    <intent-filter>
        <action android:name="android.intent.action.VIEW"/>
        <category android:name="android.intent.category.DEFAULT"/>
        <category android:name="android.intent.category.BROWSABLE"/>
        <data android:scheme="YOUR_CUSTOM_SCHEME"
                        android:host="YOUR_REDIRECT_HOST"/>
    </intent-filter>
</activity>
Note: Skip this step if you've already made these changes under section Define redirectURI above.
Now, You are all set to run your demo app.
As soon as app will launch, it will look like this
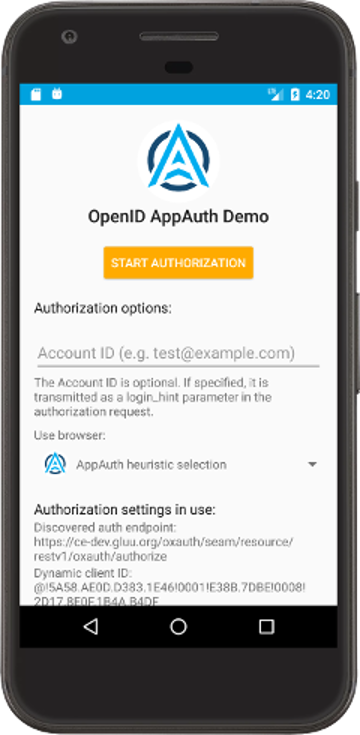
Congratulations, You've configured demo app correctly. Go ahead and click 'Start Authorization' button to make authorization request.
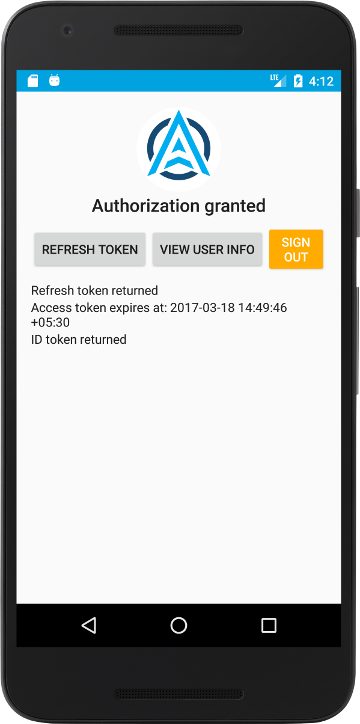
Authorization success will look like this
Auth Flow#
AppAuth supports both manual interaction with the OP where you need
to perform your own token exchanges, as well as convenience methods
that perform some of this logic for you. This example uses the convenience
method which returns either an AuthState object, or an error.
Tracking authorization state#
AuthState is a class that keeps track of the authorization and
token requests and responses, and provides a convenience method to
call an API with fresh tokens. This is the only object that you
need to serialize to retain the authorization state of the
session.Typically, one would do this by storing the authorization
state in SharedPreferences or some other persistent store private
to the app:
@NonNull
public AuthState readAuthState() {
  SharedPreferences authPrefs = getSharedPreferences("auth", MODE_PRIVATE);
  String stateJson = authPrefs.getString("stateJson");
  AuthState state;
  if (stateStr != null) {
    return AuthState.fromJsonString(stateJson);
  } else {
    return new AuthState();
  }
}

public void writeAuthState(@NonNull AuthState state) {
  SharedPreferences authPrefs = getSharedPreferences("auth", MODE_PRIVATE);
  authPrefs.edit()
      .putString("stateJson", state.toJsonString())
      .apply();
}
Configuration#
You can configure communication with Gluu server by specifying the endpoints directly:
AuthorizationServiceConfiguration config =
        new AuthorizationServiceConfiguration(name, mAuthEndpoint, mTokenEndpoint);
Or through discovery:
final Uri issuerUri = Uri.parse(`DISCOVERY_URI`);
AuthorizationServiceConfiguration config;

AuthorizationServiceConfiguration.fetchFromIssuer(
    issuerUri,
    new RetrieveConfigurationCallback() {
      @Override public void onFetchConfigurationCompleted(
          @Nullable AuthorizationServiceConfiguration serviceConfiguration,
          @Nullable AuthorizationException ex) {
        if (ex != null) {
            Log.w(TAG, "Failed to retrieve configuration for " + issuerUri, ex);
        } else {
            // service configuration retrieved, proceed to authorization...
        }
      }
  });
Additionally, AppAuth provides additional client configuration,
in order to control the browsers that can be used for the
authorization flow, or to control the HttpURLConnection
implementation that is used for token exchange. This can be done
by creating an AppAuthConfiguration object:
AppAuthConfiguration appAuthConfig = new AppAuthConfiguration.Builder()
    .setBrowserMatcher(new BrowserWhitelist(
        VersionedBrowserMatcher.CHROME_CUSTOM_TAB,
        VersionedBrowserMatcher.SAMSUNG_CUSTOM_TAB))
    .setConnectionBuilder(new ConnectionBuilder() {
      public HttpURLConnection openConnect(Uri uri) throws IOException {
        URL url = new URL(uri.toString());
        HttpURLConnection connection =
            (HttpURLConnection) url.openConnection();
        if (connection instanceof HttpsUrlConnection) {
          HttpsURLConnection connection = (HttpsURLConnection) connection;
          connection.setSSLSocketFactory(MySocketFactory.getInstance());
        }
      }
    })
    .build();
This configuration will only permit Chrome or Samsung Browser to
be used as a custom tab for authorization flows, and changes the
SSL socket factory to a hypothetical custom version
MySocketFactory. The modification of the socket factory is
useful for certificate pinning, or adding some additional
certificates to the trusted set (such as for testing).
This configuration is provided to AuthorizationService upon
construction:
new AuthorizationService(context, appAuthConfig);
Authorizing#
After configuring or retrieving an authorization service configuration, an authorization request can be constructed for dispatch:
AuthorizationRequest req = new AuthorizationRequest.Builder(
    config,
    clientId,
    ResponseTypeValues.CODE,
    redirectUri)
    .build();
Requests are dispatched with the help of AuthorizationService.
As this will open a custom tab or browser instance to fulfill
this request. An intent can be specified for both completion and
cancellation of the authorization flow:
AuthorizationService service = new AuthorizationService(context);
Intent postAuthIntent = new Intent(context, MyAuthResultHandlerActivity.class);
Intent authCanceledIntent = new Intent(context, MyAuthCanceledHandlerActivity.class);
service.performAuthorizationRequest(
    req,
    PendingIntent.getActivity(context, req.hashCode(), postAuthIntent, 0),
    PendingIntent.getActivity(context, req.hashCode(), authCanceledIntent, 0));
Handling the Redirect#
When the response is captured by RedirectUriReceiverActivity,
it is ultimately forwarded to the activity specified in your
completion intent, and can be extracted from the intent data:
public void onCreate(Bundle b) {
  // ...
  AuthorizationResponse resp = AuthorizationResponse.fromIntent(getIntent());
  AuthorizationException ex = AuthorizationException.fromIntent(getIntent());
  if (resp != null) {
    // authorization succeeded
  } else {
    // authorization failed, check ex for more details
  }
  // ...
}
The full redirect URI is also provided in your completion intent:
public void onCreate(Bundle b) {
  // ...
  Uri redirectUri = getIntent().getData();
  // ...
}
Given the auth response, a token request can be created to exchange the authorization code:
service.performTokenRequest(
    resp.createTokenExchangeRequest(),
    new AuthorizationService.TokenResponseCallback() {
      @Override public void onTokenRequestCompleted(
            TokenResponse resp, AuthorizationException ex) {
          if (resp != null) {
            // exchange succeeded
          } else {
            // authorization failed, check ex for more details
          }
        }
    });
If a confidential client is created through dynamic registration,
and the server expects the client to authenticate at the token
endpoint, the necessary client authentication must be supplied
in the token request. This can be simplified by making sure to
store the registration response in the AuthState instance,
then AuthState::getClientAuthentication can construct the
necessary client authentication:
service.performTokenRequest(
    resp.createTokenExchangeRequest(),
    state.getClientAuthentication(),
    new AuthorizationService.TokenResponseCallback() {
      @Override public void onTokenRequestCompleted(
            TokenResponse resp, AuthorizationException ex) {
          if (resp != null) {
            // exchange succeeded
          } else {
            // authorization failed, check ex for more details
          }
        }
    });
Making API Calls#
With an updated AuthState based on the token exchange, it is then possible to make requests using guaranteed fresh tokens at any future point:
AuthState state = readAuthState();
state.performActionWithFreshTokens(service, new AuthStateAction() {
  @Override public void execute(
      String accessToken,
      String idToken,
      AuthorizationException ex) {
    if (ex != null) {
      // negotiation for fresh tokens failed, check ex for more details
      return;
    }

    // use the access token to do something ...
  }
});