
This guide outlines the steps for deploying and configuring an Agama project on a Janssen server instance.
Deploying an Agama project
An Agama project is packaged as a .gama archive. To deploy a project on the Janssen Server, an administrator needs to obtain the .gama package of the Agama project and upload it to the server using one of the tools listed below.
- Using the TUI (Text based UI)
- Using the CLI
- Using the REST API
Deploying a community project from Agama Lab
The Janssen Server TUI tool is integrated with the Agama Lab’s Explore section where all the community projects are listed. This integration lets an administrator directly access the complete list of community projects from within the Janssen Server TUI tool. From the list, the administrator can select and deploy the project of choice without needing to download the .gama package and upload it manually.
Configuring an Agama project
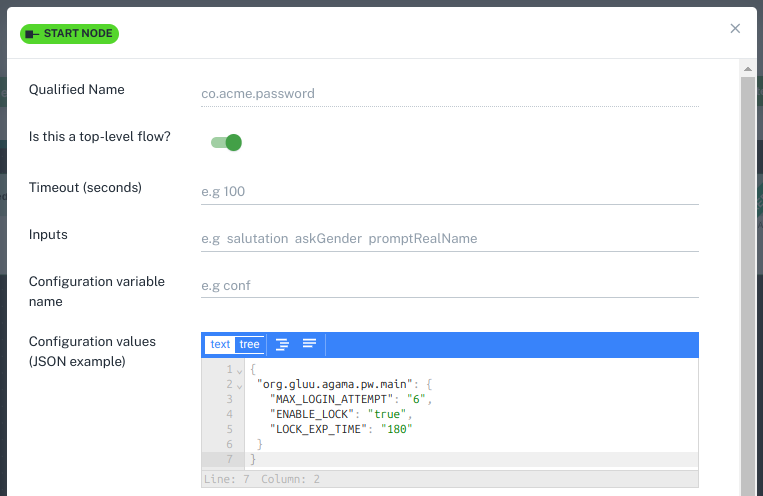
An Agama project may require configuration parameters as input in order to work properly. Agama project accepts configuration parameters in the JSON format. See an example below:
{
 "org.gluu.agama.pw.main":
  {
     "MAX_LOGIN_ATTEMPT": "6",
     "ENABLE_LOCK": "true",
     "LOCK_EXP_TIME": "180"
  }
}
Configuration parameters are used to control the behavior of an authentication flow contained within the Agama project. For example, how many times a user can retry and fail in a username and password authentication flow. Configuration parameters are also required to obtain deployment specific information. For example, which email server should be used to send out email OTP. It is upto the developer of the Agama project to decide which configuration parameters are required by the project.
What configuration parameters are required by the project?
An Agama project developer communicates the required configuration parameters needed by the project by providing a sample configuration JSON. This sample configuration JSON serves as a guide for the administrator when supplying the configuration values to the deployed project. A developer can publish the sample configuration JSON for a project in two ways:
Sample Configuration
An Agama project’s developer can publish the sample JSON configuration required for each flow in the project via the Configuration Values field in the Start node of the flow.
An administrator who is deploying the project can use this sample JSON as a guide. To retrieve this sample configuration the administrator can either open the .gama package and check project.json where the sample configuration is listed under the configs element. Alternatively, the administrator can use the TUI tool to download the sample configuration.
Using the project README
The Agama project developer may also publish the configuration JSON along with a description of each configuration element on the README file of the project’s release repository. See the configuration section on the README of the agama-pw project as an example.
Based on the sample JSON, the administrator should prepare the JSON configuration file with actual input values. The next step is to supply this JSON configuration to the Agama project that is deployed on the Janssen Server.