Office 365 configuration in Gluu Server v3#
This doc will guide you on how to setup a Gluu Server as your identity provider (IDP) for access to Office 365. By using a Gluu Server as your IDP you can bypass the process of storing passwords directly in O365.
Note
The attributes ObjectGUID and IDPEmail are mandatory for O365 SSO. The domain of IDPEmail must match the
registered domain as well.
Requirements#
- A Gluu Server with the Shibboleth IDP installed;
- An O365 account with administrative privilege.
Office 365 Configuration#
-
Create a test user from Office365 Admin Panel. Alternatively, you can use this doc to connect a backend Azure Active Directory (AD).
-
Register the domain from the Office365 (O365) Admin Panel from
Settings>DomainsVerifythe domain
-
Register Gluu Server in O365
-
Install/Use Windows Server 2012 R2
-
Install and Configure Windows Powershell cmdlets
-
Create a script and run through
Connect-MsolServiceor you can provide values inside O365 admin panel. -
For Gluu Server, values would be something like these:
-
ActiveLogOnUri                         : https://<hostname>/idp/profile/SAML2/SOAP/ECP
PassiveLogonUri                        : https://<hostname>/idp/profile/SAML2/POST/SSO
DefaultInteractiveAuthenticationMethod :
FederationBrandName                    : Gluu Inc.
IssuerUri                              : https://<hostname>/idp/shibboleth
LogOffUri                              : https://<hostname>/identity/logout
MetadataExchangeUri                    : https://<hostname>/idp/shibboleth
NextSigningCertificate                 :
OpenIdConnectDiscoveryEndpoint         :
Gluu Server Configuration#
Custom Attributes#
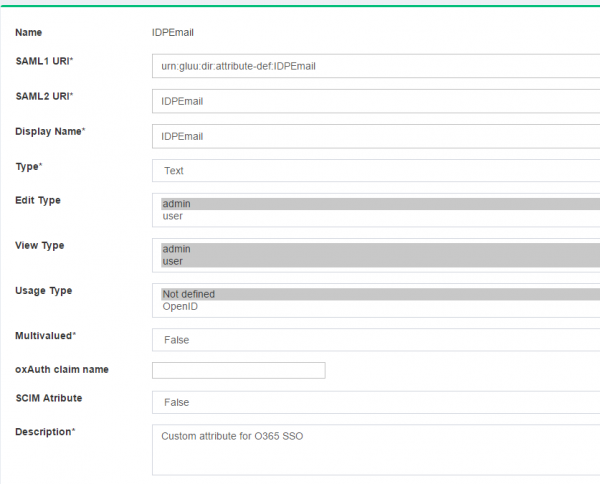
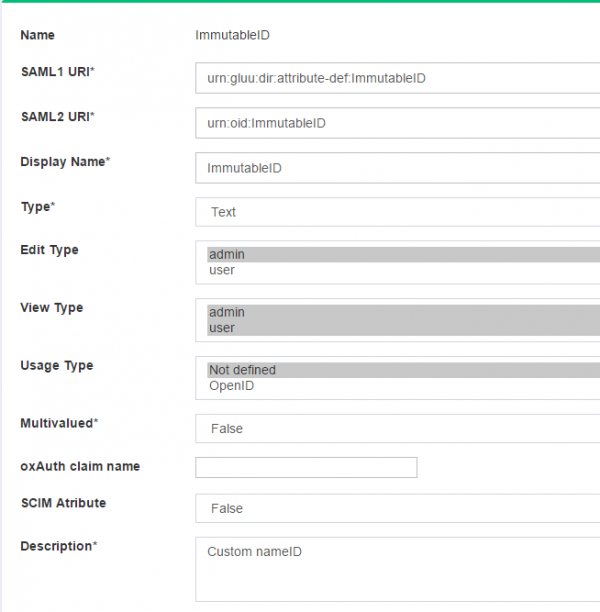
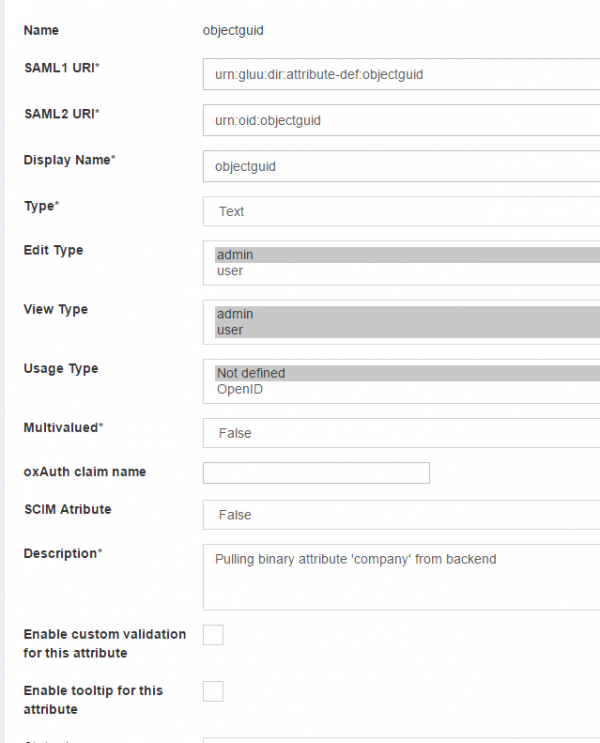
The configuration begins by creating a few custom attributes named IDPEmail, ImmutableID and objectguid.
Refer to this doc to create custom attributes.
objectguid syntax will be slightly different from other custom attributes.
objectGUID attributetype should be in the following syntax:
{

attributetype ( oxAttribute:1003 NAME 'objectGUID'
        SYNTAX 1.3.6.1.4.1.1466.115.121.1.5
       X-ORIGIN 'Gluu - custom person attribute' )

}
1. `IDPEmail` Custom Attribute

2. `ImmutableID` Custom Attribute

3. `objectguid` Custom Attribute

-
Edit the
attribute-resolver.xml.vmfile under/opt/gluu/jetty/identity/conf/shibboleth3/idpfolder.-
Add
$attribute.name.equals('ImmutableID')with the existing transientID and PersistentID to look like the snippet below##if( ! ($attribute.name.equals('transientId') or $attribute.name.equals('persistentId') or$attribute.name.equals('ImmutableID') ) ) -
Add
IDPEmailattribute definition<resolver:AttributeDefinition xsi:type="ad:Simple" id="UserId" sourceAttributeID="IDPEmail"> <resolver:Dependency ref="siteLDAP" /> <resolver:AttributeEncoder xsi:type="enc:SAML2String" name="IDPEmail" friendlyName="UserId"/> </resolver:AttributeDefinition> -
Add
ImmutableIDattribute definition<resolver:AttributeDefinition id="ImmutableID" xsi:type="Simple" xmlns="urn:mace:shibboleth:2.0:resolver:ad" sourceAttributeID="objectguid"> <resolver:Dependency ref="siteLDAP"/> <resolver:AttributeEncoder xsi:type="SAML2StringNameID" xmlns="urn:mace:shibboleth:2.0:attribute:encoder" nameFormat="urn:oasis:names:tc:SAML:2.0:nameid-format:persistent" /> </resolver:AttributeDefinition>
-
IDP configuration#
The cache refresh mechanism is used to populate the Gluu Server LDAP with data from a backend LDAP/AD. The objectGUID
attribute must be pulled from the backend data source to Gluu Server.
- Edit the
ox-ldap.properties(location:/etc/gluu/conf/ox-ldap.properties) to add the following:
binaryAttributes=objectGUID,objectguid
Note
objectGUID (the first one) is the attribute which contains binary values in the backend AD
and objectguid (the second one) is the Gluu Server binary attribute name which will pull value from objectGUID attribute
- Restart oxAuth, identity, and idp services
```
# service identity stop
# service identity start
# service oxauth stop
# service oxauth start
```
Identity Mapping#
Two attributes require for mapping:
- IDPEmail
- objectguid
IDPEmail pull data from backend's email attribute and objectguid get data from backend's objectGUID.
Create Trust Relationship#
Refer here to create trust relationships.
Configure Relaying Party#
Refer to Relaying Party Configuration for more details. Relaying Party configuration screen should look like below.
