SAML#
Overview#
SAML is an XML-based, open-standard data format for exchanging authentication and authorization data between an identity provider (like the Gluu Server) and a service provider (like Dropbox, O365, etc.). SAML is a stable and mature standard, and is well supported at many of the Internet's largest domains. However, the last major release of SAML was in 2005! Therefore it is important to understand when to use SAML and when to use a newer protocol like OpenID Connect to achieve your identity goals.
Refer to these four considerations to determine which protocol to use for single sign-on (SSO):
- If you have an application that already supports SAML, use SAML.
- If you need to support user login at an external IDP (like a customer or partner IDP), use SAML.
- If you have a mobile application, use OpenID Connect.
- If you are writing a new application, use OpenID Connect.
If you are continuing with the SAML documentation it is presumed your use case aligns with one or both of the first two bullet points above. If not, we recommend that you review the OpenID Connect portion of the Gluu Server docs.
Outbound vs. Inbound SAML#
There are two main SAML authentication workflows: outbound SAML and inbound SAML.
Outbound SAML can also be called SP-initiated Single Sign-On (SSO) or traditional SAML. In an outbound SAML transaction a website or application (SP) redirects a user to a designated Identity Provider (IDP) for authentication and authorization. The IDP asks for the user's credentials and upon successful authentication redirects the user to the protected content.
Inbound SAML enables an organization to offer SAML authentication as a front door to their digital service. Inbound SAML is a common requirement for SaaS providers who need to support the authentication requirements of large enterprise customers.
The typical user flow for inbound SAML is as follows:
- User tries to access your protected resource;
- User is redirected to a discovery page (presented by your IDP) that presents one or more external IDP's where the user may have an existing identity (their "home IDP");
- User selects their home IDP and is sent for authentication;
- Upon successful authentication at their home IDP, user is redirected back to your service with access to the protected resource.
The Gluu Server bundles separate components to support both workflows (installation of each component is optional during Gluu Server deployment):
-
For outbound SAML, the Gluu Server bundles the Shibboleth SAML IDP.
-
For inbound SAML, the Gluu Server bundles the Asimba SAML Proxy.
Documentation for each service follows in the sections below.
Outbound SAML (Shibboleth)#
Outbound SAML can also be called SP-initiated Single Sign-On (SSO) or traditional SAML. In an outbound SAML transaction a website or application (SP) redirects a user to a designated Identity Provider (IDP) for authentication and authorization. The IDP will ask for the user's credentials and upon successful authentication, the user is sent back to the SP logged in.
In order for this transaction to happen successfully there must be pre-established trust between the IDP and the SP. In the Gluu Server, the IDPs SSO configuration is called a Trust Relationship (TR). The following sections cover how to create a TR in the Gluu Server.
Note
For any outbound SAML transaction, a trust relationship must be created in the IDP.
Trust Relationship Requirements#
Each Trust Relationship requires the infomation listed below.
Metadata of the SP
Metadata is an XML file which has configuration data used to establish trust between the website (SP) and IDP (Gluu Server). Websites (SP) can provide metadata via a URL or as a separate file. Metadata can change, so a static URL typically requires the least amount of ongoing maintenance.
Metadata of the Gluu Server
The Gluu Server's SAML metadata may be needed from time to time. It can be found at https://hostname/idp/shibboleth.
Attribute Release
Each SP may require one or more user attributes in order to grant a person access to a protected resource. Required attributes vary depending on the application, and should be explicitly listed in the target application's documentation. The Gluu Server ships with
certain preconfigured attributes and also supports the creation of custom attributes. Once the attributes are available in the Gluu Server, the administrator can use the oxTrust interface to release the necessary attributes to the SP (as described below). For a broader discussion of attributes, including how to create custom attributes, check the attributes section of the documentation.
NameID#
Refer to the attributes section of the documentation to learn how to configure the NameID attribute for your SAML SSO service.
Create a Trust Relationship in the Gluu Server#
- Go to
SAML>Trust Relationships - Click on
Add Trust Relationship - A new page will appear where you can provide all the required information to create a Trust Relationship(TR).
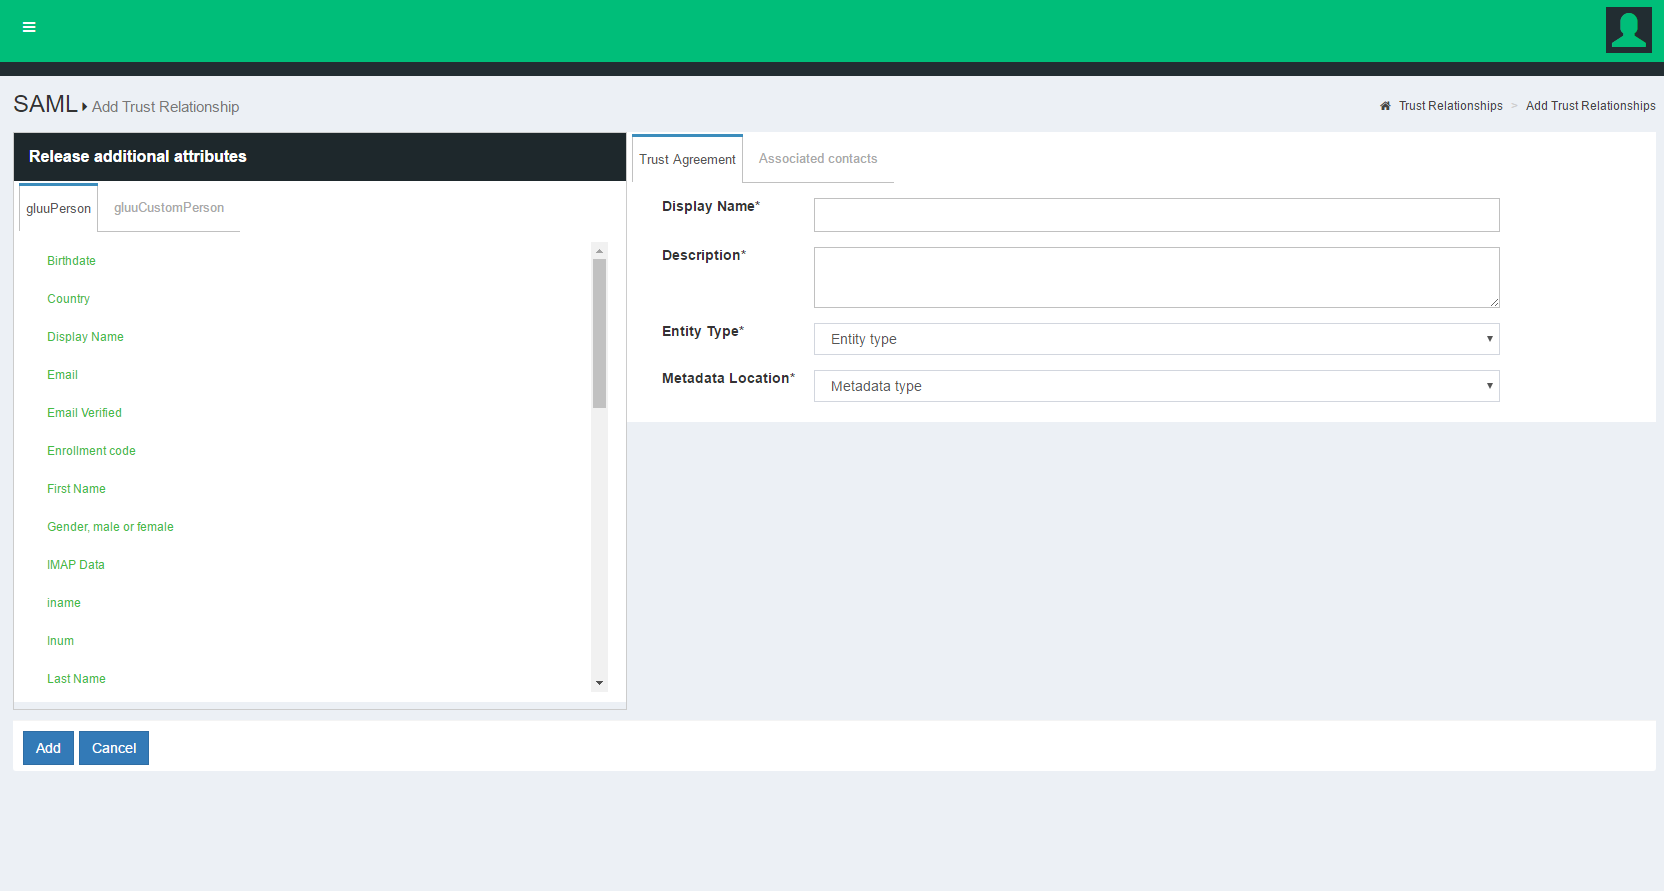
- Display Name: Name of the Trust Relationship (it should be unique for every trust relationship)
- Description: Little description. Purpose and SSO link can be added here.
-
Metadata Type: There are four available options to choose from. The correct Type depends on how the SP is delivering Metadata to your IDP.
- None
- File: Choose File if the SP has provided an uploadable metadata document in XML format.
- URI: Chose URI if the SP metadata is hosted on a URI that is accessible from the Internet.
- Generate: Choose Generate if the SP is an "inhouse application" or the “Shibboleth SP” is going to be installed in the target application (SP). This option will generate a how-to guide for installing the Shibboleth SP. If you plan on using the Generate method, please note the following:
* URL : This is the hostname of the SP.
* Public certificate : You must provide the certificate, which is a Base64 encoded ASCII file, and contain "-----BEGIN CERTIFICATE-----" and "-----END CERTIFICATE-----". This certificate can not be password protected.
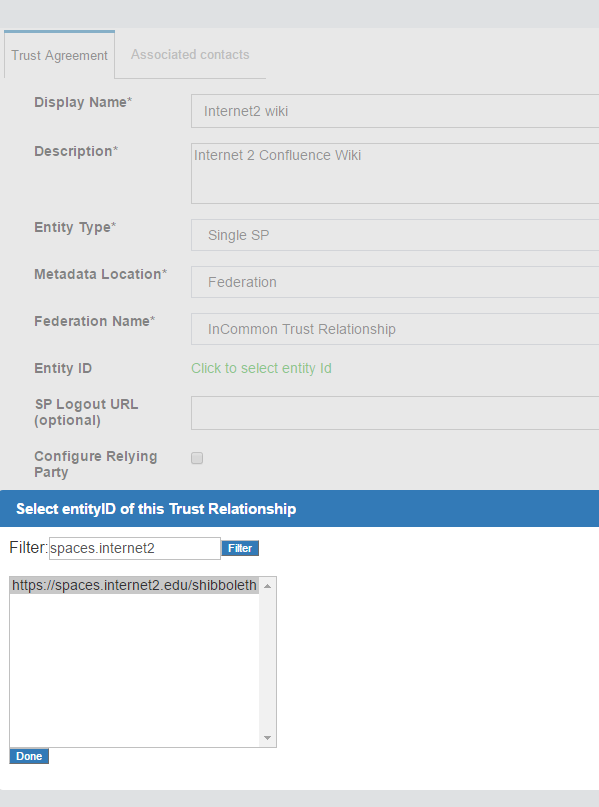
* After creating the Trust Relationship, download the generated configuration files from theDownload Shibboleth2 configuration fileslink and place these configuration files inside your SP configuration. - Federation: Choose this option if the target application (SP) is affiliated with a federation service (e.g. InCommon, NJEdge etc.). Once you select “Federation” as the Metadata Type, another drop down menu called “Select Federation” will appear. From this drop menu you can select the appropriate federation. After selecting the “Federation Name”, a new link called “Click to select entity id” will appear. Use this link to find and select the SP entityIDs that you wish to create SSO with. Learn how to establish trust with a federation below.
-
Released: The SPs required attributes must be added to this panel. The required attributes can be selected from the menu on the left with the heading “Release Additional Attributes”.
- Entity Type: You have two options to choose for entity type.
- Single SP:
- Federation/Aggregate
The Trust Relationship(TR) is added by clicking the Add button located in the lower left side of the page.
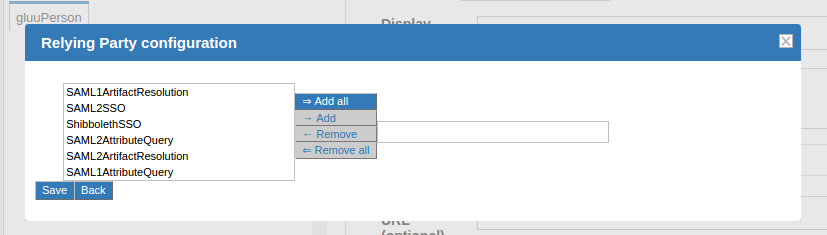
Relying Party Configuration#
If the target application does not already support SAML, the Relying Party software must be configured. The relying party configuration is accessible on the TR Creation page. The checkbox Configure specific Relying Party must be checked.

The checkbox will result in a link which can be accessed to find information about configuring the relying party for the TR. The image below shows the relying party config panel from which the administrator can add the specific option.
Note
If the target application does not already support a federation standard like SAML, and you or the developer are planning on adding federation to the application, we strongly recommend using OpenID Connect rather than SAML. OpenID Connect is newer, easier to use, and follows modern best practices. Learn more in our blog: OAuth vs. SAML vs. OpenID Connect.
Federation Configuration#
If the SP is part of an identity federation such as InCommon, the administrator must add the federation as an SP in the Gluu Server. This will enable the administrator to more easily create TRs with SPs in the federation. The example below shows how an administrator would add a TR for the InCommon Federation.
Once a TR has been established with the federation, the Gluu Server administrator can easily create TRs with any SP included in the federation by selecting the federation from the Federation Name drop down menu and selecting the entity-id for the SP. As for example here we are creating 'Internet2 Wiki' Trust Relationship which is InCommon affiliated ( that means, SP's entityID is available in InCommon metadata ).
Inbound SAML (Asimba)#
Inbound SAML allows users from external domains to login at their home identity provider to gain access to resources protected by the Gluu Server. The Gluu Server uses an open source product called Asimba to normalize inbound SAML.
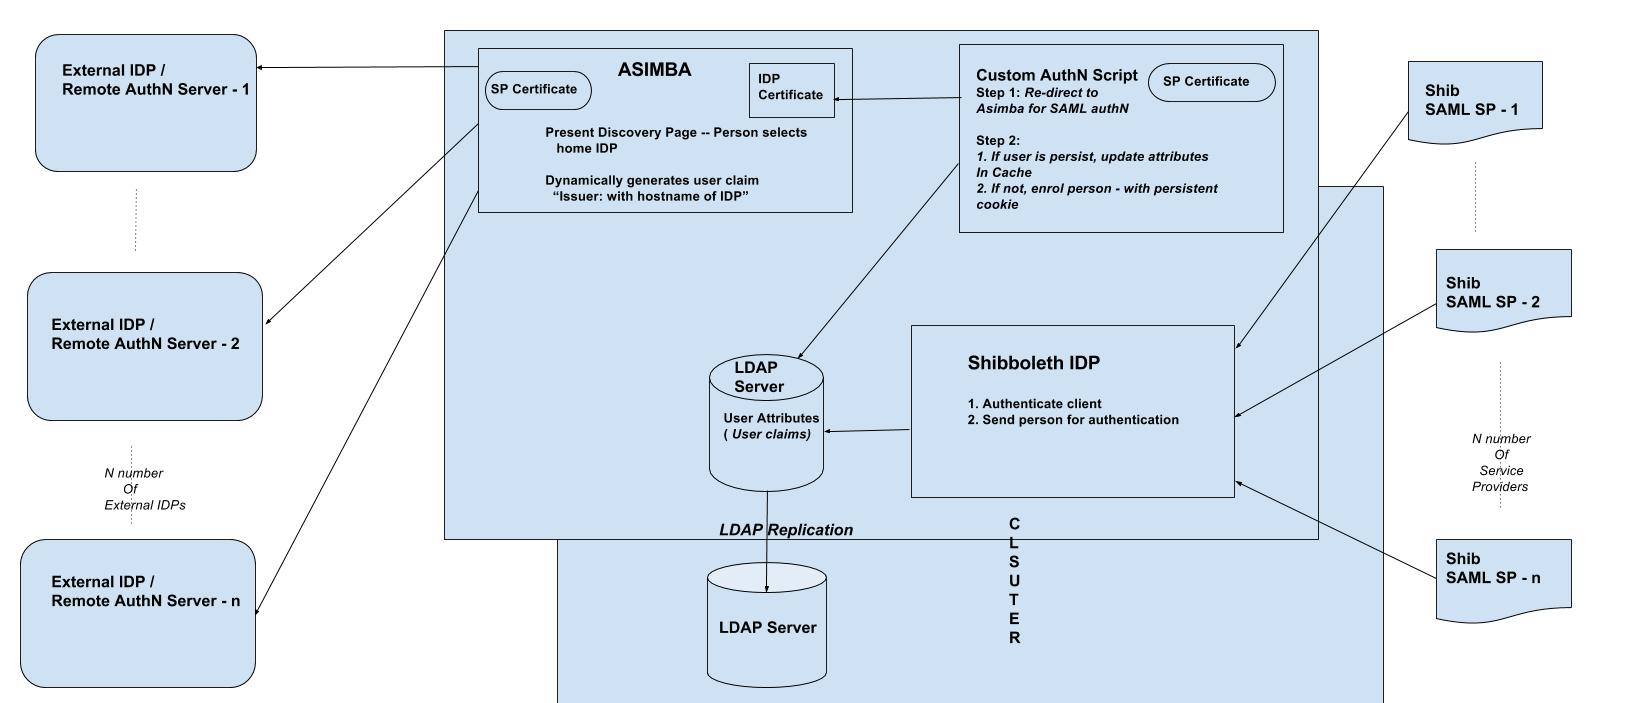
End to End configuration of Asimba in Gluu Server v3#
For this documentation we used three demo servers:
- https://[proxy3_hostname] is the Gluu server v3 with Shibboleth and Asimba installed along with other default components.
- https://[idp_hostname] is the remote authentication Gluu server v2 with Shibboleth installed with other default components.
- https://[sp_hostname] is the remote SP Gluu Server with the Shibboleth SP v26 installed.
This doc is divided into three major parts. Configuration in proxy server, configuration of remote AuthN server and Service Provider. In this whole setup we are using Gluu Servers, it's associcated open source pieces and all other well developed and maintained softwares like Shibboleth Service Provider.
Let's start!
Gluu-Asimba Server Configuration#
Custom interception script named 'asimba' configuration#
- Log into oxTrust
- Configuration -> Manage Custom Script
- Script name 'asimba'
- asimba_saml_certificate_file: /etc/certs/saml.pem [ Make sure you copy ingredient of
asimba.crtintosaml.pemwith "BEGIN CERTIFICATE" and "END CERTIFICATE" header and footer] - asimba_entity_id: https://[proxy3_hostname]/saml
- saml_deployment_type: enroll
- saml_use_authn_context: false
- saml_idp_sso_target_url: https://[proxy3_hostname]/asimba/profiles/saml2/sso/web
- user_object_classes: eduPerson, gluuCustomPerson
- saml_idp_attributes_mapping: {"uid": ["uid"], "mail": ["mail"], "issuerIDP": ["issuerIDP" ] }
- enforce_uniqueness_attr_list: issuerIDP, uid
- saml_generate_name_id: true
- asimba_saml_certificate_file: /etc/certs/saml.pem [ Make sure you copy ingredient of
SP Requestor#
- Create a SAML metadata for native SP requestor of asimba. Grab the copy of from below and replace [proxy3_hostname] with your own server's hostname. Make sure to unix format it.
- SAML -> SP Requestors
- 'Add SP Requestor'
- ID: https://[proxy_hostname]/saml
- Friendly Name: oxAuth SAML
- Metadata URL: Not required
- Metadata Timeout: -1
- Metadata File: Upload the custom metadata we created couple of mins back.
- Trust Certificate File: Not required
- Properties: Not required
- Enabled: Yes
- Signing: No
Add External IDP/AuthN Server#
- SAML -> IDPs
- 'Add IDP'
- ID: EntityID of remote IDP. i.e. https://[idp_hostname]/idp/shibboleth
- Friendly Name: Remote AuthN Server 1
- Metadata URL: Not required
- Metadata Timeout: -1
- Metadata File: upload metadata
- Trust Certificate File: Grab SAML metadata from remote IDP and upload that. This certificate must be no password protected and x509 format crt. If remote IDP is another Gluu Server then grab 'shibIDP.crt' from /etc/certs/ of that server.
- NameIDFormat: urn:oasis:names:tc:SAML:2.0:nameid-format:transient [ If your remote AuthN server is also a Gluu Server ]. This NameID might vary according to various types of AuthN server.
- Enabled: Yes
- Send Scoping in AuthNRequest: Yes
- AllowCreate: Yes
- Disable SSO for IDP: No
- ACS index: Yes
- Send NameIDPolicy: Yes
- Avoid Sujbect Confirmations: No
asimba.xml file configuration#
- Modification of 'asimba.xml' file:
- location:
/etc/gluu/conf/asimba/asimba.xml - Enable and uncomment whitelist of attributes:
<gather> <attribute name="whitelist-attribute-name" /> </gather> - Allow all released attributes, add this
<attribute name="*" />in attribute release policy:<attributerelease class="com.alfaariss.oa.engine.attribute.release.configuration.ConfigurationFactory"> <policy id="asimba.releasepolicy.1" friendlyname="Default Attribute Release policy" enabled="true"> <attribute name="firstname" /> <attribute name="lastname" /> <attribute name="email" /> <attribute name="role" /> <attribute name="country" /> <!-- country is defined in <global ..> attribute section --> <attribute name="*" /> ... ... - Restart asimba service with 'service asimba restart'
Create custom attribute 'issuerIDP'#
You need to create a custom attribute named 'issuerIDP' in this stage. Here is how you can create custom attributes.
Remote AuthN Server Configuration#
Create Trust Relationship#
- Download you Asimba server's metadata with https://[proxy3_hostname]/asimba/profiles/saml2 and save it as 'gluu_asimba_server_metadata.xml'
- Log into Authentication server oxTrust ( or, management console GUI )
- Create a new trust relationship with this metadata which you just downloaded.
- Relying Party Configuration:
- SAML2SSO Profile:
- signResponses: conditional
- signAssertions: never
- signRequests: conditional
- encryptAssertions: never
- encryptNameIds: never
- Attribute: Release transientID and Username attribute
New test user registration#
Enable 'User Registration' module:#
- Log into oxTrust
- 'Manage Custom Scripts'
- 'User Registration' tab
- Custom property: enable_user = true
- 'Enable' it
- Hit 'Update'
New user registration#
- Hit 'https://[idp_hostname]/identity/register
- Fill up the form and new user will be registered
- We will use this user to test our SSO
Remote SP Configuration#
Shibboleth SP installation#
- Prepare your SP instance by following this doc: https://gluu.org/docs/ce/3.0.2/integration/webapps/saml-sp/#super-quick-ubuntu-shib-apache-install
shibboleth2.xml configuration#
- Download Shibboleth metadata of your Gluu-Asimba server with 'https://[prox3_hostname]/idp/shibboleth'
- Put it inside /etc/shibboleth/ location
- Modify 'shibboleth2.xml' file like below:
- SSO entityID:
<SSO entityID="https://[proxy3_hostname]/idp/shibboleth" discoveryProtocol="SAMLDS" discoveryURL="https://ds.example.org/DS/WAYF"> SAML2 SAML1 </SSO> - Metadata provider:
<MetadataProvider type="XML" file="proxy3_gluu_org_shib.xml"/> - Restart shibd and apache2
Trust Relationship in Gluu-Asimba server#
We need to create a trust relationship in Gluu-Asimba server with Shibboleth SP metadata.
- Log into oxTrust
- Grab Shibboleth SP metadata. You can get that with https://[sp_hostname]/Shibboleth.sso/Metadata
Test SSO#
- Log into Gluu-Asimba server.
- 'Manage Custom Scripts'
- 'Person Authentication' tab
- 'Enabled'
basicauthentication script - 'Enabled'
asimbaauthentication script
- 'Enabled'
- 'Manage Authentication'
Files#
Requestor metadata:#
<md:EntityDescriptor xmlns:md="urn:oasis:names:tc:SAML:2.0:metadata" entityID="https://[proxy_hostname]/saml">
  <md:SPSSODescriptor protocolSupportEnumeration="urn:oasis:names:tc:SAML:2.0:protocol">
    <md:AssertionConsumerService Binding="urn:oasis:names:tc:SAML:2.0:bindings:HTTP-POST" Location="https://[proxy_hostname]/oxauth/postlogin" index="0"/>
  </md:SPSSODescriptor>
  <md:Organization>
    <md:OrganizationName xml:lang="en">Gluu</md:OrganizationName>
    <md:OrganizationDisplayName xml:lang="en">Gluu - Open Source Access Management</md:OrganizationDisplayName>
    <md:OrganizationURL xml:lang="en">http://www.gluu.org</md:OrganizationURL>
  </md:Organization>
  <md:ContactPerson contactType="technical">
    <md:GivenName>Administrator</md:GivenName>
    <md:EmailAddress>support@gluu.org</md:EmailAddress>
  </md:ContactPerson>
</md:EntityDescriptor>