Inbound SAML#
Overview#
This document provides instructions for configuring the Gluu Server to support user authentication at one or more external SAML IDPs (a.k.a. inbound SAML). For a quick overview of key concepts associated with "inbound identity", visit the introductory page.
Enable Passport#
Make sure the Gluu Server installation already has Passport installed. Then perform the following:
-
Enable the custom script
- In oxTrust, navigate to
Configuration>Manage Custom Scripts - Navigate to the
Person Authenticationtab, expand the script labelledpassport_saml, checkenabled, and clickUpdate
- Navigate to the
UMA RPT Policiestab, expand the script labelledscim_access_policy, checkenabled, and clickUpdate
- In oxTrust, navigate to
-
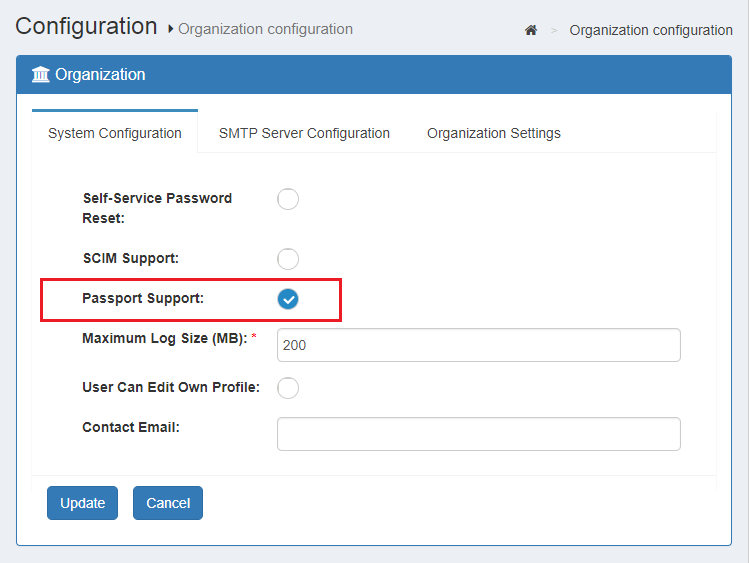
Enable Passport support
- In oxTrust navigate to
Configuration>Organization configuration>System configuration - In
Passport supportchooseEnabled - Click
Update
- In oxTrust navigate to
Once the steps above are performed, the TCP port 8090 appears ready to accept connections.
Integrate IDPs for inbound SAML#
Follow these steps to integrate an external IDP for inbound SAML:
Note
Ensure the machine(s) running Passport have access to the SAML provider you are trying to connect to.
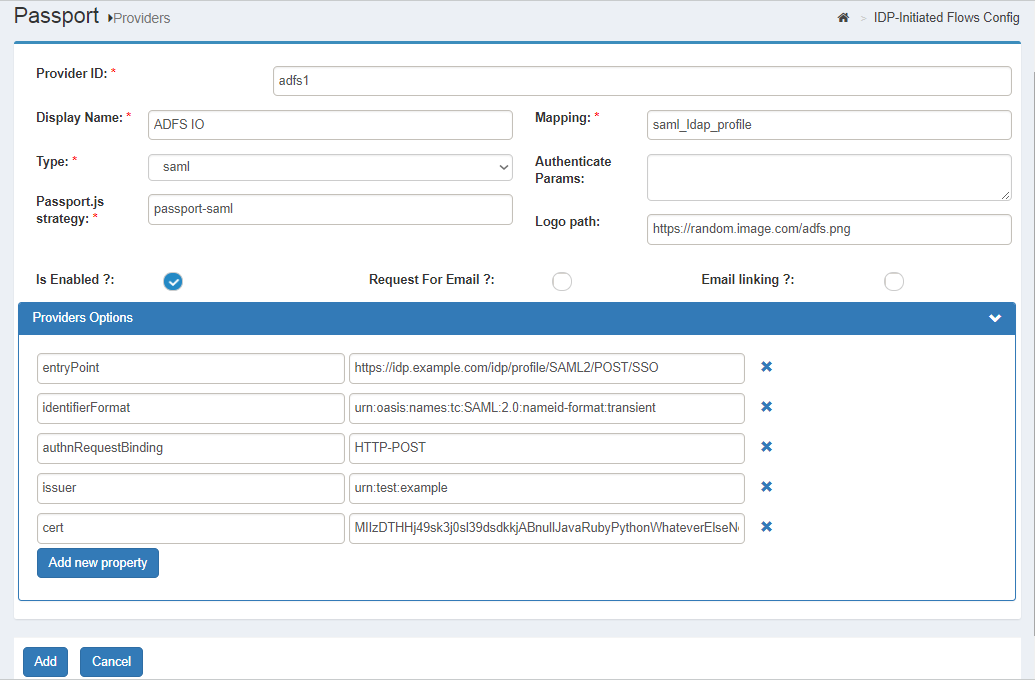
Add the IDP in the admin UI#
-
In oxTrust, navigate to
Passport>Providers -
Click on
Add new provider -
Enter an identifier for this provider (letters, digits, and underscore characters allowed). Check here to learn more about identifiers usage
-
Enter a display name for the IDP
-
In
type, choose "saml" -
Optionally, supply a
logo pathfor this provider. Check this section of the introductory page to learn more -
Check
Is enabled(unless there is a reason to leave this provider integration temporarily disabled) -
It's not required to check
Request For EmailorEmail linkingunless implementing custom flow behavior
As mentioned earlier in the introduction to inbound identity, Passport reuses Passport.js strategies to integrate a variety of identity provider "flavors". For IDPs, the passport-saml strategy is used. This strategy is highly customizable via configuration parameters, which are specified in the "Provider options" panel.
By default, only a small set of parameters for a working setup are shown in the options panel:
entryPoint: URL to which SAML requests can be sent toidentifierFormat: Identifier format to request from IDPauthnRequestBinding: SAML binding for requesting authentication, onlyHTTP-POSTorHTTP-Redirectare supported. If not provided, the default isHTTP-Redirectissuer:entityIDof Passport as SP (eg.urn:test:example). You can use different values or the same across different added IDPscert: The IDP's public PEM-encoded X.509 certificate used to validate incoming SAML responses. Include only the body of the certificate: suppress theBEGIN CERTIFICATEandEND CERTIFICATElines, any whitespace, and all line breaking characters (new line/carriage return). As for example if your remote IDP is another Gluu Server, you need to grab theidp-signing.crtfrom that server. Command can be used:cat /etc/certs/idp-signing.crt | grep -v '^---' | tr -d '\n';
Note
Regarding the value of cert, if you are using Shibboleth bundled in a Gluu Server instance, visit https://<remote-gluu-host>/idp/shibboleth and see the contents of XML tag KeyDescriptor where use="signing" inside IDPSSODescriptor tag.
Supply extra properties if needed#
Add other properties you might consider relevant. For details on this topic you can check passport-saml repo documentation. If not specified, the following properties will be added by default:
| Property | Value | Description |
|---|---|---|
| validateInResponseTo | true | More info here |
| requestIdExpirationPeriodMs | 3600000 | More info here |
| decryptionPvk | Contents of /etc/certs/passport-sp.key | Private key that will be used to attempt to decrypt any encrypted assertions received |
| decryptionCert | Contents of /etc/certs/passport-sp.crt | Public certificate matching decryptionPvk |
To be more precise, decryptionPvk and decryptionCert correspond to items Passport SP Decryption cert and Passport SP Decryption Private key found in the basic configuration page. In oxTrust visit Passport > Basic Configuration to see these values.
In case you are interested in signing the authentication requests, you can supply privateCert (a RSA-SHA1 PEM private key). More details here.
Cache Provider configuration#
When validateInResponseTo is set to true, a simple in-memory cache is used to store the IDs of the SAML requests sent by Passport. Then the InResponseTo of SAML responses are validated against the cache. Check here to learn more.
This cache can lead to validation errors when the Gluu Passport environment consists of more than one server (such as a clustered setup). To account for this scenario, we provide means so that a Redis or memcached can be used for this purposes. In most cases, a clustered Gluu installation already leverages a memcached or Redis cache, so we can reuse it here.
Redis#
To use this cache, add a property named redisCacheOptions whose values is a dictionary with keys as explained here as its value.
The following is an example for redisCacheOptions value. Note that keys are wrapped with " and string values use " instead of ':
{ "host": "server.co", "port": 6379, "password": "secret" }
Note
Navigate in oxTrust to Configuration > JSON configuration > Cache provider configuration. If cacheProviderType is set to REDIS, you are safe to go and can reuse some of the parameters found under the redisConfiguration section for redisCacheOptions.
Memcached#
To use this cache, add a property named memcachedCacheOptions whose value is a dictionary with keys server_locations and options (the latter is optional). To learn more on how to supply those values check the docs of the underlying client we employ.
This is an example for a memcachedCacheOptions value:
{ "server_locations": "my.memcached.org:11211"}
Register Passport metadata with external IDP#
Passport will automatically generate SP metadata for every enabled IDP added through the admin UI. The next step is to register this metadata at every external IDP.
Metadata can be accessed in a browser at https://<your-gluu-host>/passport/auth/meta/idp/<PROVIDER-ID> where PROVIDER-ID is the identifier assigned to the IDP added. In oxTrust, navigate to Passport > Providers and see the ID column in the providers table. Metadata can also be found in the Gluu chroot under /opt/gluu/node/passport/server/idp-metadata.
Registering metadata contents at remote IDPs is a process that may differ across IDP implementations. As an example, when the remote IDP is another Gluu Server, a trust relationship should be created. Review the corresponding documentation for your IDPs.
Apply the required configuration at the IDP so the appropriate attributes are released to the SP.
Configure attribute mapping#
A mapping is a mechanism that defines how the profile data released by the IDP is saved to local Gluu LDAP (see attribute mapping. By default, IDPs use the saml_ldap_profile mapping, based on the X.500/LDAP Attribute Profile.
To learn more about how mappings work, check the tutorial. Also review the file /opt/gluu/node/passport/server/mappings/saml_ldap_profile.js in the Gluu chroot. If the mapping does not suit your needs or requires adjustment, create a new mapping file based on the default, rather than editing the default mapping file. You may also check the saml_basic_profile, which is based on the SAML Basic Attribute Profile.
Provide the name (excluding the extension) of the mapping file to use in the providers details form (in the mapping field).
Make use of passport_saml authentication#
To offer inbound SAML from an OpenID Connect application, use the same steps described for Social Login, except the acr value has to be passport_saml.
Checking user profile#
To check the actual profile data received during the authentication transaction, review the logs and search for a message starting with "Resulting profile data is". To view this message, set the logging level to debug and wait for the server to pick up the change.
IDP-initiated inbound flow#
Overview#
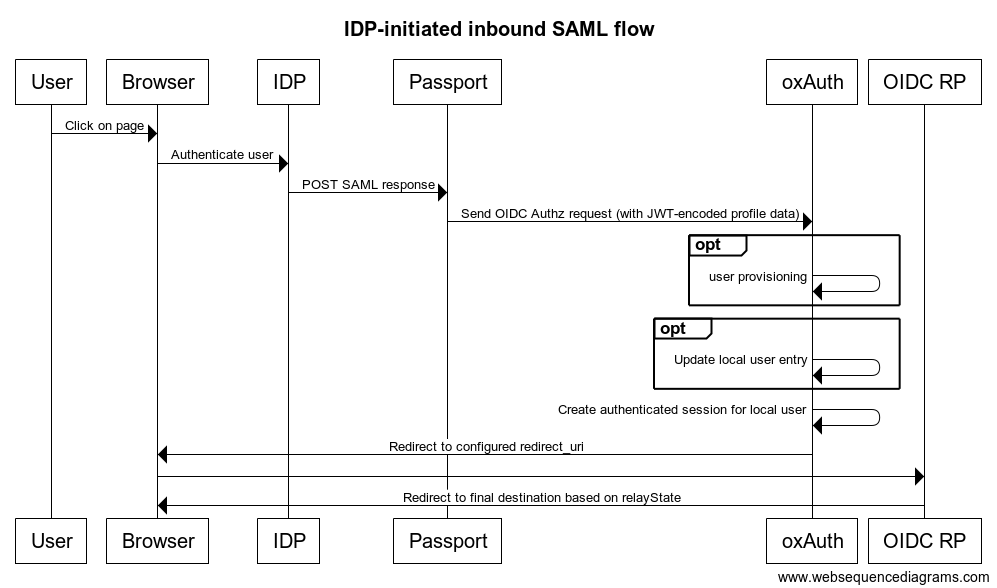
In certain circumstances, an external IDP may initiate the authentication flow by delivering a SAML response without any previously existing SAML request. This is called IPD-initiated inbound SAML.
Gluu handles this scenario by examining the SAML inResponseTo attribute to detect whether the SAML response is unsolicited (i.e. not associated with preliminary SAML requests). If inResponseTo is missing, it is considered an action initiated by an external IDP.
When this kind of request is received by Passport, the usual profile mapping takes place, and then the profile data is sent (encoded) in the parameters of an OpenID Connect authorization request to the Gluu Server. The request is processed by oxAuth and the user provisioning occurs locally, as it does with the standard flow.
Finally, this will generate a redirect to a URL whose handler logic should be able to take the user to its final destination. This logic can be deemed part of an OpenID Connect Requesting Party (the analog of an SP in the SAML world).
The following diagram depicts the flow:
About the Assertion Consumer Service (ACS) URL#
Unsolicited SAML responses can be posted to the URL shown in the field labeled "Callback URL" (see the provider's detail form). The URL looks like
https://<your-gluu-host>/passport/auth/saml/<PROVIDER-ID>/callback
where PROVIDER-ID is the identifier assigned to the given IDP. This is the same endpoint used in the regular flow where SAML requests are preliminary sent to the IDP.
Configuring the flow#
To facilitate the process described above, Gluu includes the following to minimize the amount of configuration and coding required:
- A pre-existing OpenID client to be used to issue the authorization request
- UI forms in oxTrust to easily configure the parameters of the authorization to generate per registered IDP in Passport
- A sample redirection page that sends the user's browser to a URL (previously passed as
relayStatein the initial SAML response)
To enable IDP-initiated inbound capabilities for an existing IDP, follow these steps:
- Navigate to
Passport>IDP-initiated flows config - Click the
Addbutton - Choose the IDP you want to enable usage of IDP-initiated flow
- Accept the defaults and click on
Save
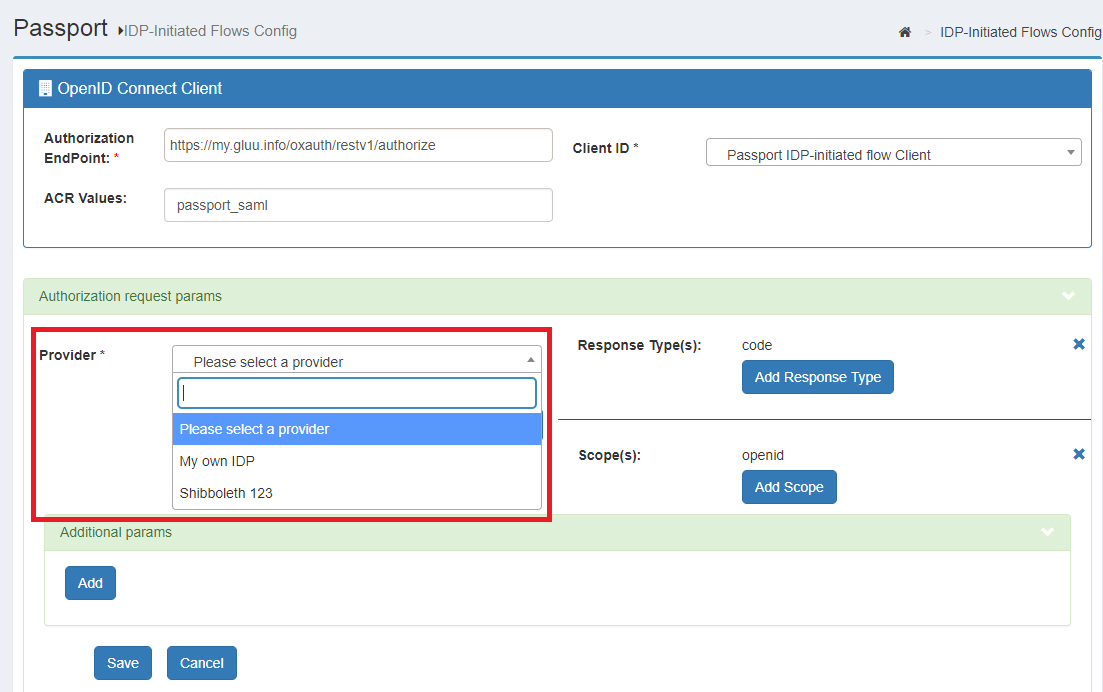
From here on, if the IDP sends an unsolicited response to Passport ACS, an OIDC authorization request will be issued using the client that appears selected on the top of the form (by default the "Passport IDP-initiated flow Client"). After the user is authenticated in Gluu, a redirection will be made to https://<your-gluu-host>/oxauth/auth/passport/sample-redirector.htm that will simply change the browser's location to the value of the relayState (which is assummed to be a valid URL).
Note
The authorization request generated can be customized by supplying values for parameters response_type, scope, and more by clicking on Add under the Additional params panel (fill name/value in the left/right fields respectively).
Customization#
The IDP-initiated flows config page in oxTrust provides default values for a working setup with minimal effort. To tweak the behavior, you have to build your own redirect page. There you can handle relayState as desired and potentially show options in the event relayState is absent. Learn how to retrieve this value checking the source code of the sample-redirector.htm:
- Login to chroot
- Run
jar -xf /opt/gluu/jetty/oxauth/webapps/oxauth.war auth/passport/sample-redirector.xhtml
Remember to provide the new redirect URI in oxTrust (Passport > IDP-initiated flows config) for the IDP of interest. Changes may take up to 1 minute to take effect.
Note
The page will receive the typical parameters of an OIDC authentication response in the HTTP request. Do not transfer those parameters to other requests/redirects that the handler logic may perform.
Using the demo app#
Warning
This is a minimalistic web application developed with the sole purpose of showcasing how inbound SAML can be achieved with Passport. It is strongly discouraged to leave it running indefinitely on a production server.
The "Inbound SAML Demo" application is a small Node.js app that provides an easy way to test the Inbound SAML scenario. The project requires node to be installed on the machine where the app will run. Optionally, and for the sake of simplicity, we recommend reusing the Node.js setup of your Gluu Server where Passport is running.
Follow the guidelines below to run the Demo app in your Gluu Server host:
Web UI configuration steps#
-
Log in to the oxTrust web UI as an administrator
-
Navigate to the
OpenID Connect>Clientspage, and register a new OIDC client to your Gluu Server with the following required properties:- Redirect login URI:
http://passport-saml-demo-app.example.com:3000/profile/ - Grant types:
authorization_code - Response types:
codeandid_token - Scopes:
openid,email,user_nameandprofile - Client secret: an non-empty value
- Redirect login URI:
-
Go to
Configuration>JSON configuration>oxAuth configuration- Scroll down to
authorizationRequestCustomAllowedParametersand click on the plus icon - Enter
preselectedExternalProvider - Save the configuration
- Scroll down to
-
Update the Passport custom script to read the custom parameter
- Navigate to
Configuration>Custom scripts - In
Person Authenticationtab, expand the script labelledpassport_saml - Click
Add new propertyand enterauthz_req_param_providerin the left field - In the right field, enter the name of the custom parameter (e.g.
preselectedExternalProvider) - Press
Updateat the bottom
- Navigate to
Console configuration steps#
-
Log in to the Gluu chroot container.
-
Ensure the VM has internet access and that incoming connections to TCP port 3000 are allowed to reach applications running on this machine.
-
Switch to "node" user with
su - node. -
Download and extract the project files.
-
Edit the file
server.js. In the line that readslet idps = ..., supply the IDs of the SAML IDPs you have added so far, e.g['Shib_123', 'OktaCore'] -
Edit the file
client-config.jsonfile and provide proper values forClientID(theinumof the client created in oxTrust),clientSecret, andhostname(the FQDN of this Gluu Server instance). -
Initialize the Demo app:
-
$ cd ~/Inbound-SAML-Demo/ -
$ npm install
-
-
Run the
$ node server.jsapplication. You can stop the app if needed by hittingCtrl + Cat any moment.
Note
Starting the demo app as described above will render the SSH session unusable while allowing you to see useful debug output, redirected to stdout. If necessary, start another SSH session in a separate console window for other tasks.
Test Passport#
-
In the machine where you will run this test, add a host entry so that the name
passport-saml-demo-app.example.comresolves to the IP address of the machine where the demo app was installed. -
Open a web browser and navigate to
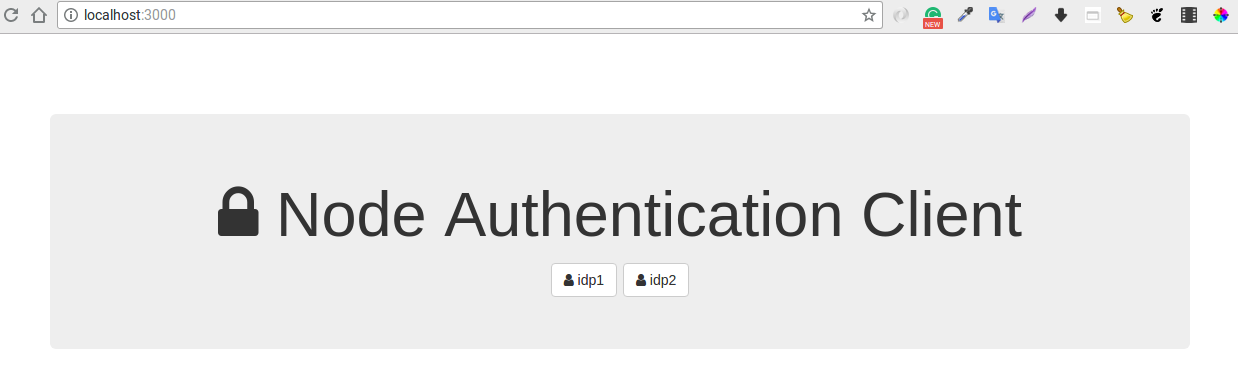
http://passport-saml-demo-app.example.com:3000. -
Select one of the displayed IDPs to initiate external authentication.
-
After logging in at the IDP, you will be redirected back to Gluu Server, where you might be prompted to authorize release of your personal data to the Demo app.
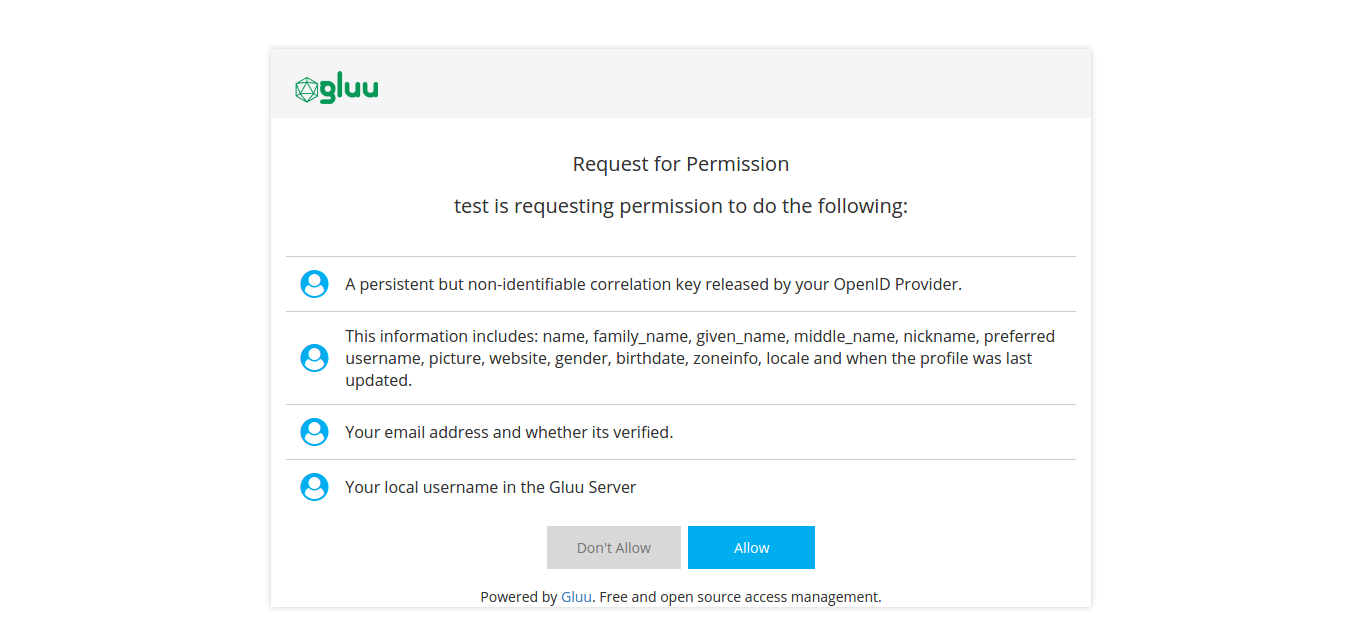
-
After consenting to release the requested claims, you'll be sent to the Demo app with an authorization code that is needed for retrieving your personal data.
-
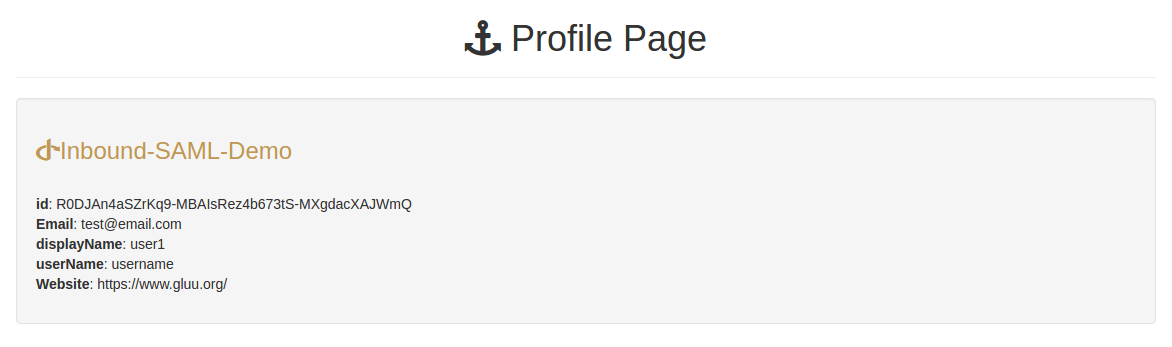
The application will display retrieved claims on the "/profile" page
See the Demo in action in this video.
Troubleshooting tips#
If there are any issues during setup or testing, consider the following:
-
Make sure that the system clocks are synchronized between all the machines that participate in the flow (NTP is recommended.) When clocks are out of sync, it's known to cause a hard-to-troubleshoot "infinite loop" (a non-ending redirection across a given set of pages).
-
Some IDPs may choose to encrypt assertions in their SAML responses in a way that the Passport module is not able to understand. In case of any issues with the flow (especially after receiving the SAML response from remote IDP by the Passport module), try to disable assertions' encryption at involved IDP in order to verify whether this is the cause (the response will still be normally passed over the encrypted channel via the SSL/TLS providing enough strong security).
-
Log files can be a useful source of clues about what is going on under the hood.
-
For debugging purposes, you can print the contents of profile data you are receiving from the external provider. Follow the guidelines given here.
If you still have trouble, feel free to open a support ticket for further assistance. Please provide all related log entries to speed up the resolution process.