Inbound OpenID Connect & OAuth#
Overview#
This document provides instructions for configuring the Gluu Server to support user authentication at one or more external OAuth or OpenID Connect Providers (a.k.a. inbound OAuth / OpenID). For a quick overview of key concepts associated with "inbound identity", visit the introductory page.
Enable Passport#
Make sure the Gluu Server installation already has Passport installed. Then perform the following:
-
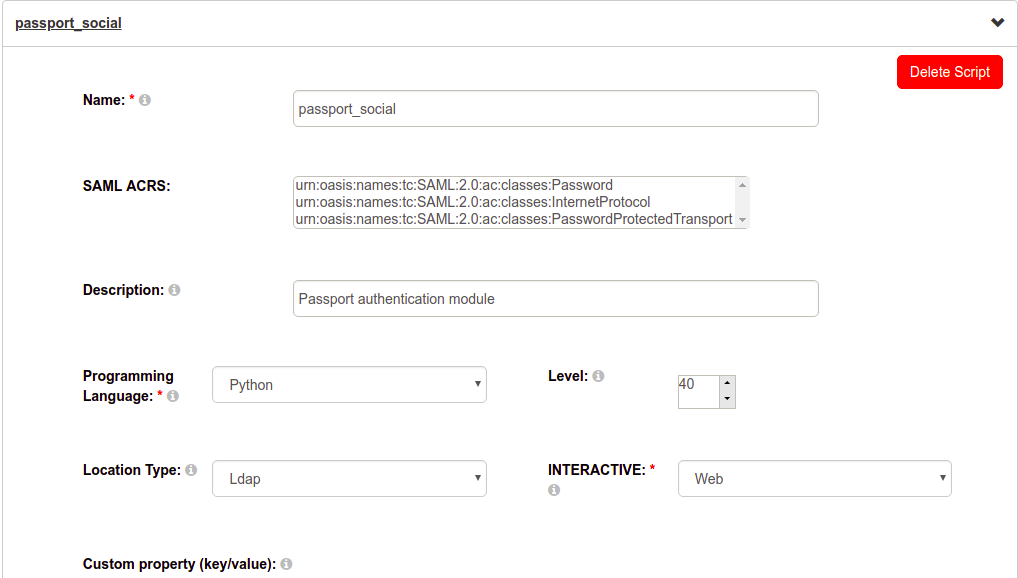
Enable the custom script
- In oxTrust, navigate to
Configuration>Custom scripts - Navigate to the
Person Authenticationtab, expand the script labelledpassport_social, checkenabled, and clickUpdate
- Navigate to the
UMA RPT Policiestab, expand the script labelledscim_access_policy, checkenabled, and clickUpdate
- In oxTrust, navigate to
-
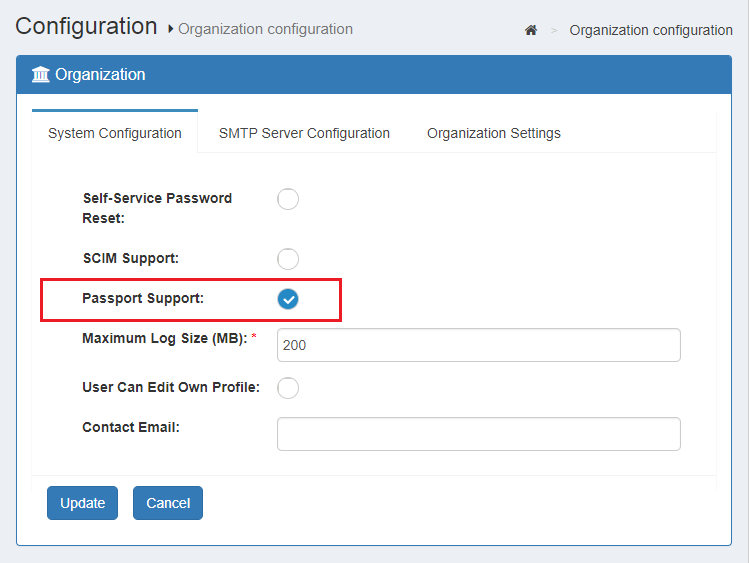
Enable Passport support:
- In oxTrust, navigate to
Configuration>Organization configuration>System configuration - In
Passport supportchooseEnabled - Click
Update
- In oxTrust, navigate to
Once the steps above are performed, the TCP port 8090 appears ready to accept connections.
Integrate OpenID Connect Providers#
Follow these steps to integrate an external OP for login to an OIDC application:
- Add the OP in the admin UI
- Register a client at the OP
- Supply OIDC parameters
- Protect the OIDC application with
passport_socialauthentication
Notes:
- OP integration is achieved via the
passport-openidconnectstrategy, which only supports the OpenID Connect code flow (not hybrid or implicit). - Communication with the token endpoint is carried out via POST only.
- There is no support for secretless clients (just confidential OAuth clients).
- Ensure the machine(s) running Passport have access to the OP you are trying to connect to.
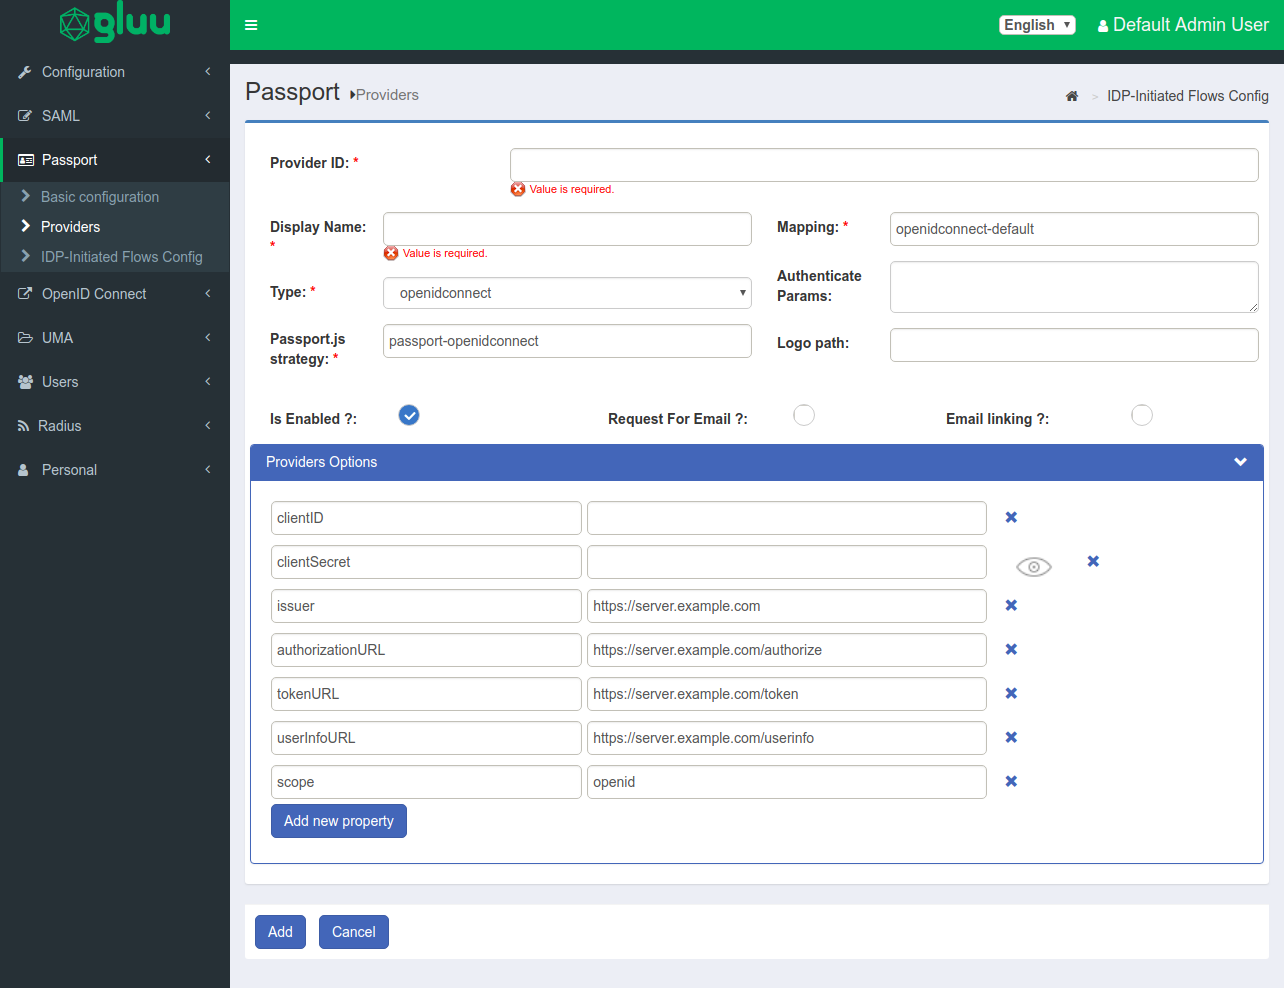
Add the OP in the admin UI#
-
In oxTrust, navigate to
Configuration>Passport>Providers -
Click on
Add new provider -
Enter an identifier for this provider (letters, digits, and underscore characters allowed). Check here to learn more about identifiers usage
-
Enter a display name for the provider (e.g "Partner 1", "Customer 1", etc.)
-
In
type, choose "openidconnect" (if you are using Gluu oxd as a mediator with an OP, check this section) -
Optionally, supply a
logo pathfor this provider (eg.img/openidconnect.png). Check this section of the introductory page to learn more -
Check
Is enabled(unless there is a reason to leave this provider integration temporarily disabled) -
It's not required to check
Request For EmailorEmail linkingunless implementing a custom flow -
Click on
Add(meanwhile, accept the default values for the remaining fields)
A simple standard attribute mapping is used for OpenID Connect providers by default. This will populate uid, mail, cn, displayName, givenName, and sn LDAP attributes if the relevant corresponding claims were gathered in the userInfo request.
To learn more about how mappings work, check the tutorial. Also review the /opt/gluu/node/passport/server/mappings/openidconnect-default.js file in the Gluu chroot. If you need to make adjustments, do not edit the default mapping file, create a new one based on its contents.
Register a client at the OP#
The procedure for registering a client at the external provider may vary. In some setups, the OP may support dynamic registration of clients. Check the product documentation or inquire the administrator of the provider to integrate.
When prompted for the redirect URI enter the URL shown in the field labeled "Callback URL" of provider's form. The URL looks like
https://your-gluu-host/passport/auth/<PROVIDER-ID>/callback
where PROVIDER-ID is the identifier assigned to the recently added provider.
After the process is finished, you should be given a client ID and a client Secret.
Supply OIDC parameters#
In the summary table, click on the name of the recently added provider and supply values for clientID and clientSecret. Fill the rest of the fields according to the endpoints exposed by the OP being configured. Depending on the OP capabilities, you can add more properties as supported, for instance acr_values.
Protect the OIDC application with passport_social authentication#
The same steps described for OAuth Login can be followed in this case. If additional assistance is needed, open a ticket on Gluu support.
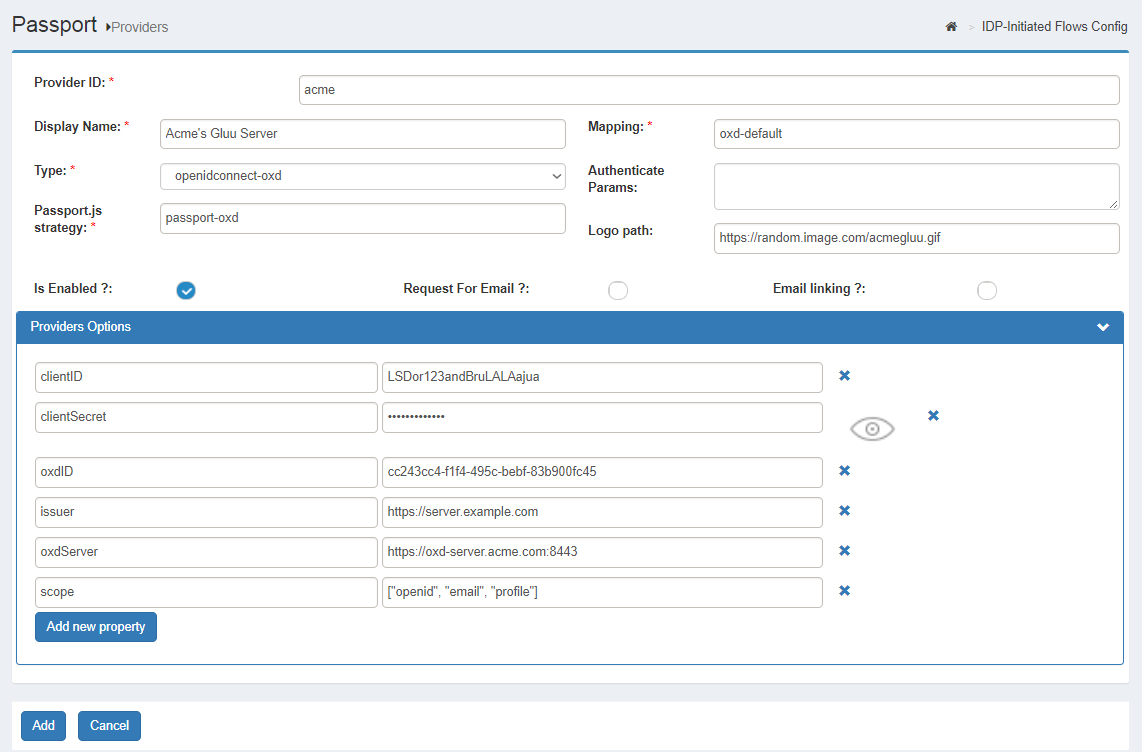
Using oxd as mediator#
When using oxd, administrators can follow the steps similar as above, taking into account the following considerations:
-
For provider
type, select "openidconnect-oxd" -
Instead of creating a client directly, a call to the oxd server
register-siteAPI method must be issued. Here is an example. From this action, theoxdIDwill be obtained. Ensure the client created actually has the scopes requested. -
Supply values for the properties required. These properties are explained here (see the options parameter).
-
If you need to supply values for optional properties, their values must be provided as JSON content. The following are examples of valid JSON values:
true,0,"a string",["item1", "item2"],{ "key": { "some": "value" }}. -
/opt/gluu/node/passport/server/mappings/oxd-default.jsis the default mapping file. Create your own if it does not fit your needs.
Using an external Gluu Server as OP#
In this section, we provide specific steps on how to configure a Gluu Server instance as the external OP (here called "remote Gluu"). Note that this is not the same server in which Passport has been installed.
-
To register a client in your remote Gluu server, log in with admin credentials to
https://<remote-gluu-server>/identityand navigate toOpenID Connect>Clients>Add. Provide the following settings:-
client name: any of your choosing
-
client secret: a password for this client
-
application type: native
-
pre-authorization: false
-
persist client authorizations: true
-
subject type: pairwise
-
JWS algorithm ID token: rs256
-
authentication method for token endpoint: client_secret_post
-
require auth time: false
-
scopes: openid, profile, user_name, email
-
grant types: authorization_code
-
logout session required: false
-
response types: code
-
redirect login URI:
https://<host-name>/passport/auth/<PROVIDER-ID>/callback. Where<host-name>is the host of the Passport-enabled Gluu Server
-
-
Supply the OIDC parameters as follows:
-
clientIDandclientSecret: Grab those from the recently created client. Go toOpenID Connect>Clientsand use for "clientID" the one appearing in the "Inum" column of the table. -
issuer:https://<remote-gluu-server> -
authorizationURL:https://<remote-gluu-server>/oxauth/restv1/authorize -
tokenURL:https://<remote-gluu-server>/oxauth/restv1/token -
userInfoURL:https://<remote-gluu-server>/oxauth/restv1/userinfo
Integrate OAuth Authorization Servers#
Note
Only specific OAuth servers with an already existing Passport.js strategy can be integrated. Click here to learn more about supported providers.
Follow these steps to configure your Gluu Server for login with external OAuth servers:
- Add the provider in the admin UI
- Obtain client credentials
- Supply strategy parameters
- Protect the application with
passport_socialauthentication
Note
Apple Sign In integration requires some pre-requisite configurations and to deal with a number of technical subtleties. We have written a complete guide for Apple integration. You can skip safely the rest of this guide if desired.
Add the provider in the admin UI#
-
In oxTrust navigate to
Configuration>Passport>Providers -
Click on
Add new provider -
Enter an identifier for this provider (letters, digits, and underscore characters allowed). Check here to learn more about identifiers usage
-
Enter a display name for the provider (e.g "Yahoo!", "Windows Live", "Foursquare", etc.)
-
In
typechoose "oauth" -
For Passport.js strategy use the reference table below:
Provider Strategy Dropbox passport-dropbox-oauth2 Facebook passport-facebook Github passport-github Google passport-google-oauth2 LinkedIn @sokratis/passport-linkedin-oauth2 Tumblr passport-tumblr Twitter passport-twitter Windows Live passport-windowslive Yahoo! passport-yahoo-oauth2 If the provider of interest is not listed, find the proper node package for that provider and install it. The package must be a Passport.js strategy based on OAuth 1.0 or OAuth 2.0.
Packages can be installed in the following way:
- Log in to Gluu Server chroot.
- Switch to
nodeuser:su - node. - Add the
nodeexecutable to path:export PATH=$PATH:/opt/node/bin. cdto the Passport application:cd /opt/gluu/node/passport. Recommended: back up this folder before proceeding- Ensure the VM has Internet access and install the strategy, eg.
npm install STRATEGY --savewhereSTRATEGYis the package to install, for instance,passport-reddit. - Restart the
passportservice.
Strategies do not follow any standardized naming convention, so it's not possible to autofill the "Passport.js strategy" field based on words previously entered in the provider's display name. Also, there are cases where several strategies are suitable for a given provider.
-
Fill the name of the applicable mapping. Use the following table as reference:
Provider Mapping Dropbox dropbox Facebook facebook Github github Google google LinkedIn linkedin Tumblr tumblr Twitter twitter Windows Live windowslive Yahoo! yahoo If the provider of interest is not listed, a mapping file must be created. A mapping is a mechanism that defines how the profile data released by the external provider will be saved locally in Gluu.
Use an existing mapping file to create the new mapping. Make a copy of any file listed in the table above (see directory
/opt/gluu/node/passport/server/mappingsin Gluu chroot) and name it appropriately. Enter the name (without file extension) in the form field. The tutorial contains instructions for writing attribute mappings. -
For the
Logo pathfield, addimg/<mapping>.pngif the provider is present in the table above (images are bundled by default for social sites supported out-of-the-box). Otherwise, check this section of the introductory page for instructions to add a new provider icon.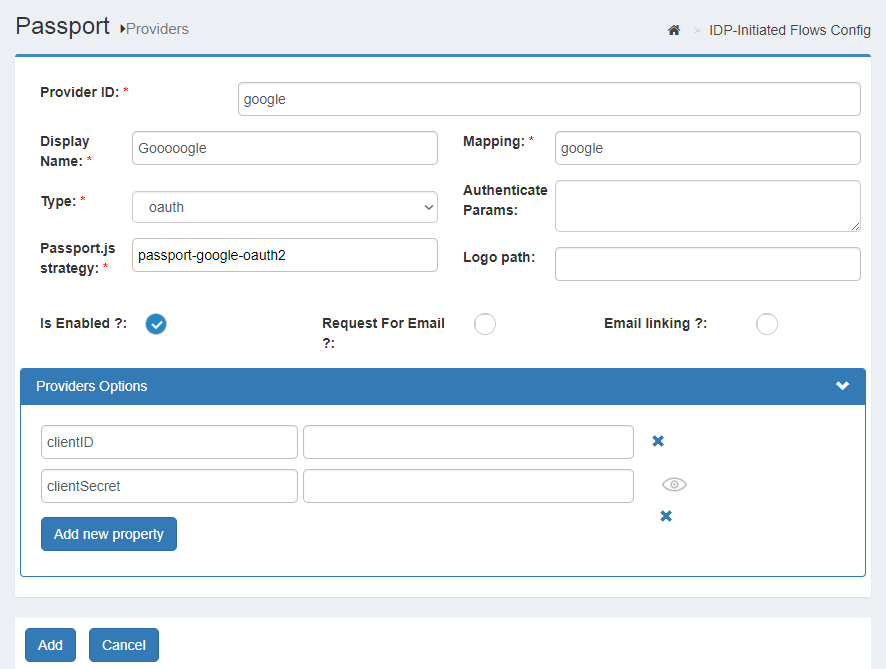
-
Authenticate paramsis a field that normally can be left empty. It is used to supply the value for the second parameter of Passport.js methodpassport.authenticate. It is recommended to supply data here only when the provider to be added is not listed in the table above.As an example, suppose VKontakte is the external provider to integrate. To have access to user's email, a proper scope must be specified (check here and here). In this case, the field
Authenticate paramscan be filled with{ "scope": ["email"] }. Note the usage of"instead of'and that object keys have to be wrapped with".Only valid JSON content will work. No Javascript dynamic expressions can be included. For instance,
{ "key": Math.random() }won't produce the effect desired.In all Passport.js strategies,
passport.authenticateis usually called at two different places in the code. The params configured here are those corresponding to the route/auth/<PROVIDER-ID>and not to the callback URL/auth/<PROVIDER-ID>/callback. -
Check
Is enabled(unless there is a reason to leave this provider integration temporarily disabled) -
It's not required to check
Request For EmailorEmail linkingunless implementing a custom flow -
Leave the fields under the
Providers Optionsempty and clickAdd.
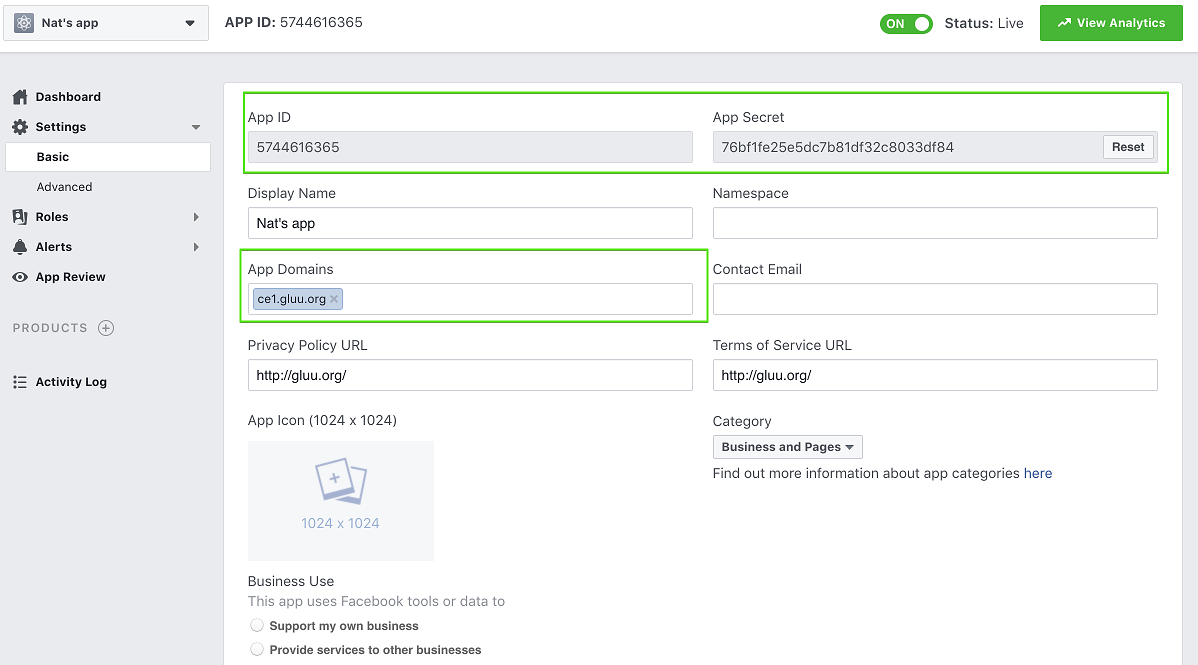
Obtain client credentials#
Every provider has its own procedure for issuing client credentials (AKA client ID and client secret). Check the developer docs of the specific social site (or OAuth provider) for more information. The aim is to get to a page that allows creation of applications. Here are links for a few popular providers:
To create an application, you will need to provide information like an application name or ID, domain name of your application, and authorization callback URLs. The callback URL is shown in the field labeled "Callback URL" of provider's form. The URL looks like
https://your-gluu-host/passport/auth/<PROVIDER-ID>/callback
where PROVIDER-ID is the identifier assigned to the recently added provider.
Once the application is created, you will be given two pieces of data: client ID and client secret. Terminology varies depending on provider; sometimes it is called consumer key and consumer secret, or app ID and app secret, etc. For instance, this is how it looks on Facebook.
Supply strategy parameters#
In the summary table, click on the name of the recently added provider and supply values for clientID and clientSecret. If the strategy for the provider in question was manually installed (ie. by npm install ...), check the documentation of the strategy and determine if extra options parameters have to be passed for the strategy instantiation.
As an example, the VKontakte docs state strategy instantiation can have the following form in order to request email, city, and birth date in addition to typical profile fields:
new VKontakteStrategy(
    {
        profileFields: ['email', 'city', 'bdate']
    },
...)
If this behavior is desired, click on Add new property, fill on the left with profileFields and on the right with the actual value for this property (eg. ["email", "city", "bdate"]). Note again the use of " in preference of '
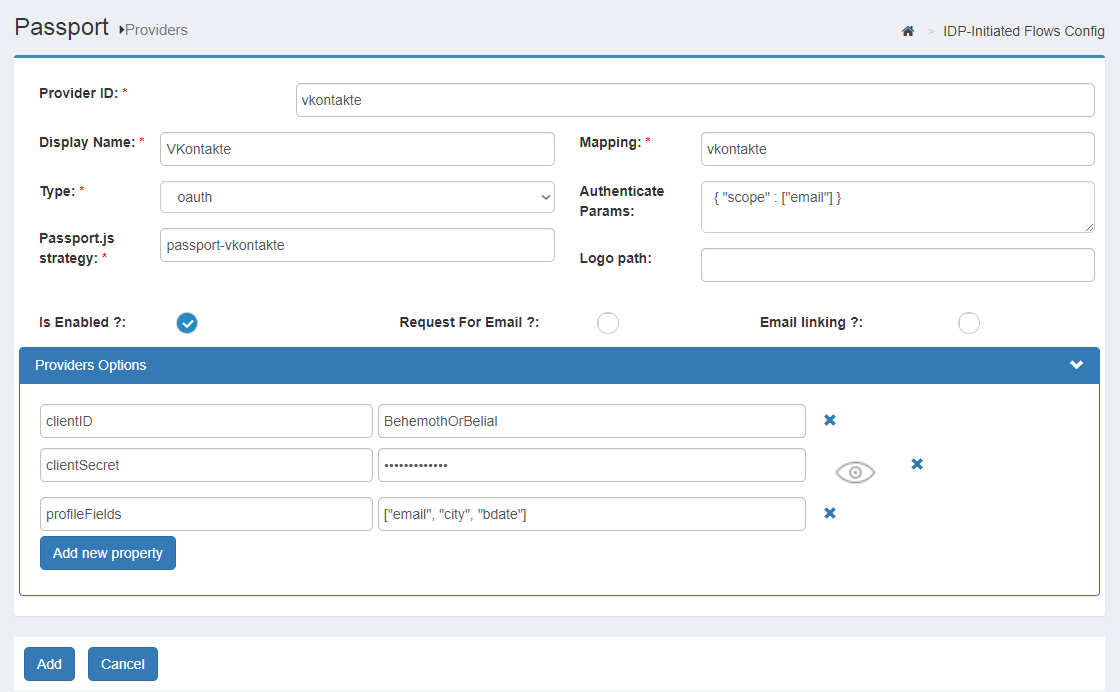
Any number of properties can be added. The following are examples of valid values for a property: true, 0, "a string", ["item1", "item2"].
Notes:
- There is no need to supply a property value for callbackURL. Gluu Passport internally sets its value.
- Some strategies do not use clientID but consumerKey. In this case, consumerKey is automatically generated. The same applies for clientSecret/consumerSecret.
- If neither clientID nor consumerKey is used, supply the name as a separate property (click on the Add new property button). This is the case for example of wechat where appID and appSecret are used.
Finally, press the Update button.
Protect the application with passport_social authentication#
From the application, send an OpenID connect authorization request to your Gluu Server, passing acr_values=passport_social. This will show a form with username+password fields, as well as links to every provider enabled to trigger the process of inbound authentication as shown below:

For more information on acr_values manipulation, check this page.
For a concrete example, and as a means to quickly test the work so far, oxTrust can be configured to be protected with passport_social this way:
- Navigate to
Configuration>Manage Authentication>Default Authentication - Set the
oxTrust acrfield topassport_social - Click
Updateand wait for 1 minute
Open a separate browsing session (e.g incognito) and try accessing oxTrust. If your setup is correct, you'll be prompted for authentication at the external provider and, after successfully authenticating, will be redirected back to oxTrust as an authenticated user.
Note
Ensure the machine(s) running Passport have access to the OAuth provider you are trying to connect to. Once you have supplied login credentials at an external provider, you won't be prompted for authentication again until your session expires or you explicitly log out of the external provider.
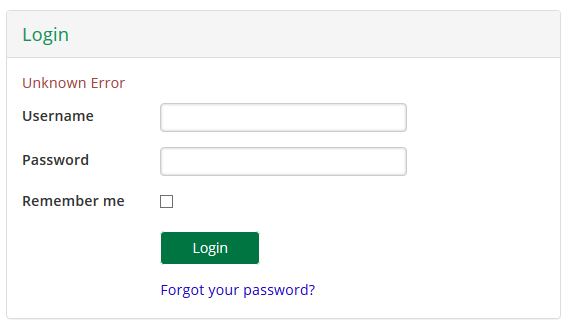
If you get an error page like the one below, double check your configuration and Internet access from both your browser and VM. Also check the logs.
Once login is successful, you can check user profile data as explained here.
Checking user profile#
Once login is successful, check user data by navigating to Personal > Profile in oxTrust. Alternatively you can use the admin user and navigate to Users > Manage people to inspect the recently created user entry.
To check the actual profile data received during the authentication transaction, review the logs and search for a message that looks like "Resulting profile data is". To be able to view this message, set logging level to debug and wait for the server to pick the changes.
If you modify some aspect of your profile at the external provider and attempt to re-login, the user attributes will also be updated in your local Gluu LDAP.
Making all applications use inbound identity flow#
To force all applications that leverage Gluu Server as authentication server to use inbound identity authentication flow, proceed as follows:
- In oxTrust navigate to
Configuration>Manage Authentication>Default Authentication - Set the
default_acrvalue topassport_social