Inbound SAML#
Overview#
The Gluu Server bundles the Passport.js authentication middleware to enable inbound SAML and inbound OAuth and OpenID Connect (all of which can be referred to as "inbound identity"). Passport normalizes the process of supporting user authentication at external identity providers (IDP) and offers a standard mapping for user claims and user registration in your Gluu Server.
Passport is an MIT licensed, Node.js web app that supports hundreds of "authentication strategies" out-of-the-box.
Passport setup#
Passport is available as an optional component during Gluu Server installation. Or, to add Passport to an existing Gluu Server installation, perform the following actions (requires Internet access):
-
Login to Gluu Server chroot
-
cd to
/install/community-edition-setup -
wget
https://raw.githubusercontent.com/GluuFederation/community-edition-setup/master/post-setup-add-components.py -
chmod +x post-setup-add-components.py -
Run
./post-setup-add-components.py -addpassport -
Run
runuser -l node -c "cd /opt/gluu/node/passport/&&PATH=$PATH:/opt/node/bin npm install -P"
Authentication flow#
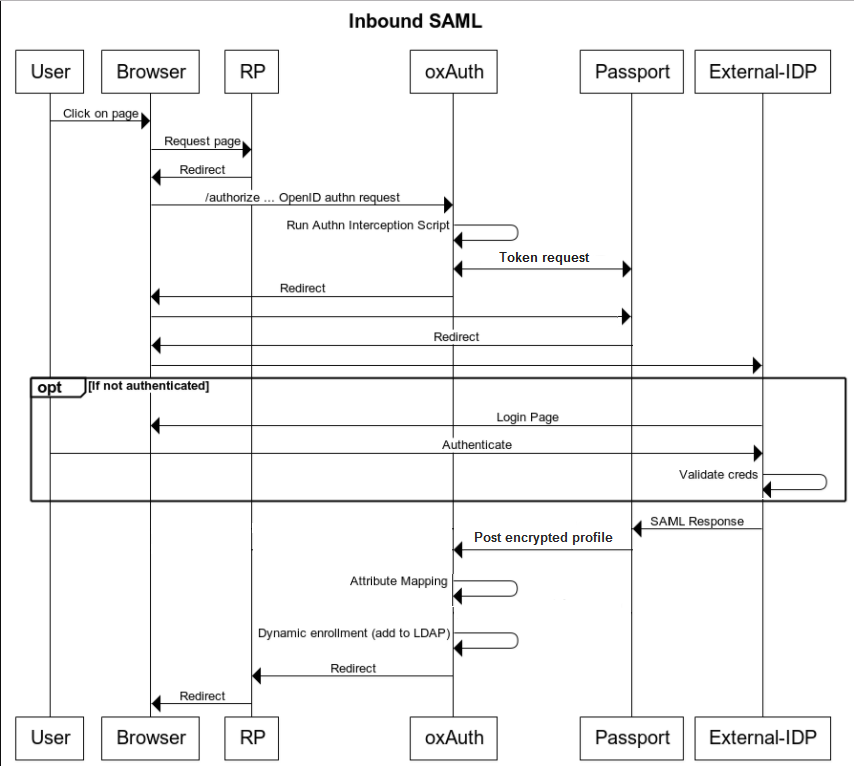
The following is a high-level diagram depicting an inbound SAML user authentication and provisioning workflow::
-
User attempts to access an application protected by Gluu.
-
The RP (requesting party) or application generates and sends an authorization request.
-
If a session doesn't exist in the authorization server, the Passport SAML custom script logic is triggered to initiate the flow. Depending on how the authorization request was built in the previous step, the end-user is sent to a page showing a list of external IDPs to choose one, or directly to a specific IDP to initiate the login process.
-
The script issues a call to Passport module requesting a token.
-
The script sends a redirect to a URL (including the token) which will make Passport module delegate authentication to the previously selected IDP.
-
Passport validates the token and redirects the user to the specified external SAML IDP.
-
After successful authentication the callback (redirect URL) endpoint is called. Personal data received within the SAML response is encrypted in a JWT which is then posted to an endpoint that hands control back to the custom script
-
The custom script verifies whether the user exists in Gluu's local LDAP server. If so, the profile is updated, otherwise a new user entry is created.
-
A session is created for the user at the authorization server and the user is able to accesses the application.
Setting up Inbound SAML#
This section describes the steps required to implement the authentication workflow described above.
The following summarizes the steps (and assumes Passport is already included in your Gluu Server, see above):
Enable passport#
Follow the steps in the inbound OAuth and OpenID doc. Instead of enabling the passport_social script, enable the passport_saml script.
Configure Trust#
SSO between target application and Gluu#
The target application needs to have an SSO relationship with your Gluu Server.
-
If it is a SAML app, follow the instructions in the admin guide for configuring your Gluu SAML IDP,
-
If it is an OpenID Connect app, follow the instructions in the admin guide for configuring your Gluu OP.
Register external IDPs with home IDP#
Passport expects to find information about supported SAML IDPs in the configuration file at /etc/gluu/conf/passport-saml-config.json. Every supported external IDP should be added as a JSON object. When updates are applied to this file, please restart passport service.
A sample configuration containing entries for two external IDPs named "idp1" and "idp2" is provided below:
{
  "idp1": {
    "entryPoint": "https://idp1.example.com/idp/profile/SAML2/POST/SSO",
    "issuer": "urn:test:example",
    "identifierFormat": "urn:oasis:names:tc:SAML:2.0:nameid-format:transient",
    "authnRequestBinding": "HTTP-POST",
    "additionalAuthorizeParams": "<Some additional params json>",
    "skipRequestCompression": "true",
    "logo_img": "../../ext/resources/idp1.png",
    "enable": "true",
    "cert": "MIIDbDCCAlQCCQCuwqx2PNP...........YsMw==",
    "reverseMapping": {
      "email": "email",
      "username": "urn:oid:0.9.2342.19200300.100.1.1",
      "displayName": "urn:oid:2.16.840.1.113730.3.1.241",
      "id": "urn:oid:0.9.2342.19200300.100.1.1",
      "name": "urn:oid:2.5.4.42",
      "givenName": "urn:oid:2.5.4.42",
      "familyName": "urn:oid:2.5.4.4",
      "provider": "issuer"
    }
  },
  "idp2": {
    "entryPoint": "https://idp2.example.com/idp/profile/SAML2/POST/SSO",
    "issuer": "urn:test2:example",
    "identifierFormat": "urn:oasis:names:tc:SAML:2.0:nameid-format:transient",
    "authnRequestBinding": "HTTP-POST",
    "additionalAuthorizeParams": "",
    "skipRequestCompression": "true",
    "logo_img": "https://my.idp2.com/logo.jpg",
    "enable": "true",
    "cert": "AVDVfsgsdafkmiaAFJiasdfmpaf...........YsMw==",
    "reverseMapping": {
      "email": "email",
      "username": "urn:oid:0.9.2342.19200300.100.1.1",
      "displayName": "urn:oid:2.16.840.1.113730.3.1.241",
      "id": "urn:oid:0.9.2342.19200300.100.1.1",
      "name": "urn:oid:2.5.4.42",
      "givenName": "urn:oid:2.5.4.42",
      "familyName": "urn:oid:2.5.4.4",
      "provider": "issuer"
    }
  }
}
!!! Note:
Except for additionalAuthorizeParams, all properties listed above must be included in the file for it to be validated by Passport.
Placeholder URLs like https://idp1.example.com must be replaced with the URLs of actual remote IDPs.
A short description of properties:
-
entryPoint: Endpoint URL where SAML requests must be sent to. -
issuer: A string specifying anentityidPassport must use when communicating with this specific external IDP. In particular, it allows usage of differententityidvalues for each of registered IDPs. If not needed, the sameentityidcan be used in all entries in the file. -
identifierFormat: URI specifying name identifier format ("nameid's") to request/expect from this remote IDP. -
authnRequestBinding. If set to "HTTP-POST", then authentication requests sent toentryPointwill use HTTP POST method (SAML's HTTP POST binding), otherwise it defaults to HTTP method (HTTP Redirect binding). -
additionalAuthorizeParams: A JSON object of additional query parameters which can be added in order to 'authorize' requests. -
skipRequestCompression: If set to "true", the SAML request to this service provider will not be compressed. -
logo_img: Absolute or relative URL pointing to the IDPs logo used by the Gluu's Passport login page. -
enable: If set to "true", this IDP is allowed to be used by users that try to authenticate. -
cert: The IDP's PEM-encoded X.509 certificate with theBEGIN CERTIFICATEandEND CERTIFICATEseparator lines stripped and all line breaking characters (new line/carriage return) supressed. In other words, a base64-encoded string representing the body of a certificate. The following command can be used to transform an existing X.509, PEM-encoded certificate into string in the required format:# cat ~/your_cert.crt | grep -v '^---' | tr -d '\n'. The certificate supplied here is the one intended for signing. For example, if you are using Shibboleth bundled in a Gluu Server instance, visithttps://<gluu-host>/idp/shibbolethand see the contents of XML tagKeyDescriptorwhereuse="signing"insideIDPSSODescriptortag. -
reverseMapping- An embedded JSON object defining how the SAML attributes names must be mapped to attributes that are used internally by the Passport module:email- the user's emailusername- the user's username (uid)displayName- a display name for the userid- the user's useridname- the user's full namegivenName- the user's first namefamilyName- the user's last name
Register home SP with external IDPs#
Once configuration is successfully validated, Passport automatically generates SAML SP metadata for every IDP listed in passport-saml-config.json. The next step is to register the SP at all external IDPs.
The metadata can be accessed at URLs like: https://<hostname>/passport/auth/meta/idp/<IDP-id-from-passport-saml-config>.
In the filesystem, contents can also be found in the Gluu chroot under /opt/gluu/node/passport/server/idp-metadata. Copy this data to your local machine and upload to remote external IDPs.
The actual process of creating trust will differ across IDP implementations.
For example, for cases when the remote IDP is another Gluu Server, the relevant documentation page should be followed. In case of other SAML IDPs, consult the corresponding documentation.
Note
When registering the Passport SP at each remote IDP, at least username will be required for each user.
Testing your setup#
Passing an acr value#
In an OIDC app, you can create an authorization request URL including acr_value=passport_saml in the parameters. This suffices to trigger the standard flow (the one that shows the provider selection page). Note this requires having pre-registered an openid client and knowledge of redirect URI and scopes.
Use the following Java snippet to quickly produce an authorization URL that can be pasted in your browser:
import java.util.*;
import org.xdi.oxauth.client.AuthorizationRequest;
...

String clientid = "your_openid_client_id";
String redirect_uri = "redirect_uri";
String host = "your_gluu_host";
String state = UUID.randomUUID().toString();

AuthorizationRequest authorizationRequest = new AuthorizationRequest(
                Collections.singletonList(ResponseType.CODE)
                , clientid
                , Arrays.asList(("openid", "profile", "user_name")
                , redirect_uri, UUID.randomUUID().toString());

authorizationRequest.setRedirectUri(redirect_uri);
authorizationRequest.setAcrValues(Collections.singletonList("passport_saml"));
authorizationRequest.setScopes(Arrays.asList("openid", "profile", "email"));
authorizationRequest.setState(state);

return String.format("https://%s/oxauth/authorize.htm?%s", host, authorizationRequest.getQueryString());
Place this jar file in your classpath to compile and run the code above.
The string produced looks like:
https://<gluu_host>/oxauth/authorize.htm?response_type=code+...&client_id=...
   &scope=openid+...&redirect_uri=...&state=...&nonce=
   &acr_values=passport_saml
Skipping the IDP selection page#
You can programmatically compose an authorization URL where you can pass as parameter the name of IDP to which you want to send your users directly. This requires adding a custom authorization parameter to your Gluu Server. Visit this section to learn more.
Using the demo app#
Warning
Demo app is a minimalistic web application developed with the sole purpose of showcasing how inbound SAML can be achieved with Passport. It is strongly discouraged to leave this app running indefinitely on a production server.
The "Proxy-client" demo application is a small Node.js app that provides an easy way to test the Inbound SAML scenario. The project requires node to be installed on the machine where the app will run. Optionally, and for the sake of simplicity, we recommend re-using the Node.js setup of your Gluu Server where Passport is running.
Follow the guidelines below to install the Demo app in your Gluu Server host:
Web UI configuration steps#
-
Log in to oxTrust web UI as an administrator user
-
Navigate to the
OpenID Connect>Clientspage, and register a new OIDC client to your Gluu Server with following required properties:- Redirect login uri:
http://passport-saml-demo-app.example.com:3000/profile/ - Grant types:
authorization_code - Response types:
codeandid_token - Scopes:
openid,email,user_nameandprofile - Client secret: an non-empty value
- Redirect login uri:
-
Go to
Configuration>JSON configuration>oxAuth configuration- Scroll down to
authorizationRequestCustomAllowedParametersand click on the plus icon - Enter
preselectedExternalProvider - Save the configuration
- Scroll down to
-
Parameterize the Passport custom script to read the custom parameter
- Navigate to
Configuration>Custom scripts - In
Person Authenticationtab, expand the script labelledpassport_saml - Click
Add new propertyand enterauthz_req_param_providerin the left field - In the right field, enter the name of the custom parameter (e.g.
preselectedExternalProvider) - Press
Updateat the bottom
- Navigate to
Console configuration steps#
-
Login to Gluu chroot container.
-
Ensure your VM has internet access, also that incoming connections to TCP port 3000 are allowed to reach applications running on this machine.
-
Switch to "node" user:
# su - node. -
Download and extract the project files.
-
Copy your
passport-saml-config.jsonfile used during the registering external IDPs step into the app's directory:$ cp /etc/gluu/conf/passport-saml-config.json ~/Inbound-SAML-Demo/. -
Edit the file
client-config.jsonfile and provide proper values for:ClientID(theinumof the client created in oxTrust),clientSecret, andhostname(FQDN of this Gluu Server instance). -
Initialize the Demo app:
-
$ cd ~/Inbound-SAML-Demo/ -
$ npm install
-
-
Run the application:
$ node server.jsYou can stop the app by hittingCtrl + Cat any moment.
Note
Starting the demo app as described above will render your SSH session unusable while allowing to see useful debug output redirected to stdout. Consider starting another SSH session in a separate console window for other tasks.
Test it!#
-
In the machine where you will run this test, add a host entry so that the name
passport-saml-demo-app.example.comresolves to the IP address of the machine where the demo app was installed. -
Open a web browser and hit
http://passport-saml-demo-app.example.com:3000. -
Select one of the displayed IDPs to initiate external authentication.

-
After logging in at the IDP, you will be redirected back to Gluu Server where you might be prompted to authorize release of your personal data to the Demo app.
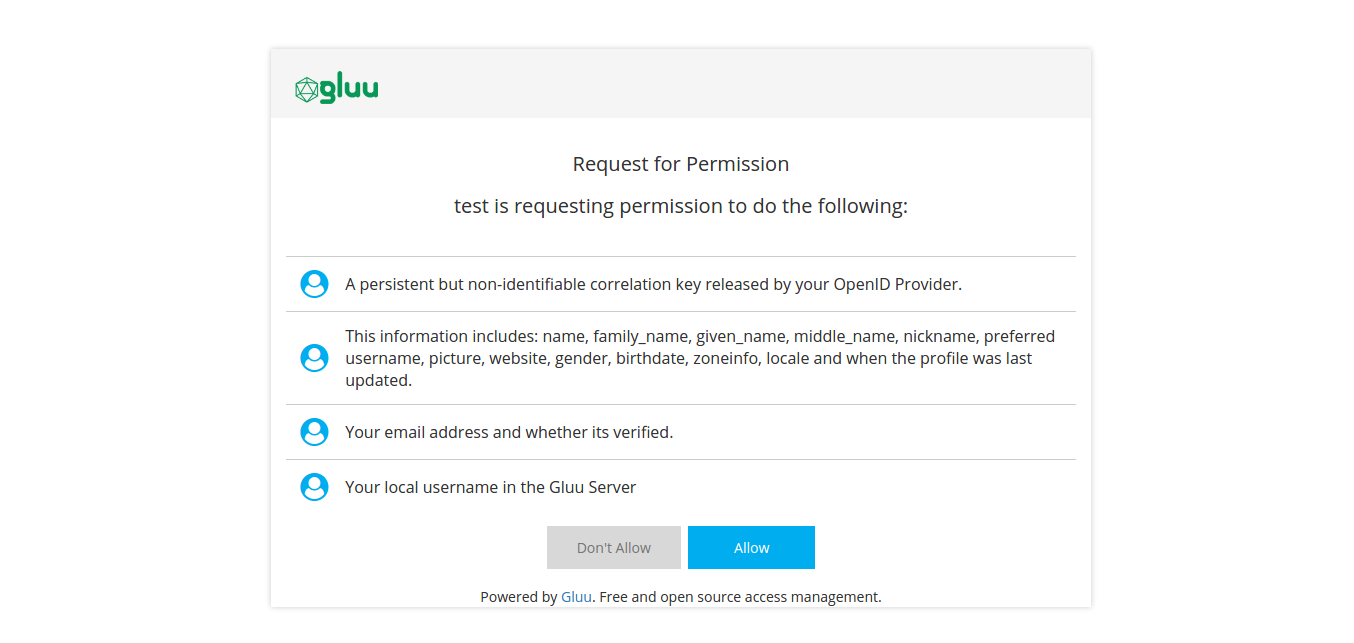
-
After consenting to release the requested claims, you'll be sent to the Demo app with an authorization code which is needed for retrieving your personal data.
-
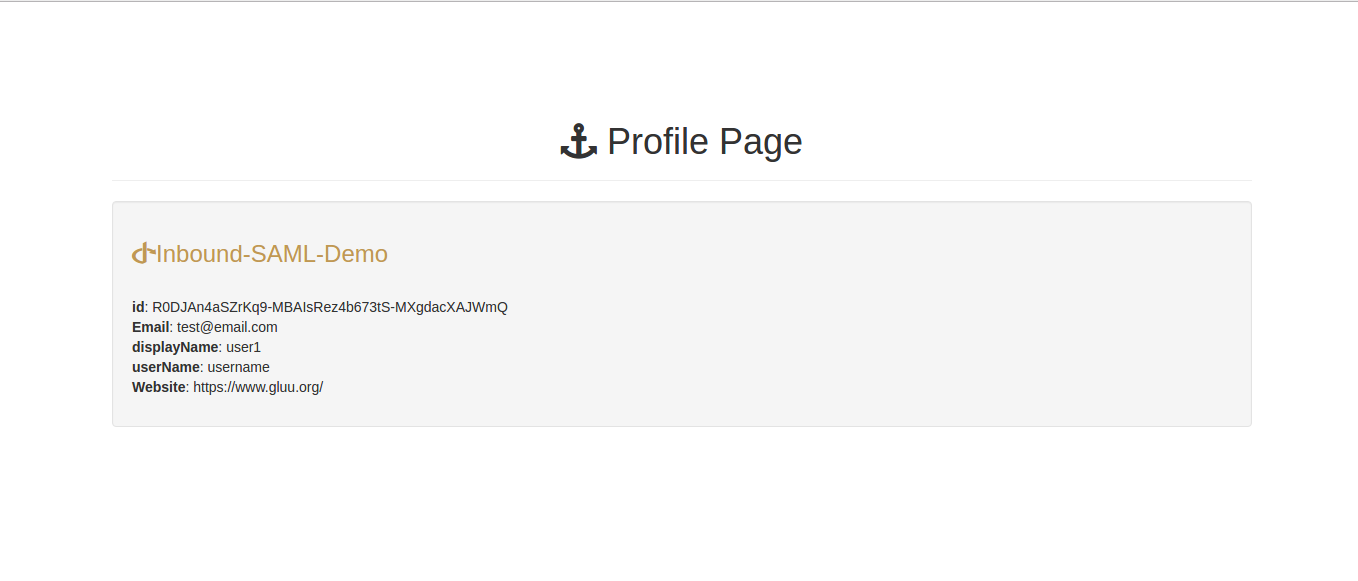
The application will display retrieved claims on the "/profile" page
See the Demo in action in this video.
How user onboarding works#
Refer to the inbound OAuth and OpenID docs. Onboarding is handled the same way for all inbound identity workflows.
Altering flow behaviour#
This too is explained in the inbound OAuth and OpenID docs. You can:
- Require email to be present for enrollment
- Apply email account linking
- Send users to a pre-selected the IDP
In all cases, instead of adding a property via oxTrust, you have to manually add it for the proper provider in config file /etc/gluu/conf/passport-saml-config.json. Equivalently, if you need to alter properties of a custom script, apply those in the passport_saml script. Wait for about 1 minute for changes to take effect (no restarts needed).
Additional configuration details#
Log level#
You can tweak the log level used in passport-YYYYmmdd.log files. Check this for more info.
Custom script parameters#
The Passport SAML script can be parameterized for instance, to include more attributes in the mapping or work with provider pre-selection.
Implement IDP discovery ("WAYF")#
IDP Discovery refers to process of determining which IDP users should be sent to for authentication (also known as: "Where Are You From", or WAYF). There are many ways to achieve this, but the following methods are most commonly used in practice.
Discovery based on supplied email address#
Email-based discovery, or "identifier-first" login, relies on an email address to discover where to send an user for authentication. It can be implemented as follows:
-
Users are asked for an email address which they usually use for logging in their home IDP.
-
The domain name part of the email address is parsed and evaluated; the domain name part is a sub-string of the email address following the "@" character.
-
Check if such IDP is allowed to be used with this application. The list of allowed IDPs will usually be derived from IDP entries in
passport-saml-config.jsonfile of target Gluu Server. -
If found, an OpenID Connect authorization request URL can be buit by supplying the IDP id in a custom parameter (as described here).
-
The user is redirected to the URL of the previous step, triggering the Passport Inbound SAML scenario.
-
The Passport SAML authentication script parses the custom parameter, and the flow proceeds to the designated IDP.
Landing page discovery#
If you do not mind exposing the list of your external IDP partners, you can allow users to choose which IDP better suits their needs by displaying all IDPs you've established trust with. This is the standard behavior in Gluu Server with Passport.
Discovery based on sub-domain or sub-directory#
If you provide a dedicated sub-domain or sub-path namespace to your customers or partners (URLs like https://customer1.mydomain.com or https://mydomain.com/customer1 illustrate this approach), then you can perform discovery based on this as well. When an unauthenticated user tries to access any protected resources related to those dedicated namespaces, an appropriate IDP related to it can be looked up in a configuration file and its id encoded into a custom parameter of the authorization request before redirecting the user to Gluu Server.
Troubleshooting tips#
In case of issues during setup or tests, consider the following:
-
Make sure that the system clocks are synchronized between all the machines that participate in the flow (NTP is the way to go). When clocks are out of sync, it's known to cause a hard to troubleshoot state of an "infinite loop" (non-ending redirection across a given set of pages).
-
Some IDPs may choose to encrypt assertions in their SAML responses in a way that the Passport module is not able to understand. In case of any issues with the flow (especially the ones following the reception of SAML response from remote IDP by the Passport module) try to disable assertions' encryption at involved IDP in order to verify whether this is the cause (the response will still normally being passed over the encrypted channel via the SSL/TLS providing strong enough security).
-
Log files can be a useful source of clues about what is going on under the hood.
-
For debugging purposes, you can print the contents of profile data you are receiving from the external provider. Follow the guidelines given here.
If you still have trouble, feel free to open a support ticket for further assistance. Please provide all related log entries to speed up the resolution process.