FAQ#
Diagnostic Tools#
Logs#
When it comes to troubleshooting issues in the Gluu Server--from service hiccups to outages--your server logs are the best place to gather relevant information.
See what's going on by tailing the identity and oxauth logs:
$ tail -f /opt/gluu-server-3.1.2/opt/gluu/jetty/identity/logs/* \
          /opt/gluu-server-3.1.2/opt/gluu/jetty/oxauth/logs/*
Logs can be lengthy and difficult to search. As needed, all logs inside the container can be cleared by using the clear-log feature explained in clear-logs.
Connect a remote debugger#
Connecting your local debugger up to Gluu can help with troubleshooting.
Enable remote debugging#
Change the configuration of the init.d scripts for the identity and oxauth processes:
# /etc/init.d/gluu-server-3.1.2 login
# vim /etc/default/identity
Change:
JAVA_OPTIONS="-server -Xms256m -Xmx858m -XX:MaxMetaspaceSize=368m
-XX:+DisableExplicitGC -Dgluu.base=/etc/gluu
-Dserver.base=/opt/gluu/jetty/identity
-Dlog.base=/opt/gluu/jetty/identity -Dpython.home=/opt/jython
-Dorg.eclipse.jetty.server.Request.maxFormContentSize=50000000"
To:
JAVA_OPTIONS="
  -server -Xms256m -Xmx858m
  -XX:MaxMetaspaceSize=368m
  -XX:+DisableExplicitGC
  -Dgluu.base=/etc/gluu
  -Dserver.base=/opt/gluu/jetty/identity
  -Dlog.base=/opt/gluu/jetty/identity
  -Dpython.home=/opt/jython
  -Dorg.eclipse.jetty.server.Request.maxFormContentSize=50000000
  -Xrunjdwp:transport=dt_socket,server=y,suspend=n,address=6005
"
The important bit is the last line starting with -Xrunjdwp.
Then restart the identity process:
# /etc/init.d/identity restart
Do the same in /etc/default/oxauth, but choose a different port for the debugger to connect to:
-Xrunjdwp:transport=dt_socket,server=y,suspend=n,address=5005"
Then restart oxauth:
# /etc/init.d/oxauth restart
Now, if you're running the gluu system inside a virtual machine (or just a different machine than your host machine), forward the ports 6005 and 5005 to your local machine. Type this command on your local machine, where you forward these two ports as you ssh into the Gluu machine:
$ ssh -L5005:localhost:5005 -L6005:localhost:6005 user@gluu
As long as you keep this ssh connection open, you can access the debug ports 5005 and 6005 as if they were running locally.
Now, you can open up your favorite IDE like IntelliJ IDEA, Eclipse or Emacs and set up the debugger to connect to 5005 for oxauth and 6005 for identity.
Grab the source#
For remote debugging to make sense, you must have the source code checked out locally and you must check out the Git tag corresponding to the gluu server you're running.
For oxAuth:
$ git clone https://github.com/GluuFederation/oxAuth.git
$ cd oxAuth
$ git checkout version_3.1.2
For identity:
$ git clone https://github.com/GluuFederation/oxTrust.git
$ cd oxTrust
$ git checkout version_3.1.2
Connect an external LDAP browser#
Sooner or later you will probably want to peek at what is stored in the Gluu Server's local LDAP. This means connecting something like Apache Directory Studio to the slapd process running inside the chroot container.
You can find the configuration you need in /opt/gluu-server-3.1.2/etc/gluu/conf/ox-ldap.properties, e.g.:
bindDN: cn=directory manager,o=gluu
bindPassword: foobar
servers: localhost:1636
Forward the 1636 the same way as you did with the debug ports above. You can then see full details like how OpenID Connect clients are stored and how user objects are mapped in the LDAP tree.
Find your Gluu Server version#
The Gluu Server version can be found in the oxTrust dashboard. Alternatively:
- SSH into VM
-
Log into Gluu-Server container.
a. Use the below command
# service gluu-server-3.1.2 login -
To find oxTrust version
# cat /opt/jetty-9.3/temp/jetty-localhost-8082-identity.war-_identity-any-8734901518752897483.dir/webapp/META-INF/MANIFEST.MF -
oxAuth version can be found using below command
# cat /opt/jetty-9.3/temp/jetty-localhost-8081-oxauth.war-_oxauth-any-6134601069165491713.dir/webapp/META-INF/MANIFEST.MF
Version numbers for included software like IDP, oxAuth-rp, etc., can be viewed in the same directory. These apps can be identified with the port number after the localhost.
Configuration#
Running out of disk space#
Run the following commands if you find your instance running out of disk space:
# /etc/init.d/gluu-server-3.1.2 stop
# rm -rf /opt/gluu-server-3.1.2/opt/jetty-9.3/temp/*
# /etc/init.d/gluu-server-3.1.2 start
Changing hostnames/IP addresses/listening ports#
It is not recommended to change the hostname, IP address or the listening port of any installed Gluu Server instance. The hostname and the IP address is used in many settings stored in the LDAP configuration entries, Apache/Jetty configuration and in the custom authentication script. It is strongly recommended to use a fresh install in a new VM.
Note
Use a static IP address with a reverse proxy or load balancer or simple port forwarding.
Setting the port to something other than 443#
Ports other than 443 are not supported as the port is used by Apache Web Server. In theory, the change must reflect in the SAML and OpenID Connect metadata and still there might be errors.
Note
Use a virtual ethernet interface and a different IP address on your server
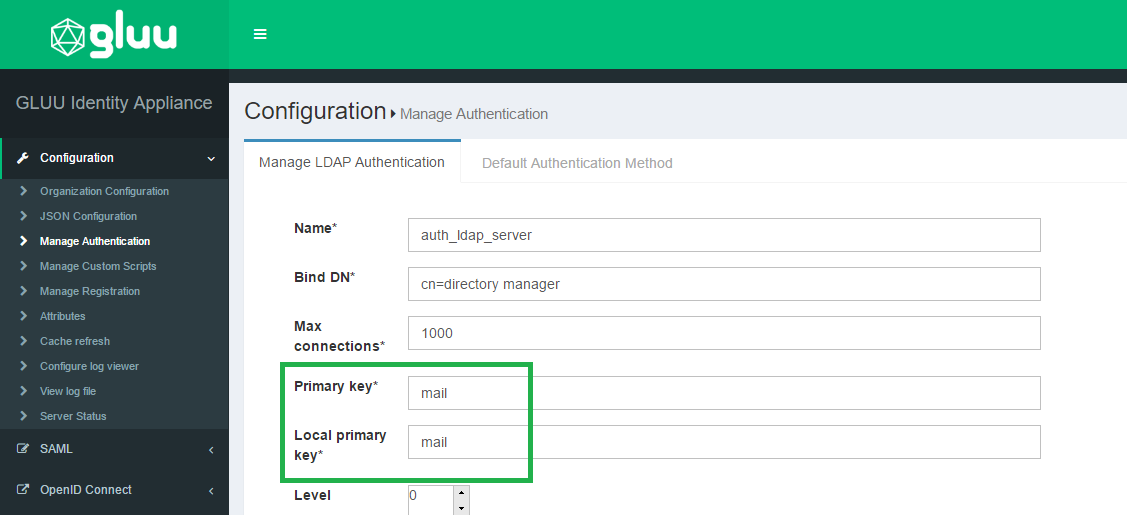
Request email instead of username for login#
In oxTrust navigate to the Manage Authentication tab within the Configuration section. By default the Primary Key and Local Key are set to uid. Set those va lues to mail and now your Gluu Server will expect email as the identifier instead of username.
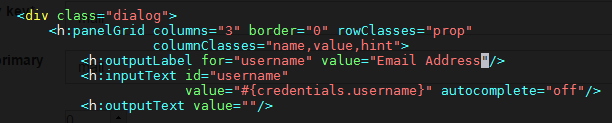
Now you will want to update your IDP login page to display Email Address as the requested identifier. In order to do that you need to modify the login.xhtm l file, which is located in /opt/jetty-x.x/temp/jetty-localhost-xxxx-oxauth.war-_oxauth-any-1234.dir/webapp. Insert Email Address as the value for outputLabel; this snippet is under the dialog class. S ee the screenshot below. Alternative solution is to put customized login.xhtml into /opt/gluu/jetty/oxauth/custom/pages and restart oxauth service after that:
# service oxauth restart
Warning
oxTrust is a tool for administrators and it must not be used as a user facing application.
Admin#
Installing a Patch#
Follow the documentation for updating a .war file.
Adding Admin Users#
Please follow these steps to restore your Gluu admin account (you will probably need to substitute actual port, bind names and hostnames with ones used by your installation):
1) Log into Gluu's chroot environment with the command below:
# service gluu-server login
2) Run this command:
#/opt/opendj/bin/ldapsearch -p 1636 -Z -X -D 'cn=directory manager,o=gluu' -w 'YOUR_BIND_PASSWORD' -b o=gluu gluuGroupType=gluuManagerGroup 1.1
Note the displayed DN of the Gluu Manager Group for future use.
3) Run this command:
# /opt/opendj/bin/ldapsearch -p 1636 -Z -X -D 'cn=directory manager,o=gluu' -w 'YOUR_BIND_PASSWORD' -b o=gluu ou=people 1.1
Note the displayed DN of the People OU for future use.
4) While staying in the chrooted environment, create the file
~/add_user.ldif using your favorite text editor, and copy the
following lines to it:
dn: inum=tempadmin,ou=people,o=@!F9CC.D762.4778.1032!0001!2C72.BB87,o=gluu
changetype: add
uid: tempadmin
objectClass: gluuPerson
objectClass: top
givenName: tempadmin
sn: tempadmin
inum: tempadmin
gluuStatus: active
userPassword: 1q2w3e
Please note the string's segment marked with bold: you will have to substitute it with the DN for your own People OU which you've acquired in step 3).
5) Run this command:
# /opt/opendj/bin/ldapmodify -p 1636 -Z -X -D 'cn=directory manager,o=gluu' -w 'YOUR_BIND_PASSWORD' -f ~/add_user.ldif
This will create new user tempadmin with attributes provided via file created in step 4).
6) Now create a file, add_2_group.ldif, in your home ("~/") directory and
copy the following lines to it:
dn: inum=@!F9CC.D762.4778.1032!0001!2C72.BB87!0003!60B7,ou=groups,o=@!f9cc.d762.4778.1032!0001!2c72.bb87,o=gluu
changetype: modify
add: member
member: inum=tempadmin,ou=people,o=@!f9cc.d762.4778.1032!0001!2c72.bb87,o=gluu
Again, please note the strings' segment marked with bold: you will have to substitute contents of the "dn:" string with dn of your own Gluu Manager Group which you've acquired in step 2), and for "member:" string you will have to use the dn of tempadmin user (the one you already specified in the 1st line of the file in step 4).
7) Run this command:
# /opt/opendj/bin/ldapmodify -p 1636 -Z -X -D 'cn=directory manager,o=gluu' -w 'YOUR_BIND_PASSWORD' -f ~/add_2_group.ldif
This will add tempadmin user to the IdP managers group and you can then log in and assign another user to act as admin.
DNS Errors#
It is possible that even after configuring everything there is a DNS resolve error in the Gluu Server.
The reason is the DNS used inside the chroot container; the dns used by the container is the Google DNS servers
and the DNS for the host OS is not used. Therefore to fix this issue:
- Change the DNS inside the container by editing the
/etc/resolv.conffile and adding the DNS used by your organization
How to recover an admin password#
The Gluu Server stores the admin password in the file /install/community-edition-setup/setup.properties.last under the
property ldapPass. Retrieve the data using the following command:
# grep ldapPass= /install/community-edition-setup/*.last
Warning
It is strongly recommended to remove the file from any production environment or encrypt the file
Revert an authentication method#
You should always test new authentication methods in a different browser to reduce the chance of lockout. However, while testing authentication scripts and mechanisms it is not unlikely that you will find yourself locked out of the Gluu Server admin GUI.
In such a situation, you can use either of the following methods to revert back to the previous authentication method.
Manual Method:#
This method relies on an ldif file to change the authentication mode in the LDAP server directly.
There are two acr's available for Default Authentication Method: (1) Default acr and (2) oxTrust acr. These two acr's are represented by the oxAuthenticationMode and oxTrustAuthenticationMode attributes, respectively. Depending on the scenario, one or both values may need to be reverted.
For this example, we applied Duo authentication to both Default acr and oxTrust acr, so we will change both attributes back to basic.
-
Run the following command to get the value of
oxAuthenticationModealong with the DN inum:``` /opt/opendj/bin/ldapsearch -h localhost -p 1636 -Z -X -D "cn=directory manager" -j <your_password_file> -b 'o=gluu' -T 'oxAuthenticationMode=*' oxAuthenticationMode ```You might get bunch of outputs but just take one which would be something like:
``` dn: inum=@!B382.75BE.B0CF.1968!0002!F907.8C8C,ou=appliances,o=gluu oxAuthenticationMode: auth_ldap_server ``` -
Do the same for
oxTrustAuthenticationModeattribute: -
Create an
LDIFfile like below. As an example, we shall call this filechangeAuth.ldif.:``` dn: inum=@!B382.75BE.B0CF.1968!0002!F907.8C8C,ou=appliances,o=gluu changetype: modify replace: oxTrustAuthenticationMode oxTrustAuthenticationMode: auth_ldap_server - replace: oxAuthenticationMode oxAuthenticationMode: auth_ldap_server ```Note
Replace the
inumfrom the example above with theinumof your Gluu Server from theldapsearchcommand. -
Push this LDIF file with ldapmodify command to apply changes.
   ```
   /opt/opendj/bin/ldapmodify -h localhost -p 1636 -Z -X -D "cn=directory manager" -j <your_password_file> -f  /home/ldap/mod_change.ldif
  ```
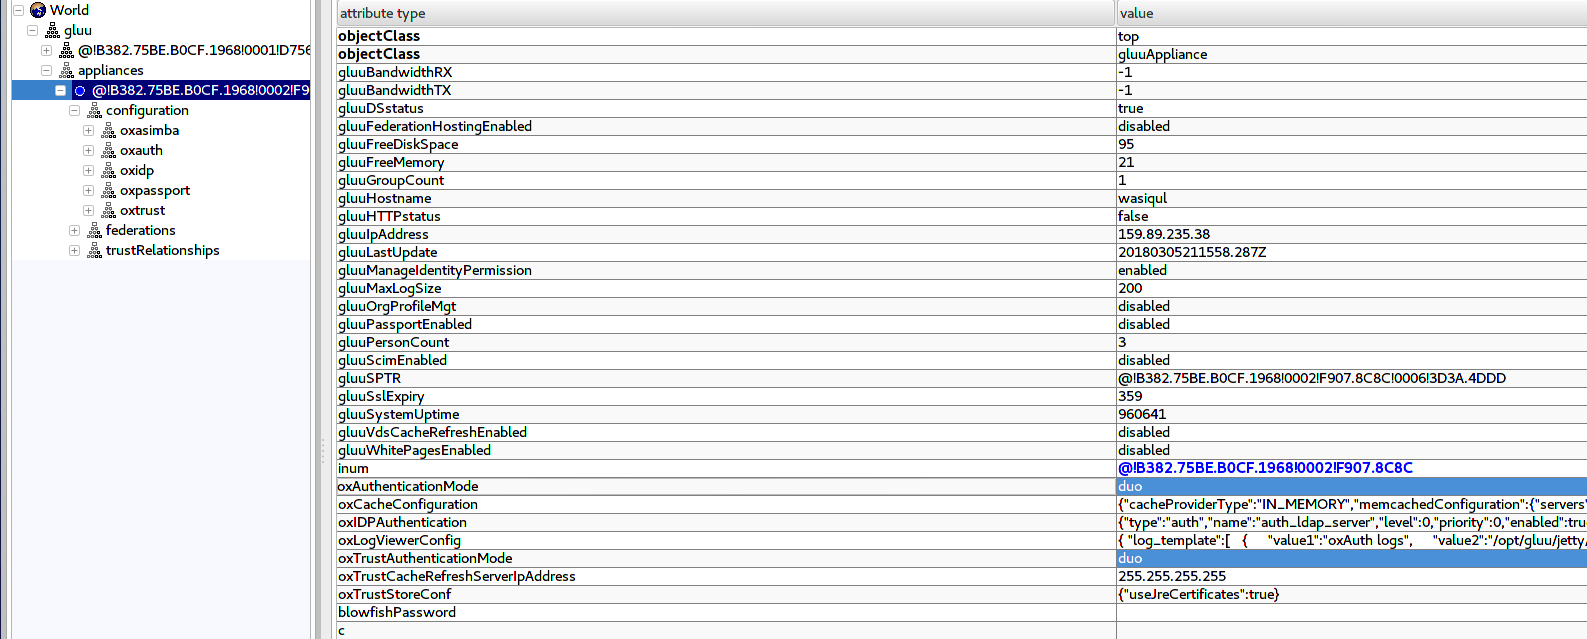
Graphical Method:#
The idea here is to use an LDAP browser, hence this method is much more simple.
You have to update one or both acr attributes ( oxAuthenticationMode and / or oxTrustAuthenticationMode ) according to you own configuration. The default authentication mode value is auth_ldap_server. Below are the steps:
- Open LDAP in a LDAP Browser (JXplorer is used here and recommended).
- Navigate to "gluu > appliances > {GUID or appliance number}" and search for "oxAuthenticationMode" and "oxTrustAuthenticationMode" attribute and change those values to 'auth_ldap_server'.
- oxAuthenticationMode attribute is used for Login pages, which stores the name of the custom script used.
- oxTrustAuthenticationMode is used for OxTrust Admin UI page.
- Submit the changes.
- Try to access the login page or Gluu Admin UI.
No Admin Access After Cache Refresh?#
Add the password for your admin account to ~/.pw and then use the commands below to add yourself as an admin.
# set this to your actual user name
export newgluuadmin='myusername'

# this is the file that will hold the info to be imported
export ldiffile='addManagers.ldif'

# run this and verify that the output is for your account
/opt/opendj/bin/ldapsearch -h localhost -p 1636 -D "cn=directory manager,o=gluu" -j ~/.pw -Z -X -b "o=gluu" "uid=$newgluuadmin" uid givenName sn cn

dn: inum=@!134D.3C3D.796E.FECE!0001!E022.CC3C!0000!A8F2.DE1E.D7FB,ou=people,o=@!134D.
 3C3D.796E.FECE!0001!E022.CC3C,o=gluu
uid: myusername
givenName: John
sn: Doe
cn: John Doe
Now you can run these commands to make the file above:
head -n1 /opt/opendj/ldif/groups.ldif > $ldiffile
echo 'changetype: modify' >> $ldiffile
echo 'add: member' >> $ldiffile
echo "member: $(/opt/opendj/bin/ldapsearch -h localhost -p 1636 -D "cn=directory manager,o=gluu" -j ~/.pw -Z -X -b "o=gluu" "uid=$newgluuadmin" uid givenName sn cn |grep -A1 dn |cut -d ' ' -f 2- | sed 'N;s/\n//')" >> $ldiffile
The resulting LDIF will look like this:
dn: inum=@!134D.3C3D.796E.FECE!0001!E022.CC3C!0003!60B7,ou=groups,o=@!134D.3C3D.796E.FECE!0001!E022.CC3C,o=gluu
changetype: modify
add: member
member: inum=@!134D.3C3D.796E.FECE!0001!E022.CC3C!0000!A8F2.DE1E.D7FB,ou=people,o=@!134D.3C3D.796E.FECE!0001!E022.CC3C,o=gluu
Once the LDIF looks right, run this to grant your account admin rights in Gluu:
/opt/opendj/bin/ldapmodify -h localhost -p 1636 -D "cn=directory manager,o=gluu" -j ~/.pw -Z -X -f addManagers.ldif
Log into the web interface and pick up where you left off :)
How to Present a Different Login Page Depending on where the User Came from (i.e. Based on the SP/RP)?#
SAML#
The SAML IDP sends an authorization request to oxAuth for user authentication.. In the request there is a JWT state parameter which contains a claim called relyingPartyId. You can use this relyingPartyId to render the proper form based on the SP... so SP=relyingPartyId.
How to fix idp service startup issue on Gluu 3.1.2 when installed with OpenDJ#
Description#
Gluu 3.1.2, when installed with OpenDJ as the LDAP implementation has an known issue. When restarting the IDP or Gluu Server after installation, if the IDP service fails to start and generates an error message like this:
2018-04-10 16:14:42,395 - ERROR [org.springframework.web.context.ContextLoader:351] - Context initialization failed
org.springframework.beans.factory.BeanCreationException: Error creating bean with name 'shibboleth.metrics.RegisterMetricSets$child#0' defined in URL [file:/opt/shibboleth-idp/conf/admin/metrics.xml]: Cannot resolve reference to bean 'shibboleth.metrics.AttributeResolverGaugeSet' while setting bean property 'arguments' with key [7]; nested exception is org.springframework.beans.factory.BeanCreationException: Error creating bean with name 'shibboleth.metrics.AttributeResolverGaugeSet' defined in URL [file:/opt/shibboleth-idp/system/conf/general-admin-system.xml]: Invocation of init method failed; nested exception is net.shibboleth.utilities.java.support.component.ComponentInitializationException: Injected service was null or not an AttributeResolver
    at org.springframework.beans.factory.support.BeanDefinitionValueResolver.resolveReference(BeanDefinitionValueResolver.java:359)
Caused by: org.springframework.beans.factory.BeanCreationException: Error creating bean with name 'shibboleth.metrics.AttributeResolverGaugeSet' defined in URL [file:/opt/shibboleth-idp/system/conf/general-admin-system.xml]: Invocation of init method failed; nested exception is net.shibboleth.utilities.java.support.component.ComponentInitializationException: Injected service was null or not an AttributeResolver
    at org.springframework.beans.factory.support.AbstractAutowireCapableBeanFactory.initializeBean(AbstractAutowireCapableBeanFactory.java:1578)
Caused by: net.shibboleth.utilities.java.support.component.ComponentInitializationException: Injected service was null or not an AttributeResolver
    at net.shibboleth.idp.attribute.resolver.impl.AttributeResolverServiceGaugeSet.doInitialize(AttributeResolverServiceGaugeSet.java:104)
Solution#
- Open the file
/opt/shibboleth-idp/conf/ldap.propertiesin a text editor - Change
idp.authn.LDAP.trustCertificates = /etc/certs/openldap.crttoidp.authn.LDAP.trustCertificates = /etc/certs/opendj.crt - Restart
identityandidpservices