Deploying the Gluu Server on Containership.io#
The following documentation provides instructions for deploying the Gluu Server on Containership.io.
Containership is a containers-as-a-service platform that makes it easy to deploy, manage and scale containerized applications on any public or private cloud.
Prepare Cluster#
-
Login to https://containership.io cloud dashboard.
-
Create new cluster by clicking
Create Clusterbutton.
A series of wizard forms will be displayed to help us configuring the cluster.
-
Select a cloud provider to host the cluster. In this example, we will use DigitalOcean provider.
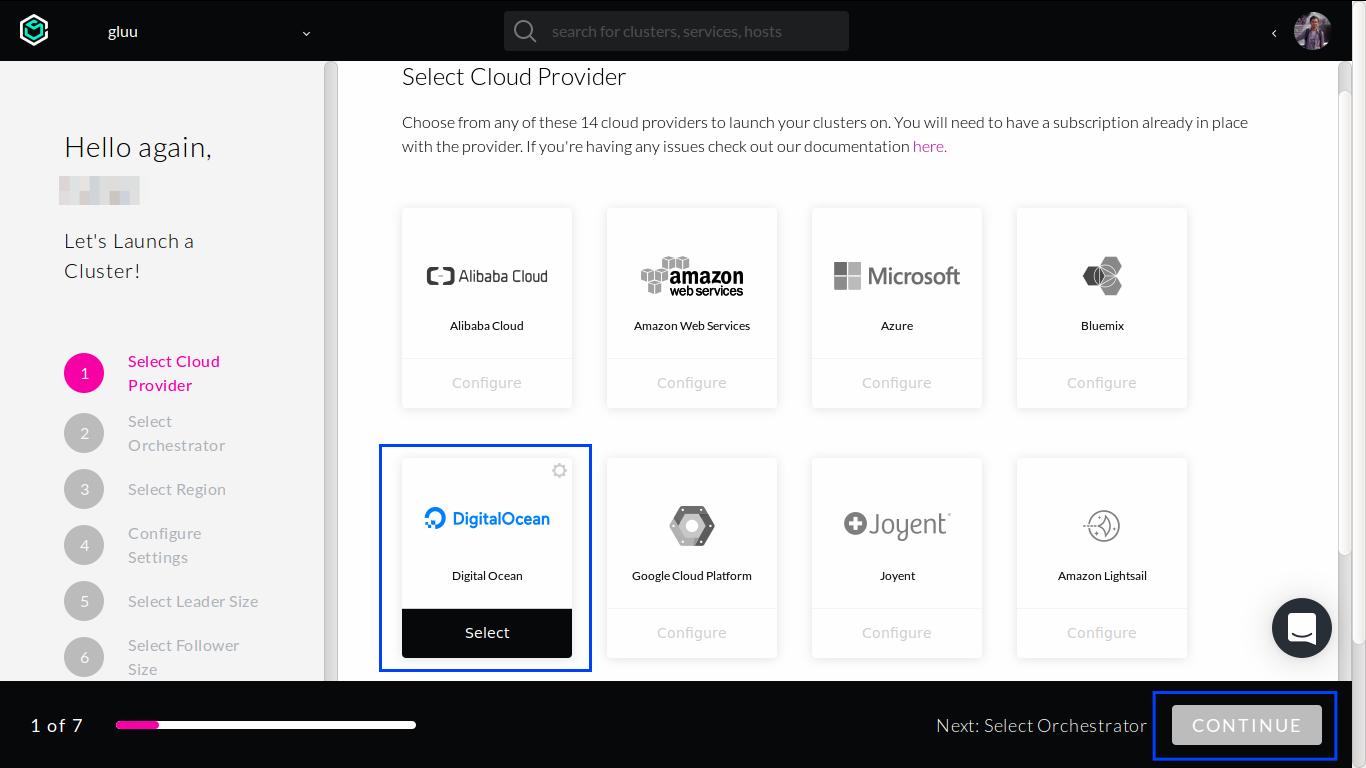
Choose the DigitalOcean box and then click
CONTINUEbutton at the bottom. -
Select Containership as the orchestrator and then click
CONTINUEbutton at the bottom.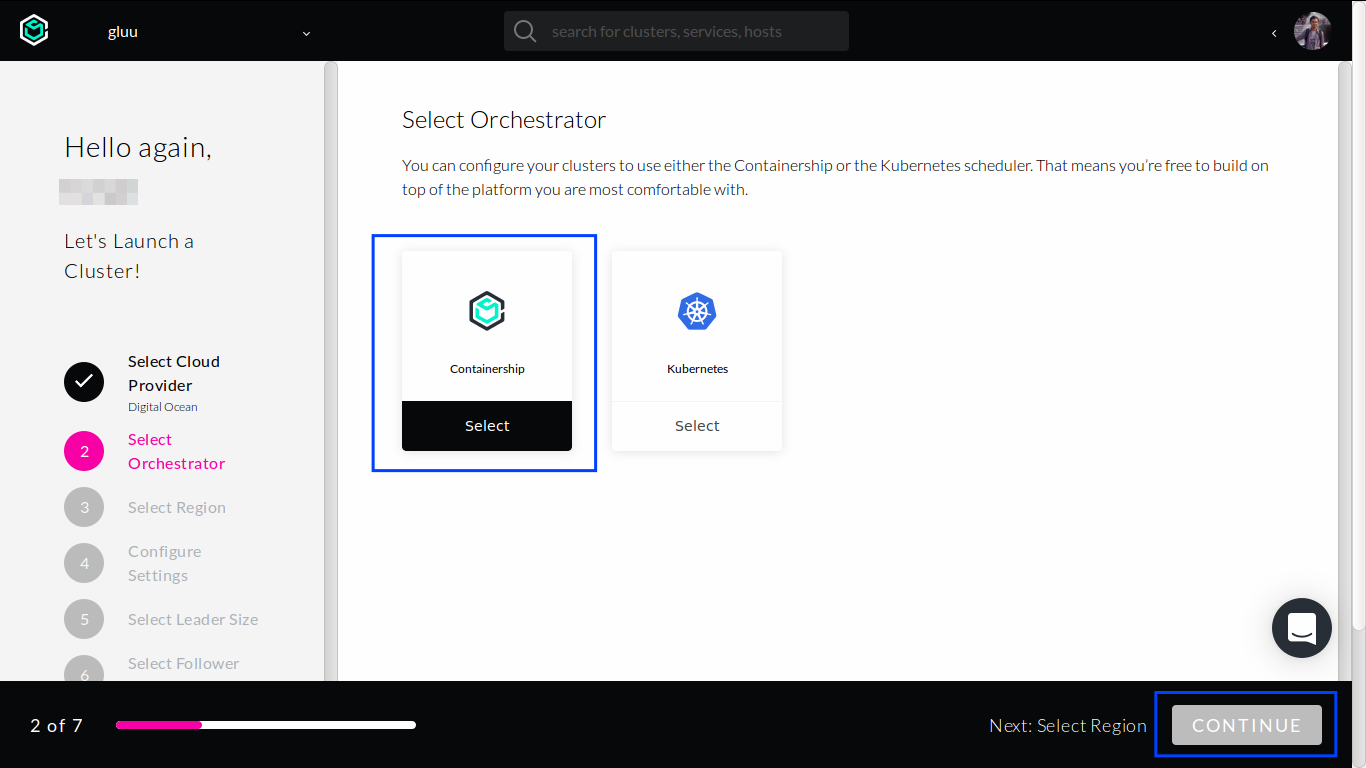
-
Select region of hosts and then click
CONTINUEbutton at the bottom.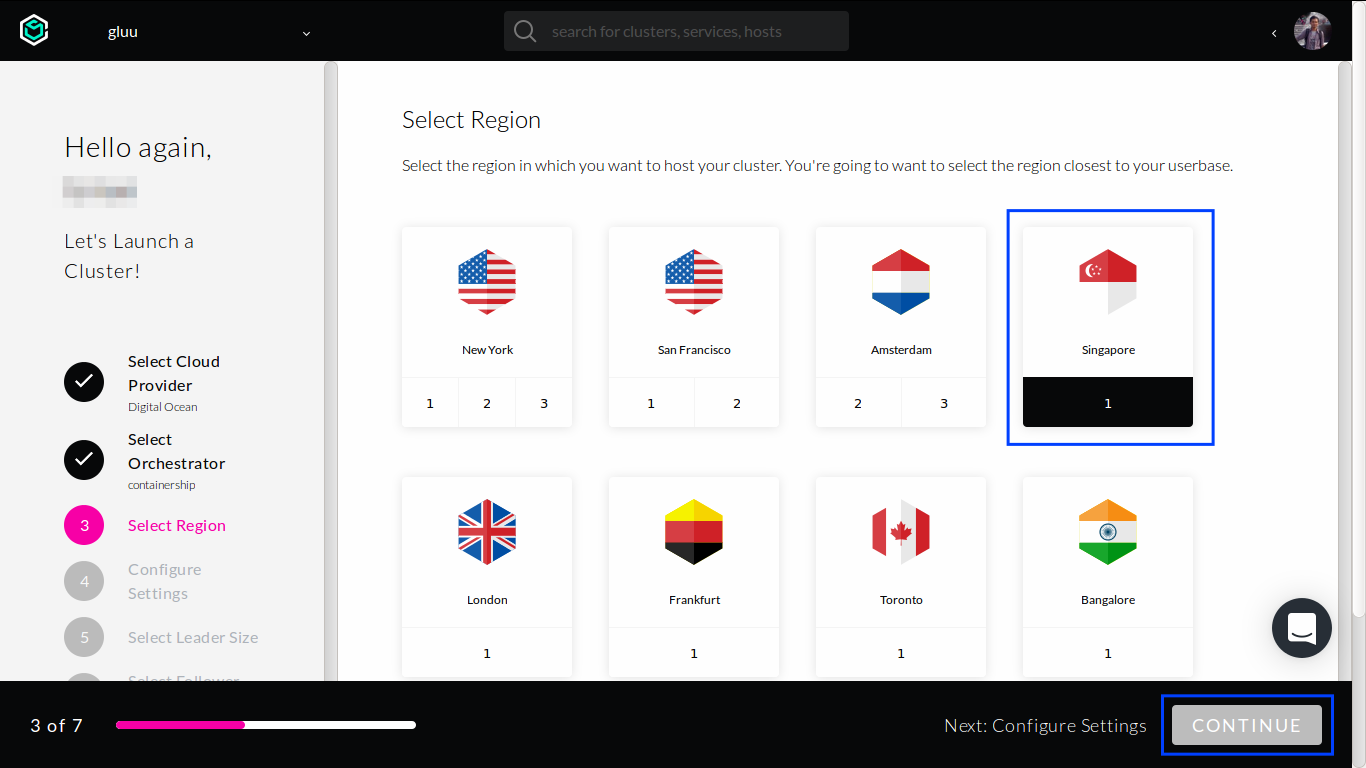
-
Select Ubuntu operating system.
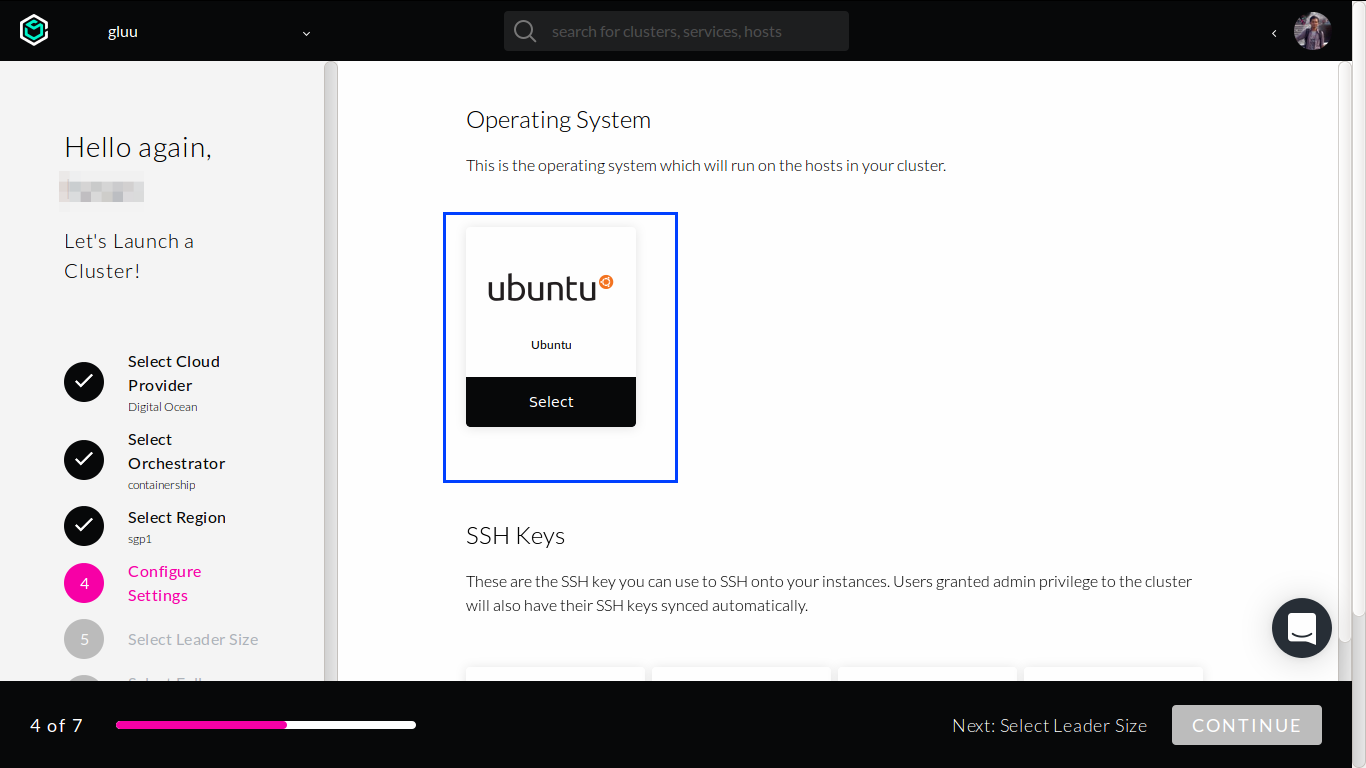
Choose any SSH keys (we can add more later).
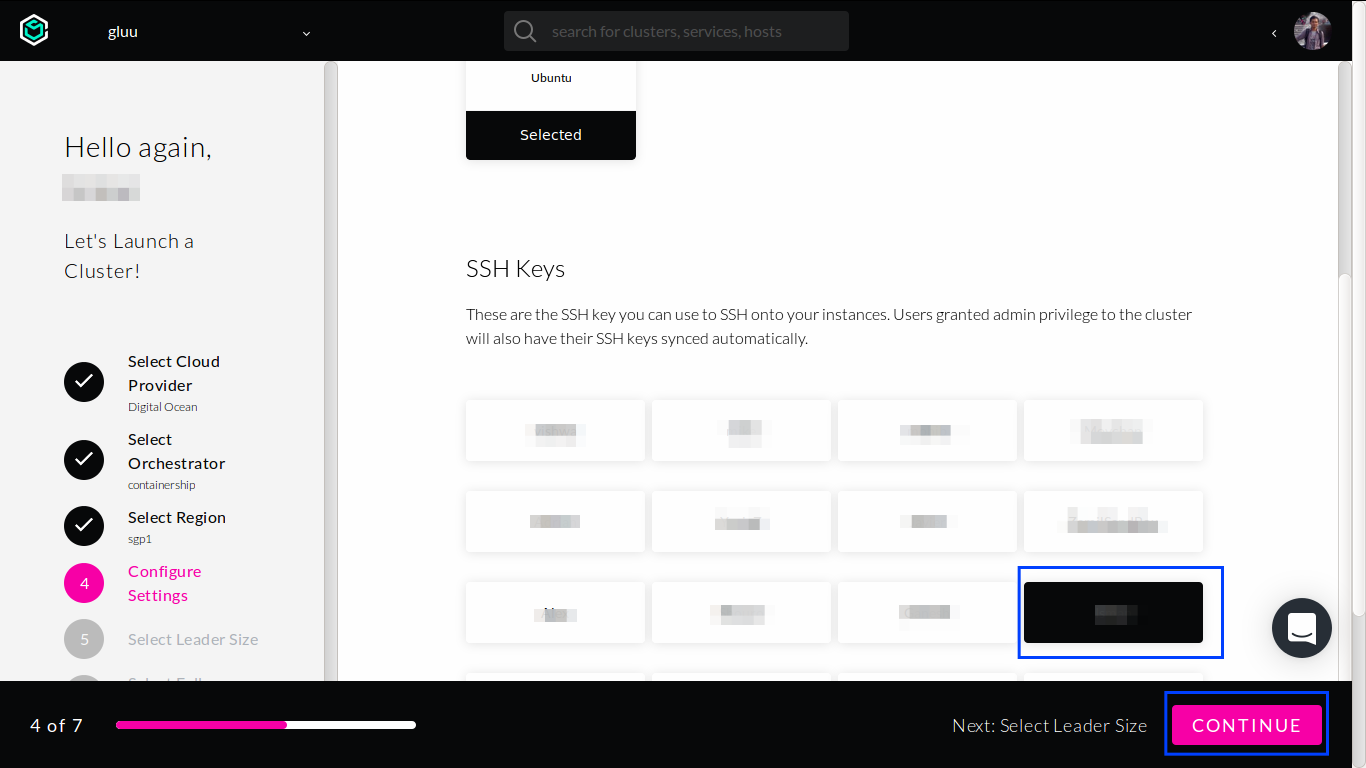
Afterwards, click
CONTINUEbutton at the bottom. -
Create Leader which has 1 CPU and 1 GB RAM, and then click
CONTINUEbutton at the bottom.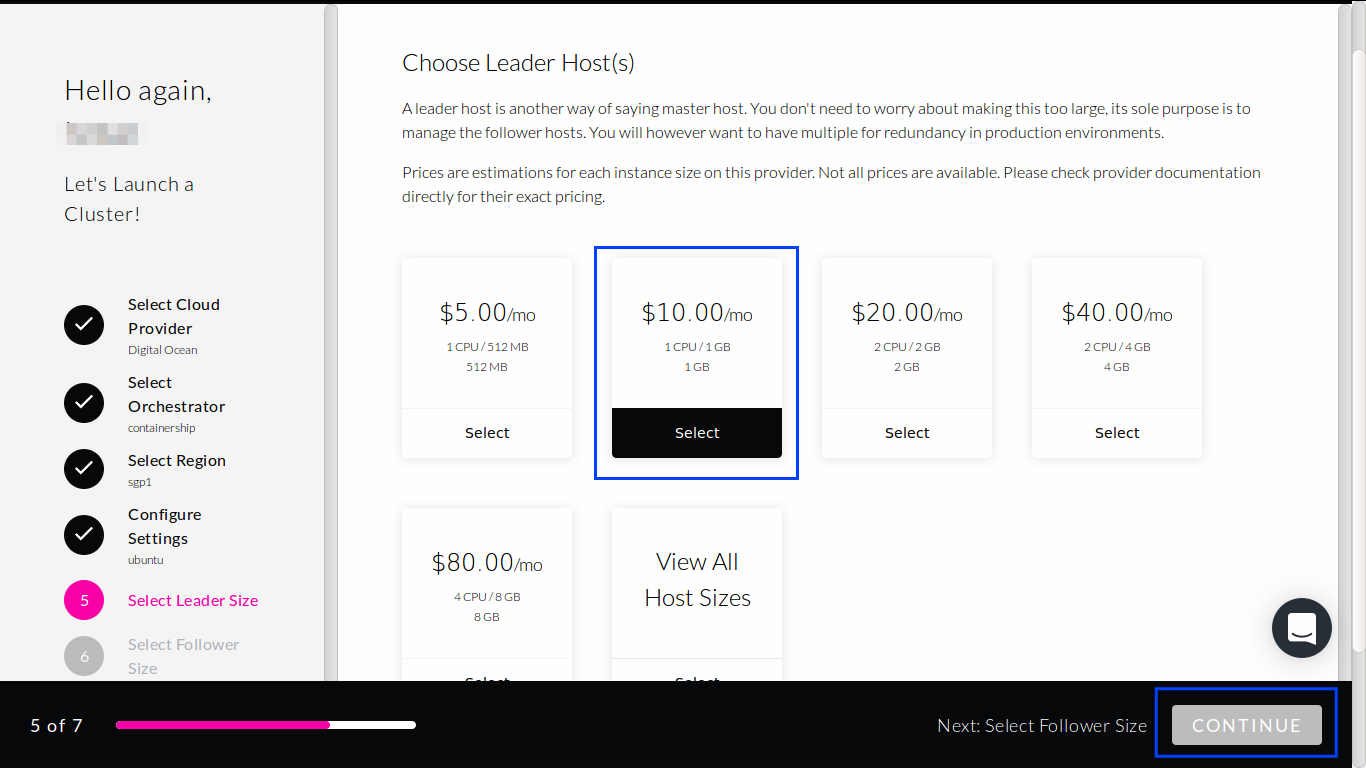
-
Create at least 2 Follower hosts which has 4 CPU and 8 GB RAM, and then click
CONTINUEbutton at the bottom.
-
Last step is to add name and environment. Use descriptive ones.
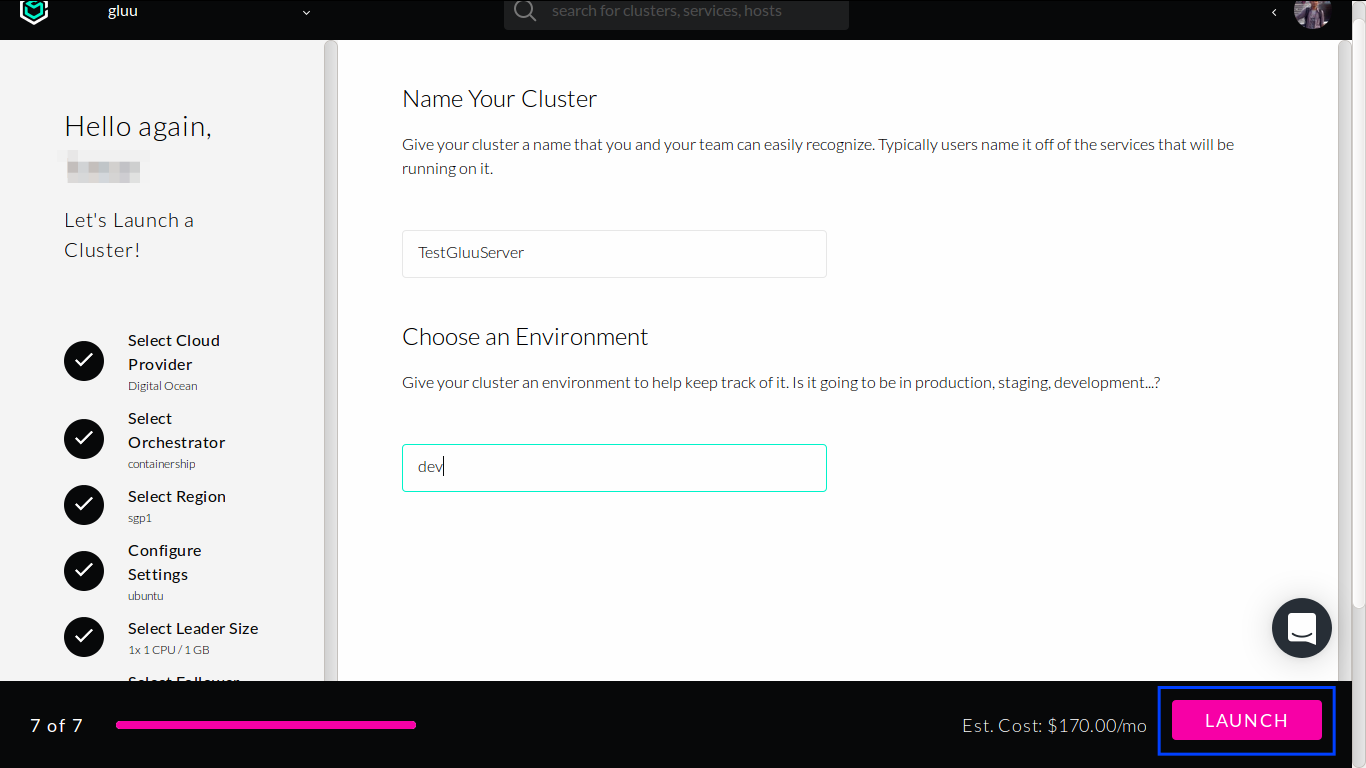
Click
LAUNCHbutton at the bottom to start provisioning the hosts.
After finishing the wizard forms, we will be redirected back to page that lists all of our clusters.
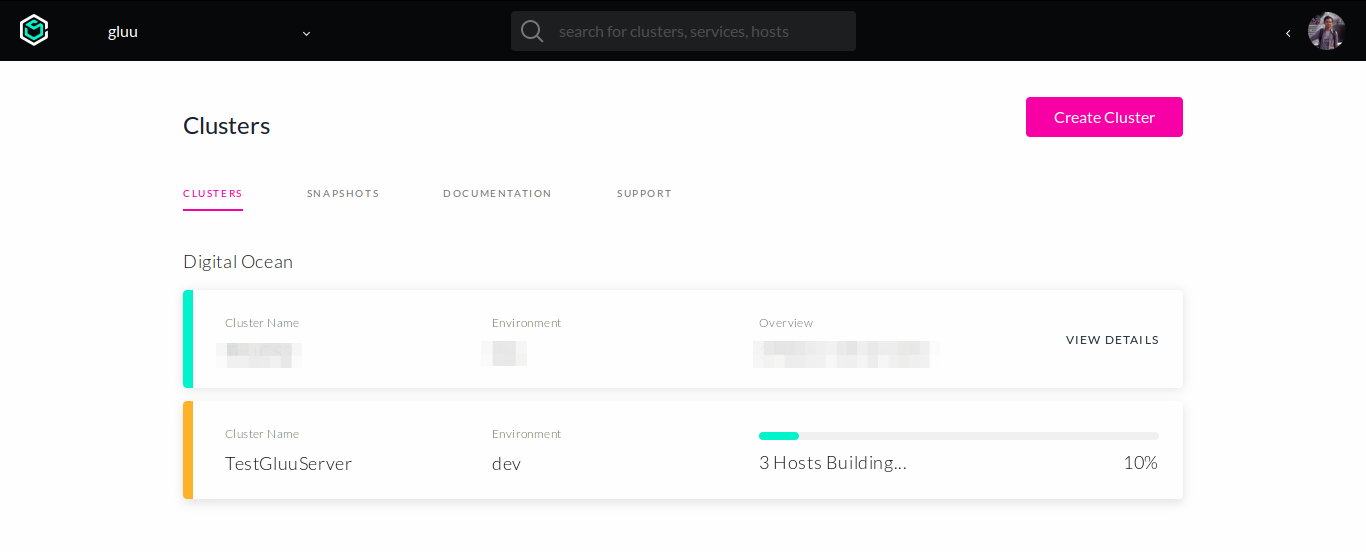
Please wait until cluster has been 100% provisioned.
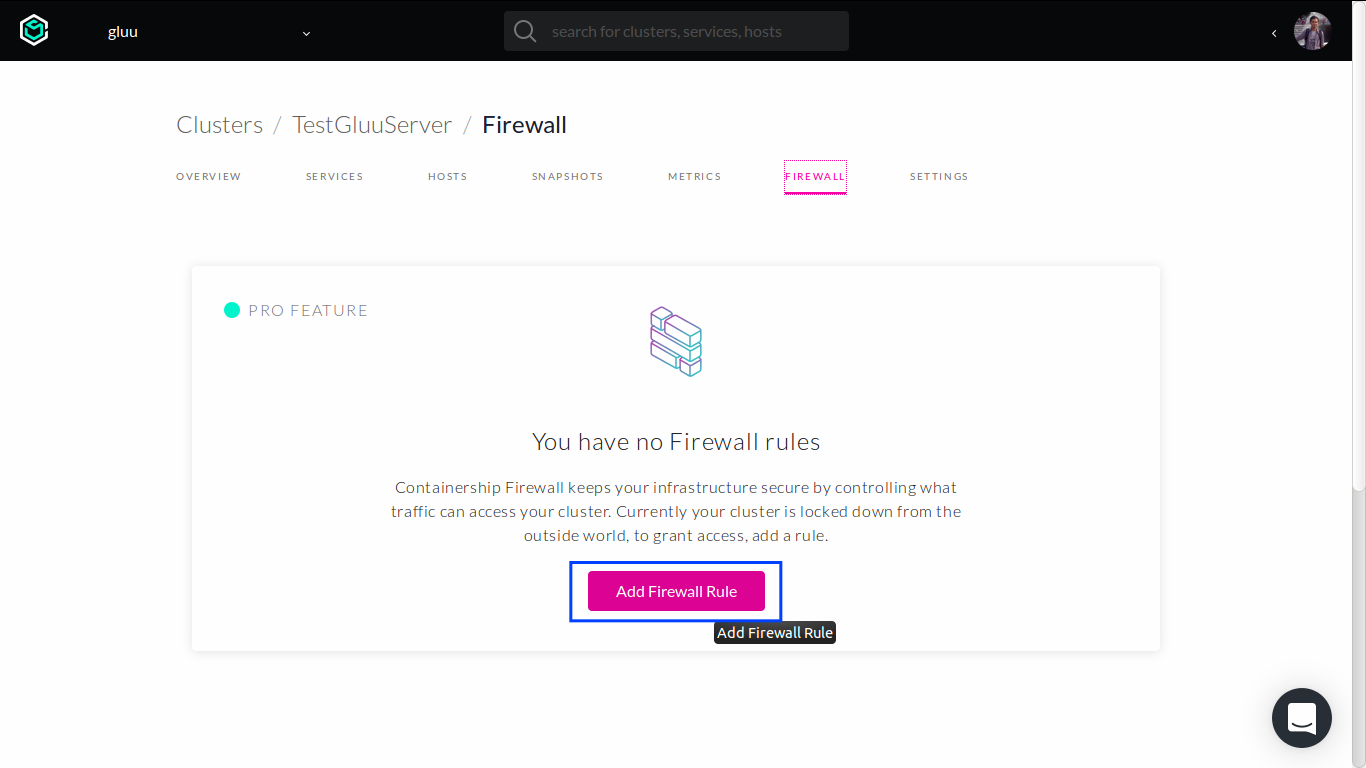
For troubleshooting and other admin purposes, we need to add firewall rule to allow SSH connection for admin users.
Click the newly created cluster which will redirect us to overview page.
Go to cluster Firewall tab, add add new rule for SSH connection by clicking Add Firewall Rule button.
Complete the forms shown below:
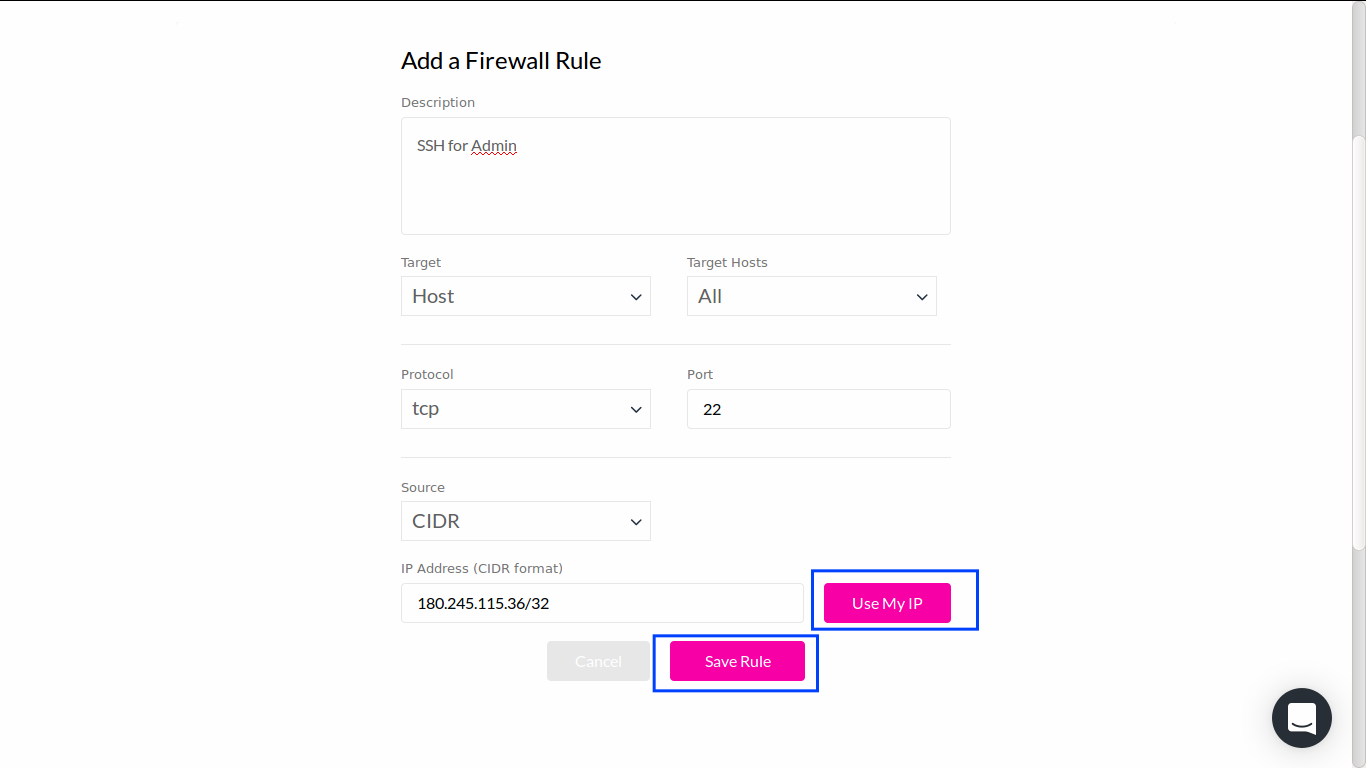
Make sure entering a correct IP address of admin's machine (either manually or using Use My IP button) before clicking Save Rule button at the bottom.
Congratulations, we have completed first stage of our cluster setup.
Custom Host Tags#
-
Go to
Hosttab.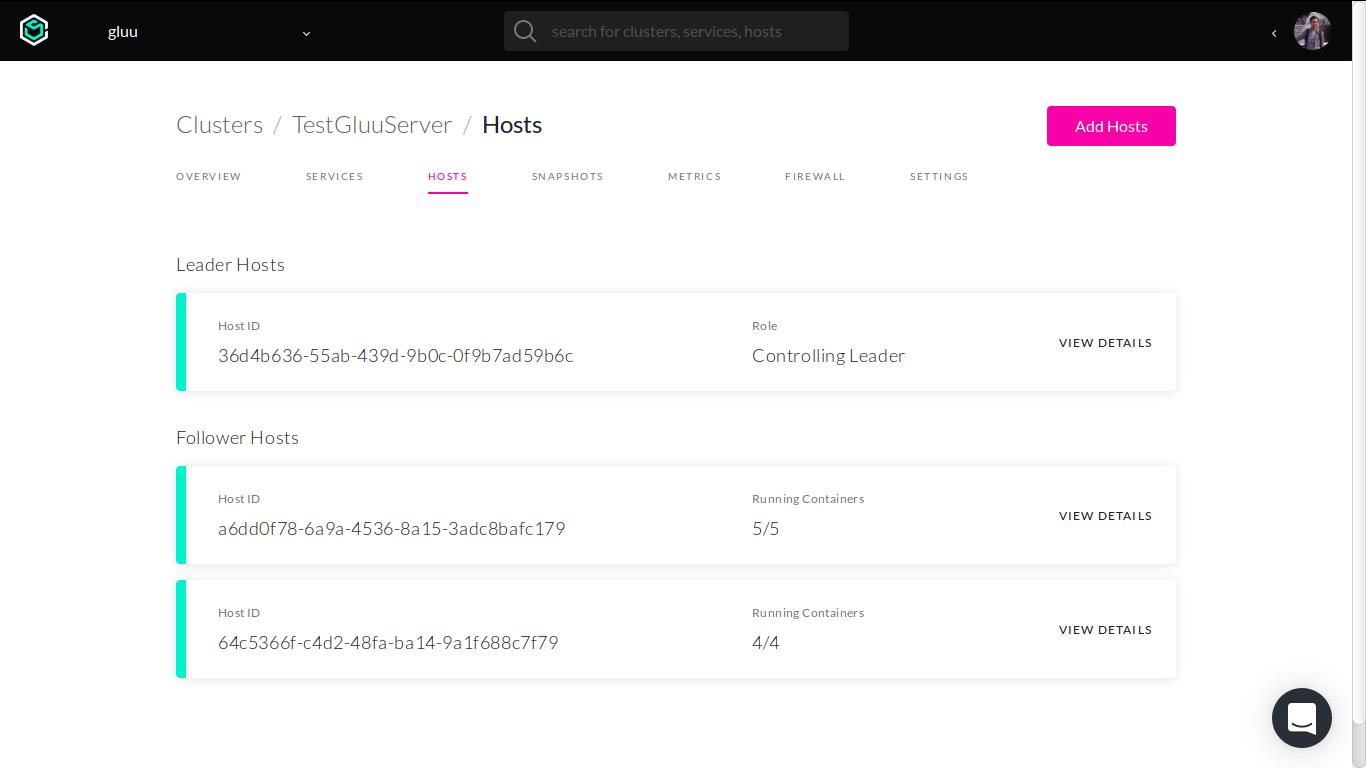
-
Click the first follower host and create the following user tags in
Tagstab.gluu.openldap.master-init = true
This mandatory tag will ensure one of OpenLDAP services that generate initial LDAP data, deployed only to this specific host.
-
Back to
Hosttab and choose another follower host. Create the following tag inTagstab.gluu.openldap.master = true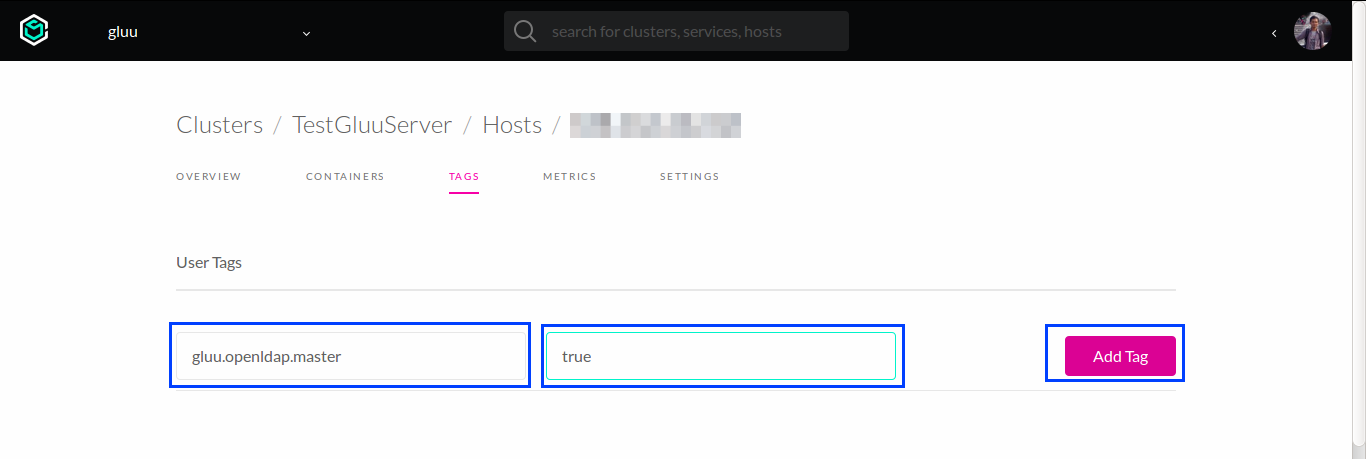
Initialize Configuration#
-
Add Consul service using Containership Marketplace.

Consul containers will be deployed to all follower hosts.
-
Go to
Hosttag, choose one of the follower hosts. Overview page will be displayed.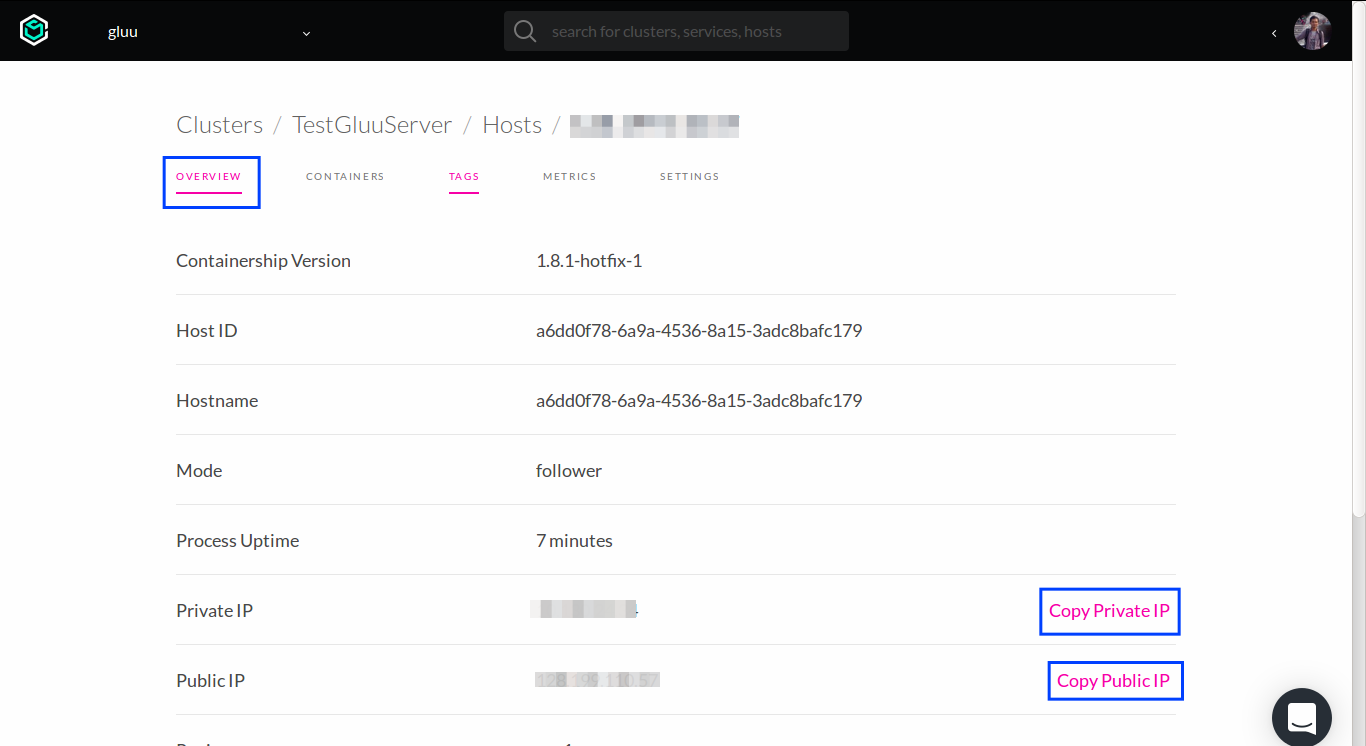
Copy the Public and Private IP, keep the values somewhere else for reference.
-
In local machine, install Docker and pull
config-initimage.docker pull gluufederation/config-init:3.1.1_rev1.0.0-beta3Consul service in Containership uses private IP and port 8314 to listen to client connection. Hence we need to do SSH tunneling to expose the port in our local machine.
ssh -L 0.0.0.0:8500:<FOLLOWER-HOST-PRIVATE-IP>:8314 <SSH-USER>@<FOLLOWER-HOST-PUBLIC-IP>After tunneling established, in another terminal, we can start generating initial config in our local machine for our Gluu Server cluster.
Prepare following steps before generating initial config:
- Use resolvable public domain
- Use SSL certificate and key for the domain (create them if we don't have one yet; self-signed is possible)
Here's an example on how to run
config-initcontainer:
docker run --rm \
    -v /path/to/org_ssl.crt:/etc/certs/gluu_https.crt \
    -v /path/to/org_ssl.key:/etc/certs/gluu_https.key \
    gluufederation/config-init:3.1.1_rev1.0.0-beta3 \
    --admin-pw my-password \
    --email 'my-email@my.domain.com' \
    --domain my.domain.com \
    --org-name 'My Organization' \
    --kv-host <LOCAL-IP> \
    --kv-port 8500 \
    --save
Deploy Gluu Server Services#
Note
At the time this document is written, all Gluu's marketplace services are still in private mode.
Deploy OpenLDAP Services#
Go to Services tab and add another service from marketplace. Pick Gluu OpenLDAP item.
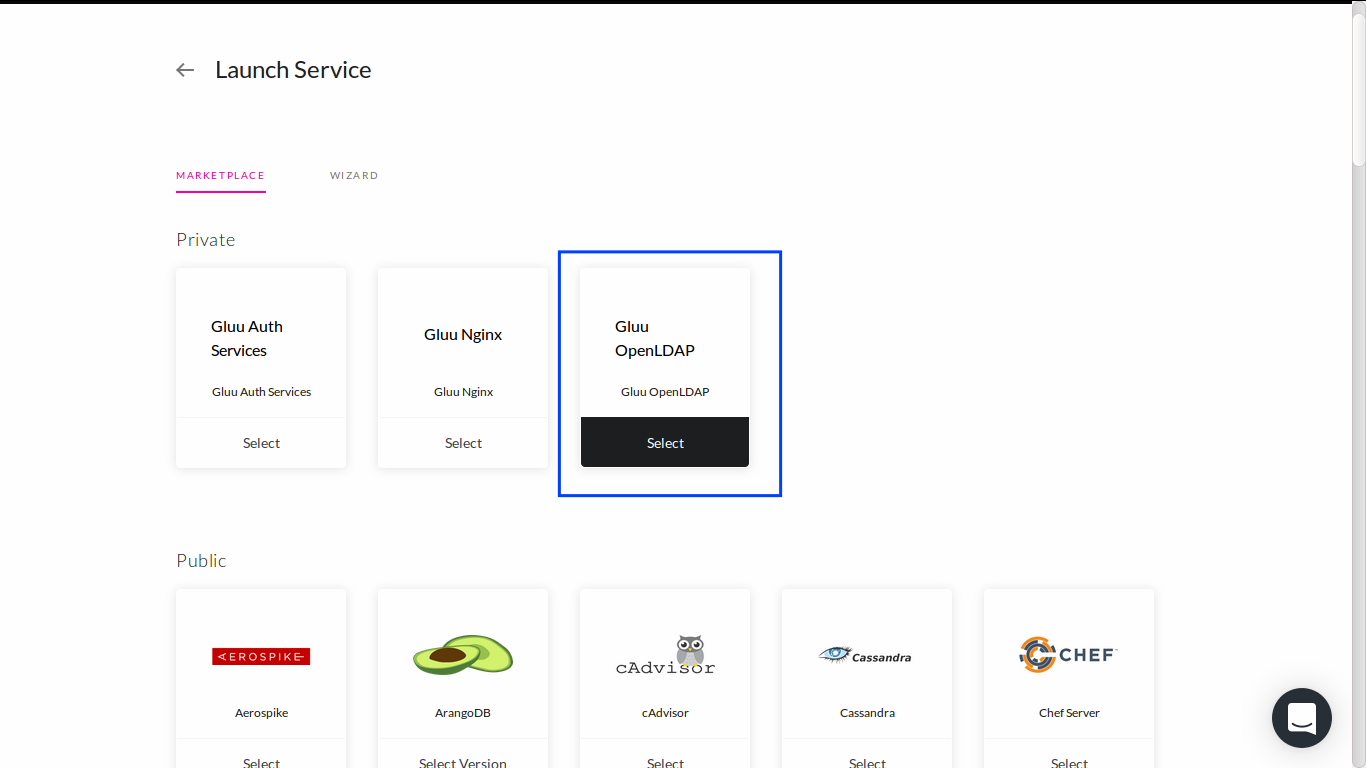
The Gluu OpenLDAP marketplace will deploy 2 services, gluu-openldap-init and gluu-openldap, with their own role:
gluu-openldap-init: to initialize LDAP data required to run Gluu Server.gluu-openldap: a peer for multi-master topology where data is replicated to/from this instance (for high-availability purpose).
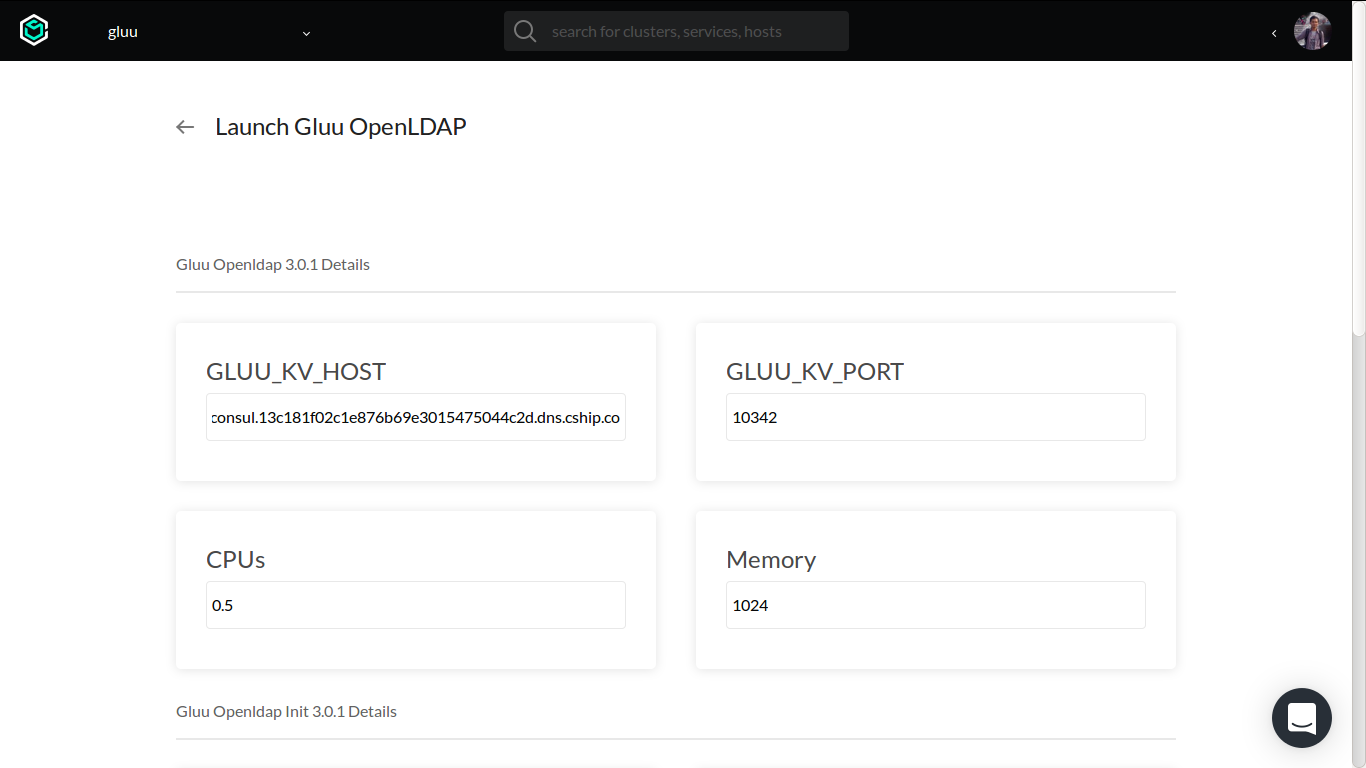
Upon the creation of services, a form will be displayed asking for configuration values.
GLUU_KV_HOST: DNS entry of existing Consul service.GLUU_KV_PORT: discovery port of existing Consul service.GLUU_CUSTOM_SCHEMA_URL: optional URL to downloadable archive (TAR format) of custom OpenLDAP schema.
For other configuration, we can leave it as is. We only need to focus on all configuration prefixed by GLUU_ string for starting point.
To get correct values for GLUU_KV_HOST and GLUU_KV_PORT, we need to go to overview page of Consul service.
Pick consul service in Services tab. Take a note of its DNS entry as shown by example below:
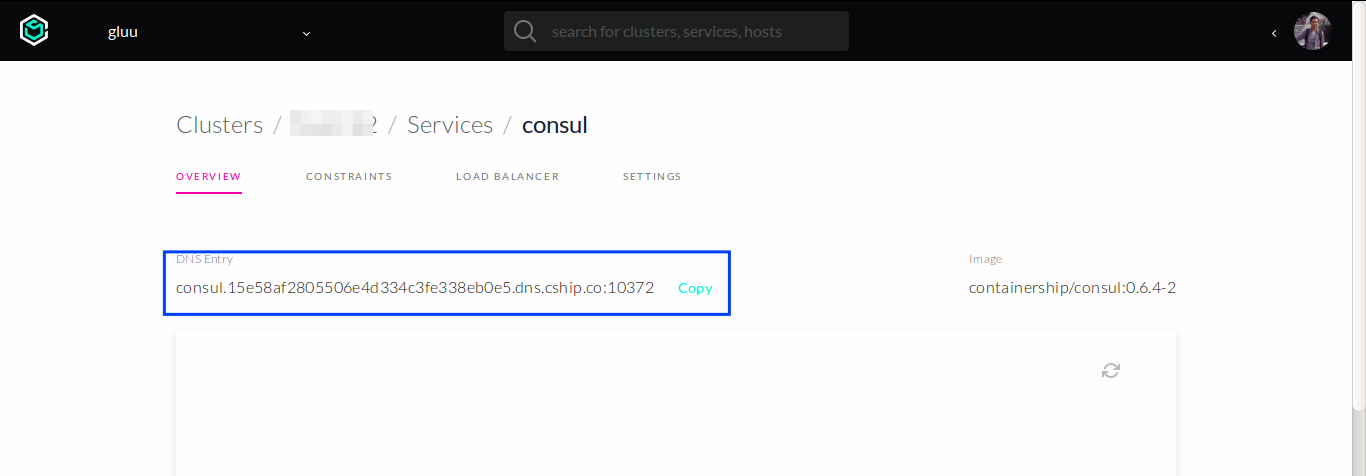
Note, the DNS entry shown above is consisting of the actual DNS entry and its discovery port.
Once we have entered the GLUU_KV_HOST and GLUU_KV_PORT for gluu-openldap service, scroll down to configure gluu-openldap-init service.
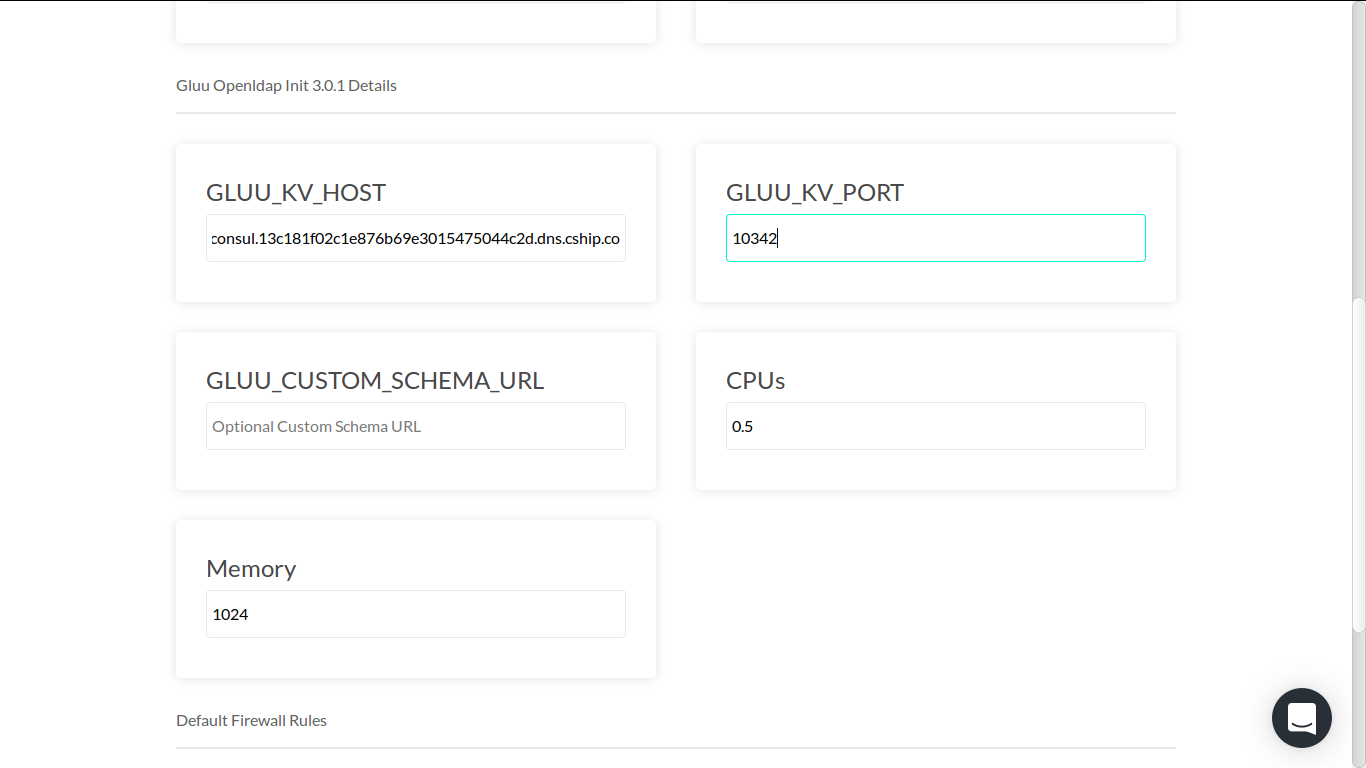
Repeat the process of entering GLUU_KV_HOST and GLUU_KV_PORT using same values when configuring gluu-openldap service.
Optionally you can add redis service here, supported ENV variables are:
GLUU_CACHE_TYPE: supported values are 'IN_MEMORY' and 'REDIS', default is 'IN_MEMORY'
GLUU_REDIS_URL: Url of redis service, fornat is redis_host1:redis_port1,redis_host2:redis_port2
Finally, click Add Service button at the bottom of the page.
OpenLDAP Multi-Master Replication#
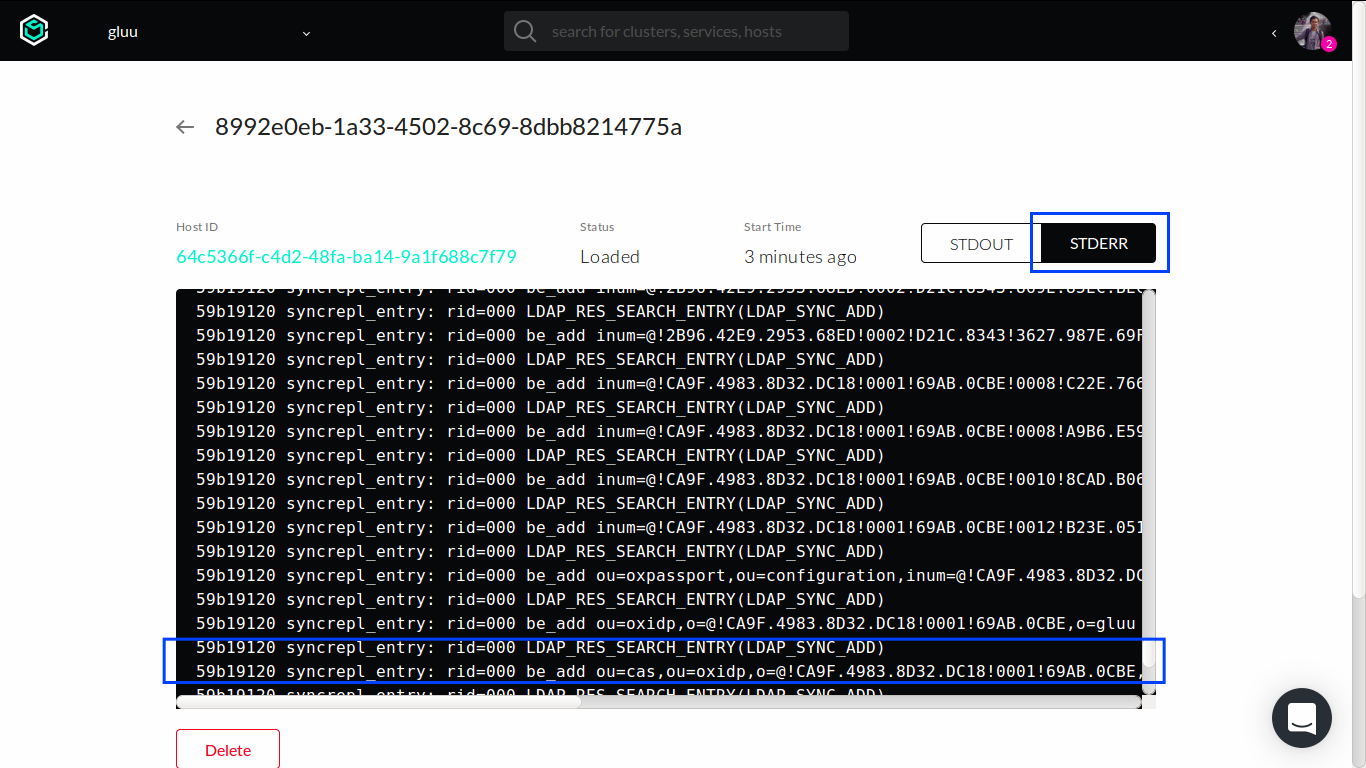
OpenLDAP services take care the process replicating data (using multi-master topology) automatically when new instance is deployed (though the process started one minute after container successfully deployed).
Although the process is hidden from users, we can check it from container's log directly in web UI.
To check the log, select gluu-openldap service in Services tab.
Scroll down to bottom and click one of the container listed there.
Click the STDERR button, and then we can see its log messages.
Here's an example of log from successful replication process (note the LDAP_RES_SEARCH_ENTRY(LDAP_SYNC_ADD) lines):
Deploy Auth Services#
Once Gluu OpenLDAP services are deployed, we can deploy Auth services.
Go to Services tab and add another service from marketplace. Pick Gluu Auth item.
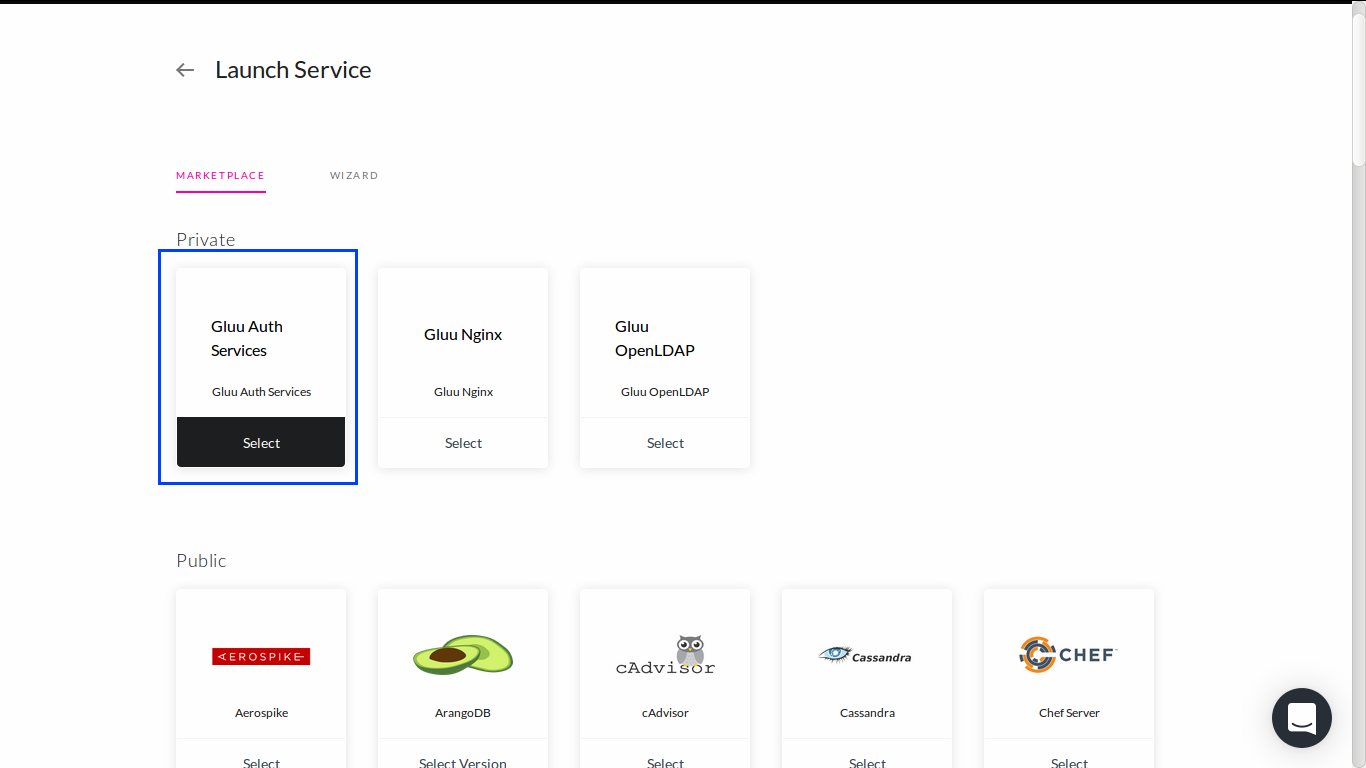
The Gluu Auth marketplace will deploy 3 services, gluu-oxauth, gluu-oxtrust and gluu-keyrotation:
gluu-oxauth: docker-based oxAuth app.gluu-oxtrust: docker-based oxTrust app.gluu-keyrotation: a daemon to rotate public and private keys for oxAuth.
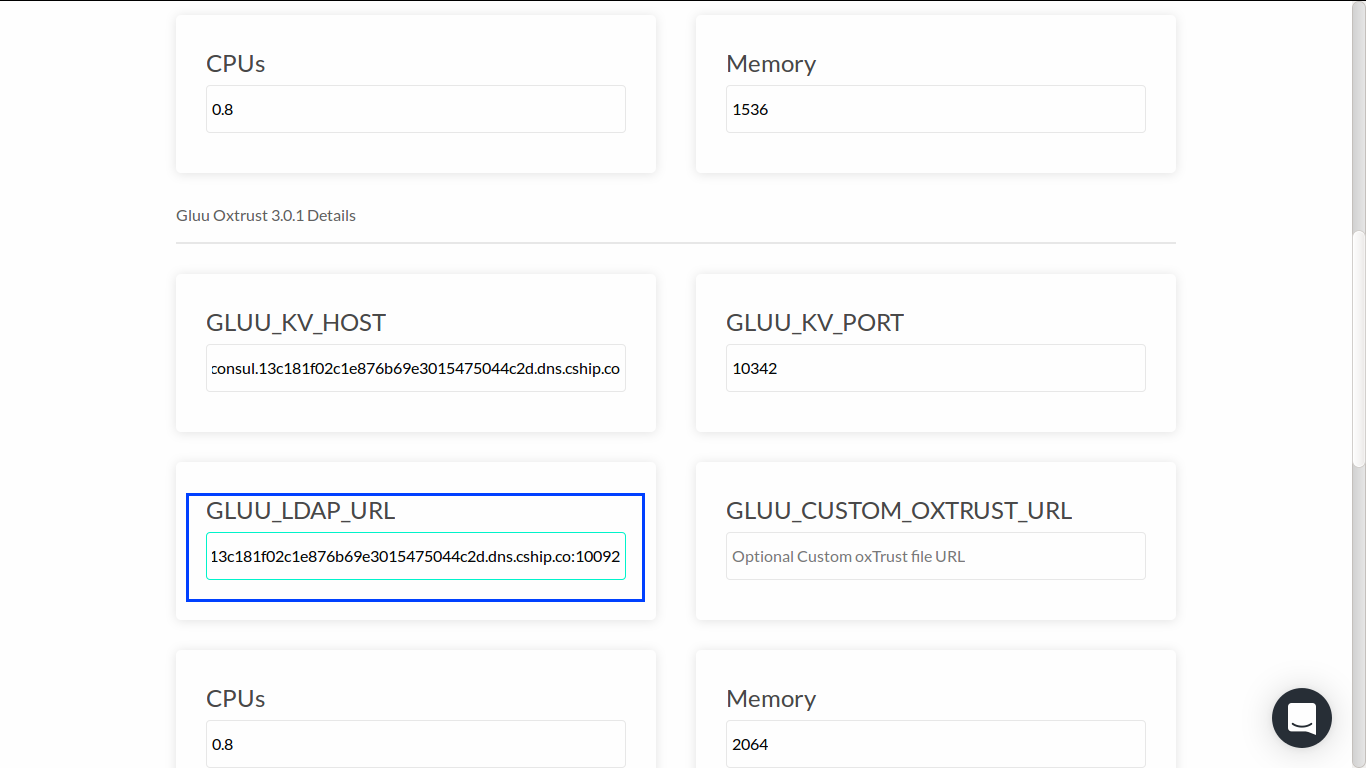
Upon the creation of services, a form will be displayed asking for configuration values.
GLUU_KV_HOST: DNS entry of existing Consul service.GLUU_KV_PORT: discovery port of existing Consul service.GLUU_LDAP_URL: DNS entry and discovery port of existing OpenLDAP services (gluu-openldap-initandgluu-openldap); note we need to add all OpenLDAP DNS entries separated by comma (for examplegluu-openldap-init.xxx.dns.cship.co:10001,gluu-openldap.xxx.dns.cship.co:10002) to achieve high-availability.GLUU_CUSTOM_OXAUTH_URL: optional URL to downloadable archive (in TAR format) of files to modify oxAuth.GLUU_CUSTOM_OXTRUST_URL: optional URL to downloadable archive (in TAR format) of files to modify oxTrust.
Let's start with gluu-oxauth configuration:
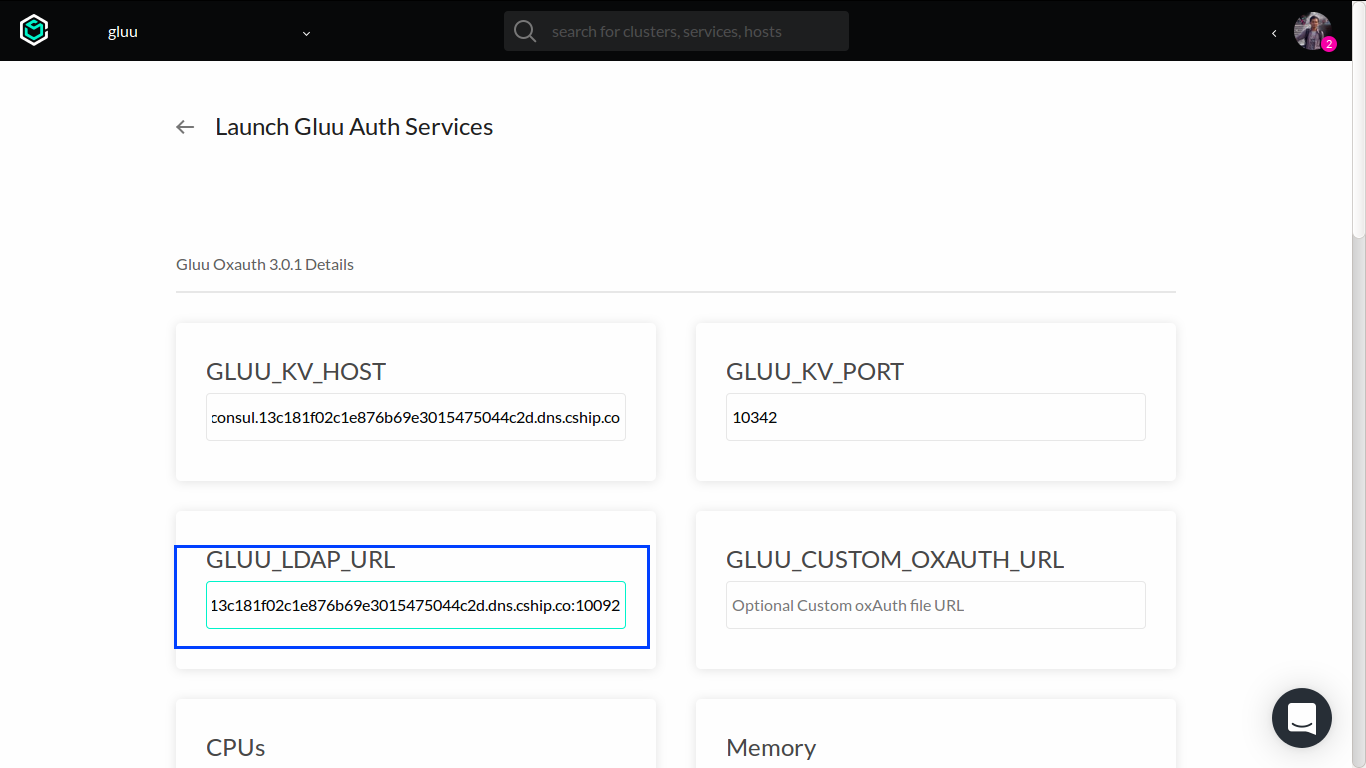
Enter the same GLUU_KV_HOST and GLUU_KV_PORT from previous process.
To get correct values for GLUU_LDAP_URL, visit gluu-openldap-init and gluu-openldap overview pages and take note about their DNS entries.
Move on to gluu-oxtrust configuration and repeat similar steps when configuring gluu-oxauth:
The last step is to configure gluu-keyrotation:
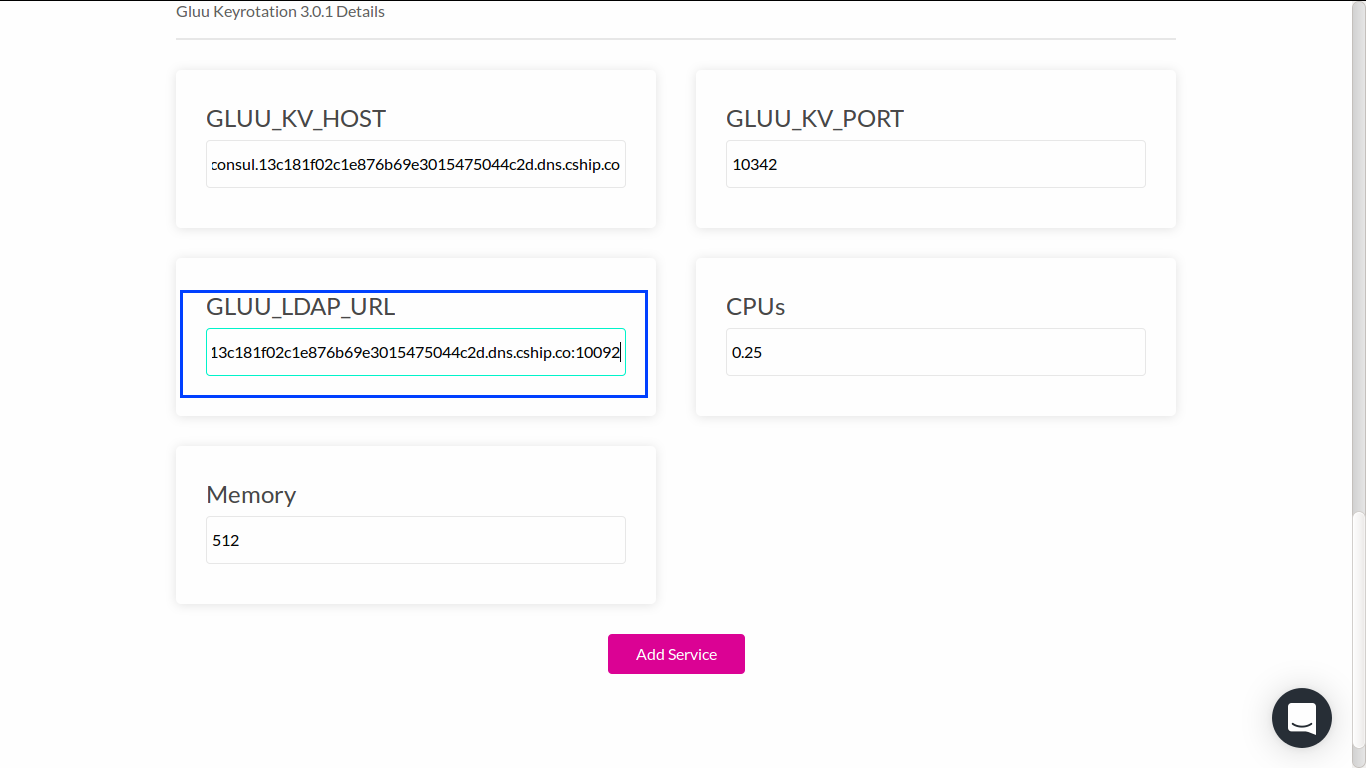
Repeat similar things from previous steps.
Finally, click Add Service button at the bottom of the page.
Deploy Nginx Services#
Once Gluu Auth services are deployed, we can deploy Nginx services.
Go to Services tab and add another service from marketplace. Pick Gluu Nginx item.
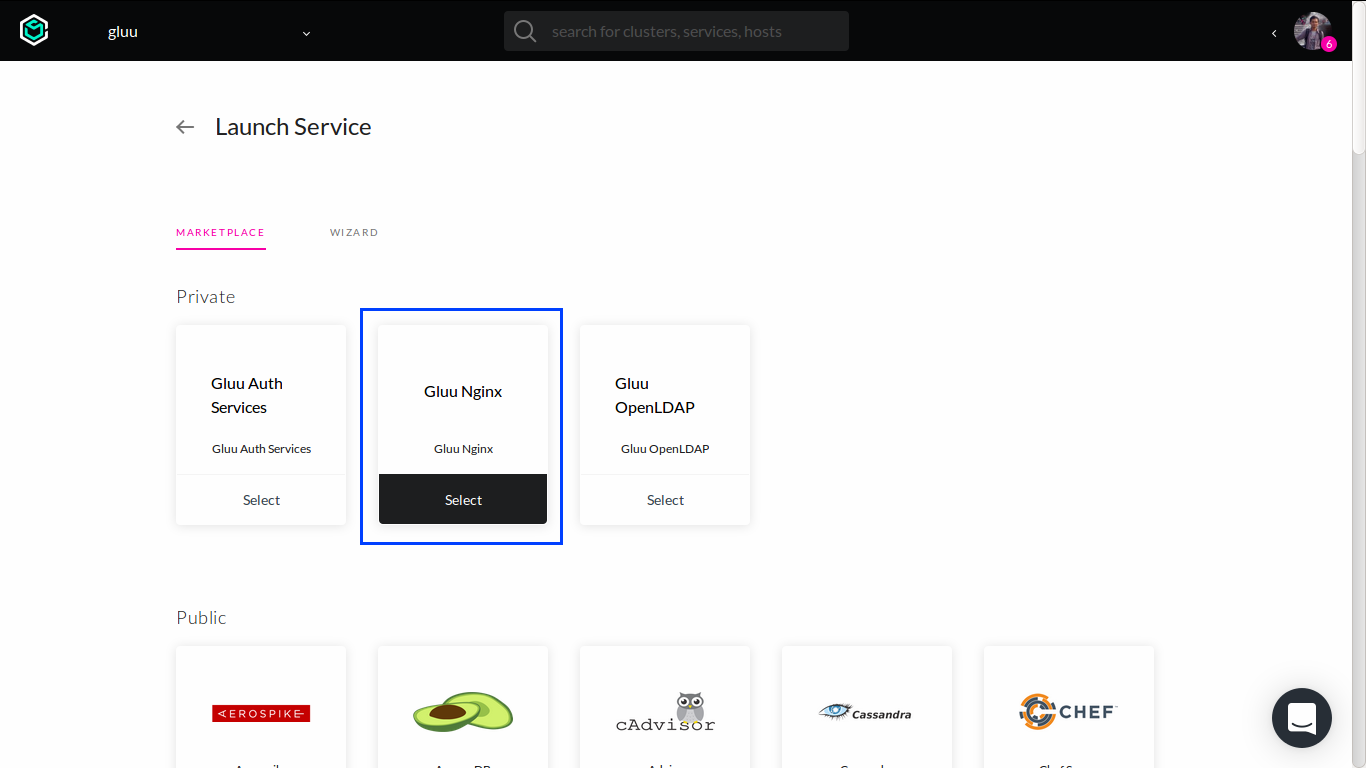
The Gluu Nginx marketplace will deploy 1 service only, the gluu-nginx.
Upon the creation of services, a form will be displayed asking for configuration values.
GLUU_KV_HOST: DNS entry of existing Consul service.GLUU_KV_PORT: discovery port of existing Consul service.GLUU_OXAUTH_BACKEND: DNS entry and discovery port of existing oxAuth service (gluu-oxauth).GLUU_OXTRUST_BACKEND: DNS entry and discovery port of existing oxTrust service (gluu-oxtrust).
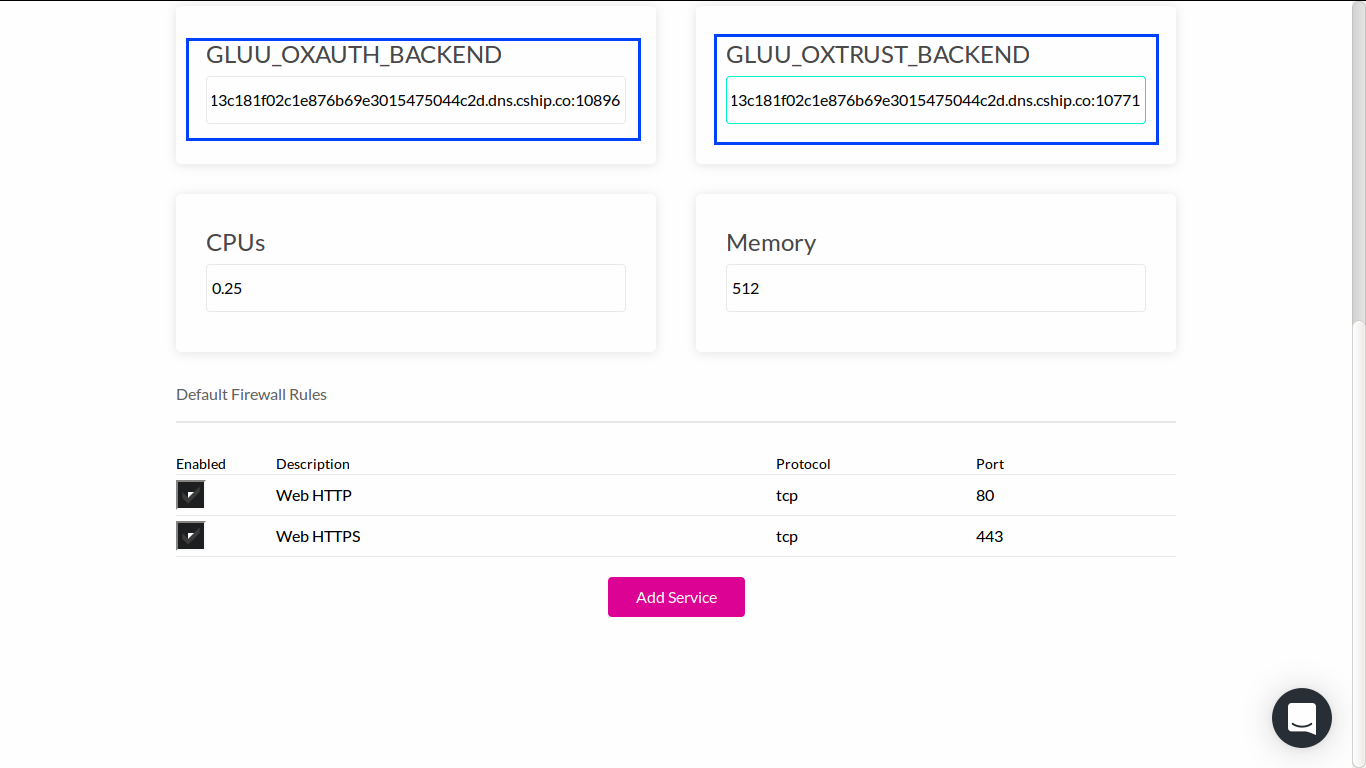
To get correct value for GLUU_OXAUTH_BACKEND, go to overview page of gluu-oxauth service and take note about its DNS entry.
To get correct value for GLUU_OXTRUST_BACKEND, go to overview page of gluu-oxtrust service and take note about its DNS entry.
Finally, click Add Service button at the bottom of the page.
Managing Public Domain#
Add CNAME record to domain, the value should be the gluu-nginx DNS entry.
Managing LDAP Authentication#
As we have 2 services for OpenLDAP, we need to save the connection configuration using oxTrust UI:
- Visit
https://<your-domain>/identity/authentication/configuration - In
Serverform field, make sure we havegluu-openldap-init's DNS entry. - In same form field, click
Add serverlink (a new form field will appear). Addgluu-openldap's DNS entry. - Click
Test LDAP Connectionbutton. - If we have
LDAP Connection Test Succeededpopup, clickUpdatebutton.
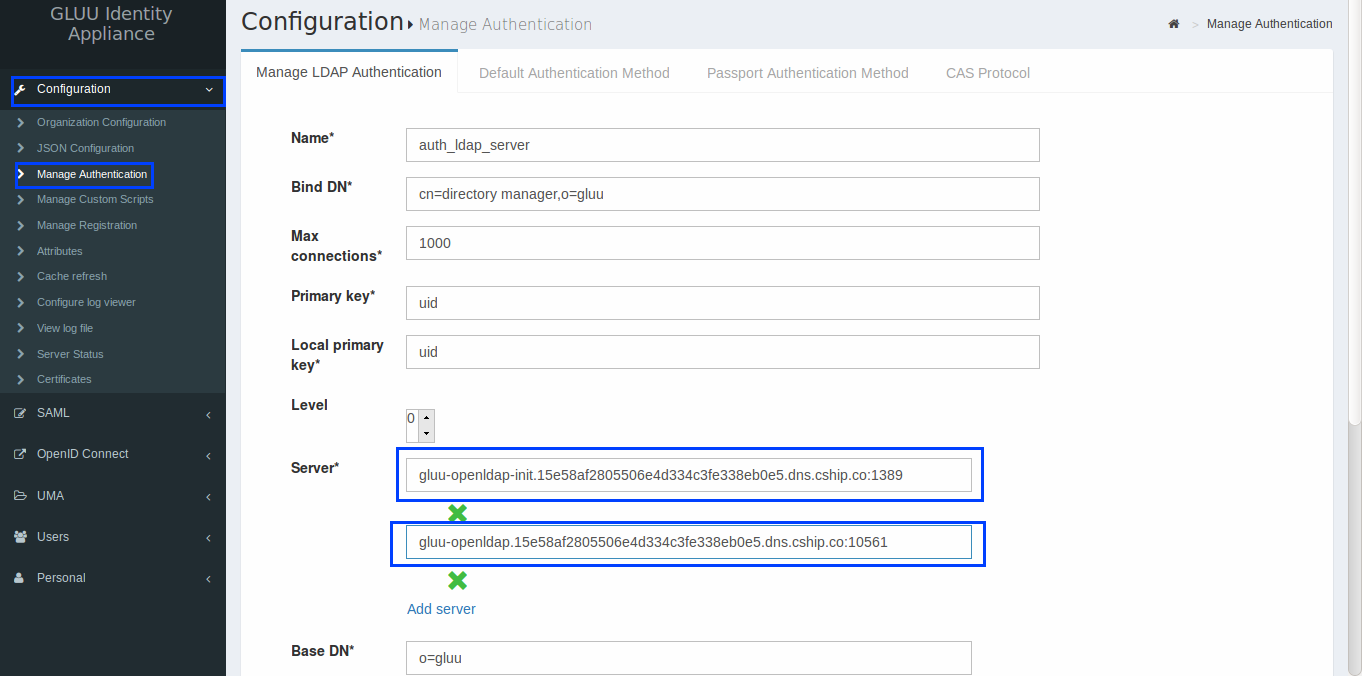
By having 2 services DNS entry listed in LDAP authentication, if one of the service is unavailable, we still have another one available for authentication.