OAuth API protection and OAuth scope security#
Overview#
In this tutorial, we will use the GLUU-OAuth-Auth for client authentication and GLUU-OPA-PEP plugins to secure api by OPA Policy.
In the demo, we will protect /posts api with read oauth scope. Plugin will check the request has token is active or not if true then check the OPA Policy. If a token has sufficient scope to pass policy, the user is granted access. If not, access is denied.
Requirements#
-
Gluu Gateway 4.0: This is our Resource Server (RS), where it checks the token first. In the second step, scope expressions are enforced, a.k.a. the Policy Enforcement Point (PEP).
-
Open Policy Agent(OPA) Server: This is policy server. It executes the policy and check whether the token has sufficient scopes or not to access resources, a.k.a. the Policy Decision Point (PDP). Install OPA from here and add below policy.
-
Gluu Server 4.0: This is our OpenID Connect Server (OP Server), from where Requesting(Relying) party issue the OAuth token with scopes. Install Gluu
-
Python Script demo app: This is our Requesting Party (RqP), which will be making authentication and authorization requests on behalf of the user. Installation instructions below
-
Protected(Upstream) API: In our demo, we are using a demo Node.js App. Take Node.js demo from here.
OPA Policy#
For this demo, we are using below very simple policy. Deploy this policy in your OPA Server. For more complex policy please check OPA docs.
Below policy will check endpoint should be /posts, HTTP method should be GET and the user should be test@gluu.org otherwise deny.
package httpapi.authz

# HTTP API request
import input

default allow = false

# allow posts with read scope
allow {
  input.path = ["posts"]
  input.request_token_data.scope = ["openid", "read"]
}
Check OPA Plugin docs for which data passed by OAuth plugin to OPA.
Gluu Server configuration (OP Server)#
We need to add read scope at OP server so we can add it to OP Client and later on we can issue token along with the read scope. To add read scope, configure the following settings inside your Gluu Server:
-
In oxTrust, navigate to
OpenID Connect>Scopes -
Click on the
+ Add Scopebutton -
It will show the below form, Fill the
readin display name and check theAllow for dynamic registrationradio box.
-
Click on the
Addbutton
Gluu Gateway configuration (RS)#
Note
The GG UI is only available on the localhost. Since it is on a remote machine, we need SSH port forwarding to reach the GG UI. Plugin configuration can be done either via REST calls or via the Gluu Gateway web interface.
Applications and their ports:
| Port | Description |
|---|---|
| 1338 | Gluu Gateway Admin GUI |
| 8001 | Kong Admin API |
| 8000 | Kong Proxy Endpoint |
| 443 | Kong SSL Proxy Endpoint. Kong by default provide 8443 port for SSL proxy but during setup, it changes into 443. |
| 8443 | oxd Server |
Login into Gluu Gateway Admin GUI(:1338) and follow the below steps.
Add Service#
Register your upstream API as a Service.
We are using http://localhost:3000 as the Upstream API, it is your application where you want to add security.
Follow these step to add Service using GG UI
- Click
SERVICESon the left panel - Click on
+ ADD NEW SERVICEbutton - Fill in the following boxes:
- Name: oauth-demo
- URL: http://localhost:3000

Add Route#
Follow these steps to add a route:
-
Click
oauth-demoon the services -
Click on the
Routes -
Click the
+ ADD ROUTEbutton -
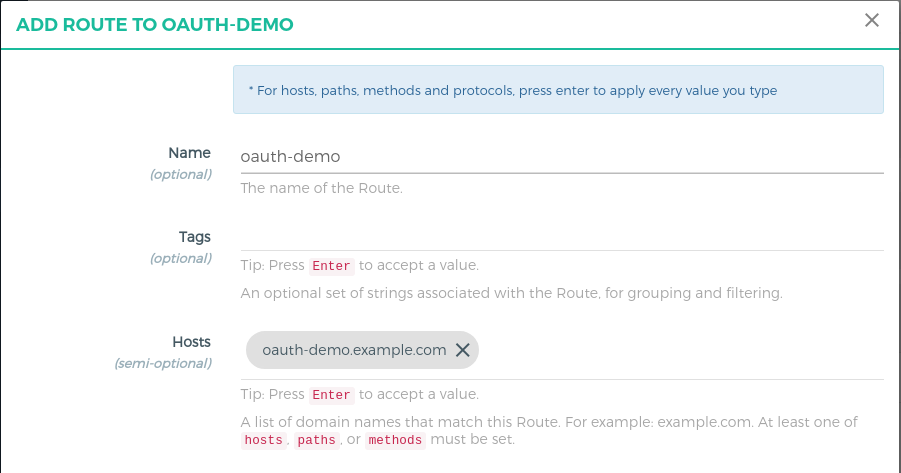
Fill in the following boxes:
- Hosts: oauth-demo.example.com,
Tip: Press Enter to accept value
- Hosts: oauth-demo.example.com,
Configure gluu-oauth-auth Plugin#
Follow these steps to add the plugin:
-
Click
oauth-demoon the services -
Click on the
Plugins -
Click on the
+ ADD PLUGINbutton -
Click on the
+of the titleGluu OAuth Auth & PEP -
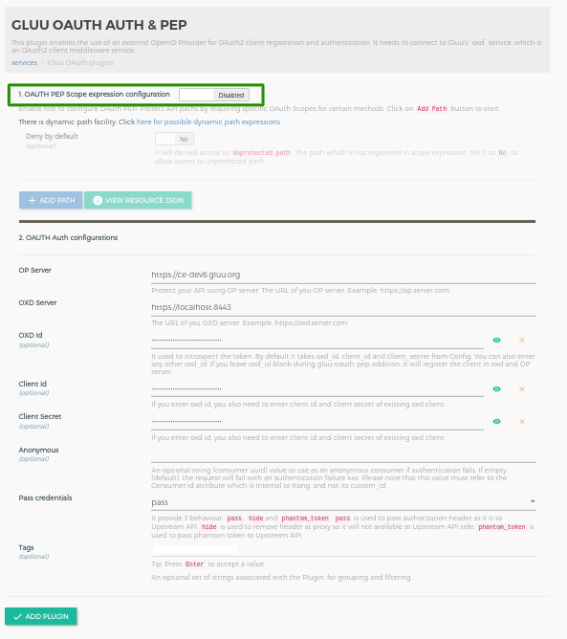
It will show the plugin configuration form. Disable the oAuth Expression button at the top and add plugin by clicking on
+ ADD PLUGINbutton at the bottom.
Configure gluu-opa-pep plugin#
-
Click
oauth-demoon the services -
Click on the
Plugins -
Click on the
+ ADD PLUGINbutton -
You will see
Gluu OPA PEPtitle and+icon in pop-up. -
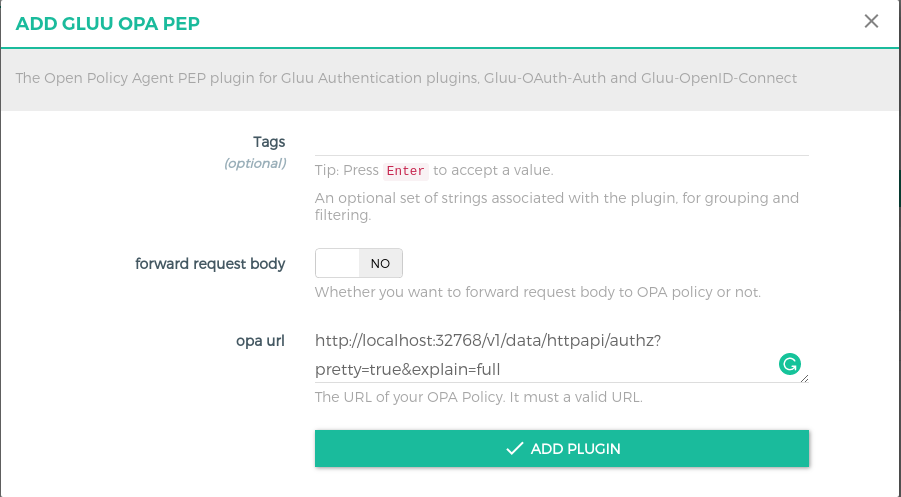
Click on the
+icon and it will show below form and add your OPA endpoint. In my case, I set up OPA Docker and below is the OPA endpoint. For more details check OPA docs.
Add Consumer with OP Client#
OP Client is used to correlating an access token with a Kong consumer. You must create an OP client before you can register it here as a way to identify a consumer.
Follow these steps to make a new OP Client and consumer using GG UI:
-
Click
CONSUMERSon the left panel -
Click on
+ CREATE CLIENTbutton -
Add
client nameand submit the form
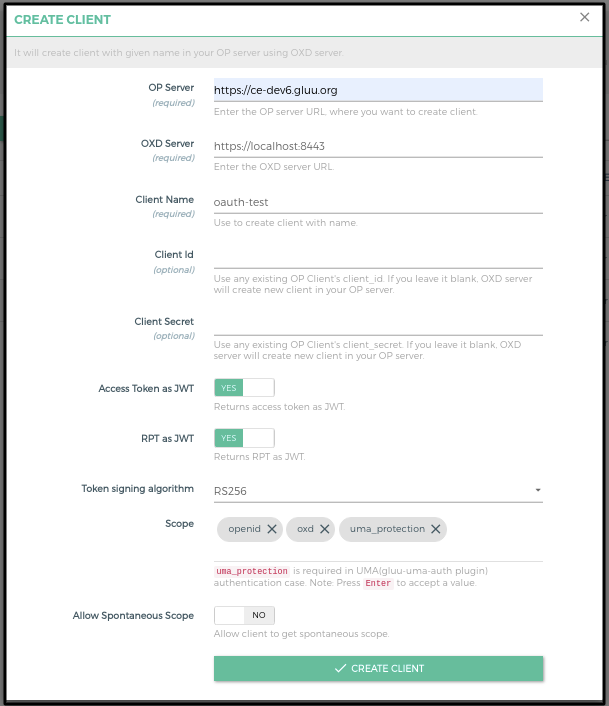
- It will create a client in your OP Server and show you all the client details. You need to copy all the details. let's call it consumer_op_client so it will help you in the next steps.
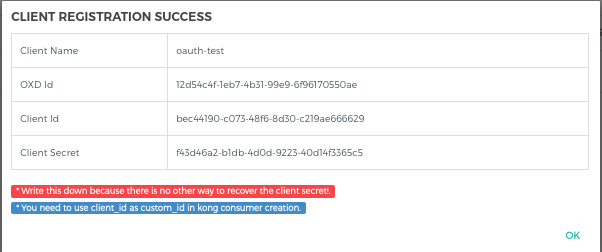
- Click on the
+ CREATE CLIENTbutton and addclient_idin theGluu Client Id.
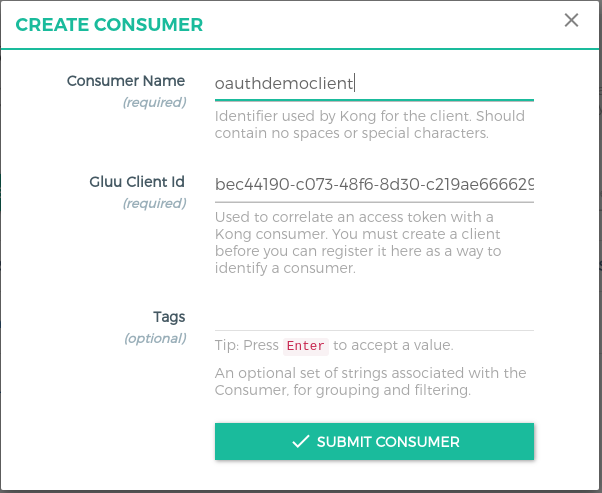
Demo app configuration (RqP)#
The demo app is a Python script. There is only one file. Download the oauth-opa-demo.py from the GG repository here.
Run oauth-opa-demo.py file using the below command.
$ python oauth-opa-demo.py
It will return the resource result i.e. the output of /posts endpoint. If not then you need to check the response.
Configuration#
In oauth-demo.py, you need to set your configuration. Configuration details as below:
| Config | Details |
|---|---|
| oxd_server_url | This your oxd server url. It is not recommended to use oxd here. You can directly request to OP token endpoint to get the token. For the demo, we are using oxd |
| consumer_client_id | This is the client id which we created during consumer configuration step |
| consumer_client_secret | This is the client secret. Requesting party need to use both client_id and client_secret to get the token |
| kong_proxy_url | Proxy url of your kong. As per the above demo configuration, we are using https://dev1.gluu.org as a kong_proxy_url |
| kong_route_host | Kong route objects host which configured in above route configuration step |
| op_server | Your OpenID Connect server url |
Steps by Steps implementation#
There only two steps:
-
Get the OAuth token. we protected the resource with just the
readscope so we just need to request for a token withreadscope.curl -X POST https://<your_oxd_server_host>:8443/get-client-token --Header "Content-Type: application/json" --data '{"client_id": "<CONSUMER_OP_CLIENT_ID>", "client_secret": "<CONSUMER_OP_CLIENT_SECRET>", "op_host": "<YOUR_OP_SERVER>", "scope":["read"]}' -
Request resource with above token
  curl -X GET https://<your_kong_proxy_host>/posts
      --Header "Authorization: Bearer <YOUR_NEW_RPT>"
      --Header "Host: oauth-demo.example.com"