Clustering for HA#
Introduction#
The tutorial below offers detailed steps for configuring high availability (HA) across multiple instances of the Gluu Server.
Notes#
A few notes before getting started:
-
Clustering for production scenarios is not a simple task. Individual environments should always be benchmarked, tested, and documented in order to ensure organizational requirements for uptime are met.
-
For VIP Customers, there are two alternatives to the "manual clustering" documentation below:
-
For VM-based clustered deployments, we offer a tool called Cluster Manager to automate the steps below.
-
For multi-node container deployments (i.e. Docker Swarm & Kubernetes), we offer separate guides and documentation.
-
Concept#
The web tier of the Gluu Server (i.e. oxAuth) is stateless and can be scaled horizontally. The local LDAP server included in all Gluu Server deployments (i.e. Gluu LDAP) supports multi-master replication (MMR). Any instance can be written to and changes are propagated to other instances.
Prerequisites#
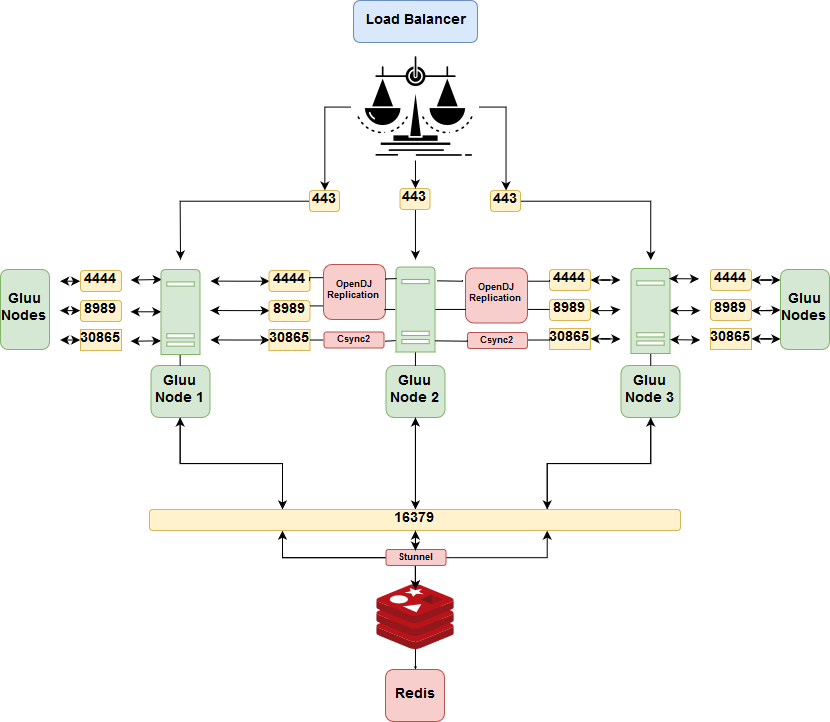
Ports#
The following ports are used by different components to communicate with their peers at other nodes of a cluster. Additional configuration may be needed to ensure they can be reached by incoming connections.
| Port | Application | Relation |
|---|---|---|
| 22 | SSH | Utility |
| 443 | SSL/TLS | Load-balancer to oxAuth |
| 4444 | OpenDJ Replication | Between Gluu Servers |
| 16379 | Redis Server through stunnel | From oxAuth to stunnel to Redis |
| 8989 | OpenDJ Replication | Between Gluu Servers |
| 30865 | Csync2 Default | Between Gluu Servers |
Software#
- For the purpose of this tutorial, the server configurations are as follows:
45.55.232.15    loadbalancer.example.org (NGINX server)
159.203.126.10  cluster.example.org (Gluu Server 4.1 on Ubuntu 16.04 ) (Node -1 )
138.197.65.243  cluster.example.org (Gluu Server 4.1 on Ubuntu 16.04 ) (Node -2 )
All server nodes will have the same hostname
197.122.32.421  redis.example.org (Redis Server)
Some prerequisites are necessary for setting up Gluu with delta-syncrepl MMR:
-
A minimum of four (4) servers or VMs: two (2) for Gluu Servers, one (1) for load balancing (in our example, NGINX), and one for redis.
-
A separate NGINX server is necessary because replicating a Gluu server to a different hostname breaks the functionality of the Gluu web page when using a hostname other than what is in the certificates. For example, if you use cluster.example.com as the host and copy that to a second server (e.g. 138.197.65.243), the process of accessing the site on cluster.example.com, even with replication, will fail authentication due to a hostname conflict. So if node 1 fails, you won't be able to use Gluu Server effectively.
-
To create the following instructions we used Ubuntu 16.04 ( Ubuntu 18.04 is supported)
-
To create the following instructions we used an NGINX load balancer/proxy, however if you have your own load balancer, like F5 or Cisco, you should use that instead and disregard the instructions about configuring NGINX
-
Gluu Server 4.1 using OpenDJ
-
Redis-server for caching short-lived tokens
-
JXplorer or a similar LDAP browser for editing LDAP
Instructions#
Install Gluu#
-
First, install Gluu on one of the servers, node 1. It will be referred to as the "primary" for the sake of simplification. Once everything is configured, there will be no primary in the multi-master configuration.
-
On all of the non-primary Gluu Cluster members (not the NGINX server, or the redis server), download the Gluu packages but don't run
setup.pyyet! -
On the primary Gluu Server, log in to the chroot and cd to
/install/community-edition-setup/ -
After setup was completed on the primary server, node 1, a file named "setup.properties.last" was created in the same directory. Copy the
/install/community-edition-setup/setup.properties.lastfile from the first install to the other server, node 2, assetup.properties. This will allow same configuration to be maintained across all nodes. Here, SSH access allows copying the file to other servers outside the Gluu chroot.
If the scp command is not yet on the server, install openssh-client:
apt-get install openssh-client
Note
Make sure that all hosts files are configured to point the IPs of all IDPs and the loadbalancer to the corresponding hostnames.
Loadbalancer /etc/hosts#
45.55.232.15    loadbalancer.example.org (NGINX server) -- for us this has not been setup yet
197.122.32.421  redis.example.org (Redis Server) -- for us this has not been setup yet
Redis /etc/hosts#
45.55.232.15    loadbalancer.example.org (NGINX server) -- for us this has not been setup yet
197.122.32.421  redis.example.org (Redis Server) -- for us this has not been setup yet
Node 1 /etc/hosts#
45.55.232.15    loadbalancer.example.org (NGINX server) -- for us this has not been setup yet
197.122.32.421  redis.example.org (Redis Server) -- for us this has not been setup yet
159.203.126.10  cluster.example.org (Gluu Server 4.1 on Ubuntu 16.04) (Node 1)
Node 2 /etc/hosts#
45.55.232.15    loadbalancer.example.org (NGINX server) -- for us this has not been setup yet
197.122.32.421  redis.example.org (Redis Server) -- for us this has not been setup yet
138.197.65.243  cluster.example.org (Gluu Server 4.1 on Ubuntu 16.04) (Node 2)
Warning
Do not add the nodes' IPs in the /etc/hosts file of your Gluu container. They are configured automatically.
Otherwise, continue to the following command changing myuser@138.197.65.243 to the login credentials for each Gluu node your sending it to :
scp /opt/gluu-server/install/community-edition-setup/setup.properties.last myuser@138.197.65.243:/opt/gluu-server/install/community-edition-setup/setup.properties
If this throws a Permission denied error, that means the user, here myuser, does not have permission to write in the directory. Use the following command at the node you are trying to send the file to, here that is 138.197.65.243. Change <user> to the user used in the command above, here myuser.
chown <user> /opt/gluu-server/install/community-edition-setup/
For security, the <user> should always be set back to root, so after finishing the file transfer, run the command again with root as <user>.
chown root /opt/gluu-server/install/community-edition-setup/
- If the Gluu server has not been started, start it and log in. Once the
setup.propertiesfile is in place on the other node(s), modify the IP to the current node. In the example, there is only one, so we changed ourip=159.203.126.10of node 1 to the IP of node 2 server which is `ip=138.197.65.243.
service gluu-server start
service gluu-server login
Gluu.Root # vi /install/community-edition-setup/setup.properties
setup.properties

...
passport_rs_client_jks_pass=xmQNp8RRuP0P
cmd_jar=/opt/jre/bin/jar
oxauth_openid_jks_pass=t1j5ykEaHFs1
idp3WebappFolder=/opt/shibboleth-idp/webapp
countryCode=US
ip=138.197.65.243                       <------ changed this from 159.203.126.10 to the current server IP
opendj_ldap_binddn=cn\=directory manager
installSaml=False
sysemProfile=/etc/profile
ldap_setup_properties=./templates/opendj-setup.properties
default_openid_jks_dn_name=CN\=oxAuth CA Certificates
oxtrust_config_json=./output/oxtrust-config.json
installJce=True
ldapPassFn=/home/ldap/.pw
...
- Now run
setup.py.
cd /install/community-edition-setup
./setup.py
- The rest of the configuration for the install should be automatically loaded, as shown below. Just press
Enter.
Installing Gluu Server...
Detected OS  :  ubuntu
Detected init:  systemd
Detected Apache:  2.4

Installing Gluu Server...

For more info see:
  ./setup.log
  ./setup_error.log


** All clear text passwords contained in ./setup.properties.last.


hostname                                             cluster.example.org
orgName                                                 Example Inc.
os                                                         ubuntu
city                                                       Austin
state                                                          Tx
countryCode                                                    US
support email                                    support@example.org
Applications max ram                                         3072
Admin Pass                                                   test
Install oxAuth                                               True
Install oxTrust                                              True
Install LDAP                                                 True
Install Apache 2 web server                                  True
Install Shibboleth SAML IDP                                 False
Install oxAuth RP                                           False
Install Passport                                            False


Proceed with these values [Y|n]
Replication#
- Run the commands below in the Gluu container for all Nodes, here that would be for
159.203.126.10and138.197.65.243:
Any attempts to log in to the LDAP in any form might result in an instant timeout error, due to Java enabling Endpoint Identification, which disrupts LDAPS connections. Set the default value to true by explicitly stating it in the java.properties file.
sed -i 's/dsreplication.java-args=-Xms8m -client/dsreplication.java-args=-Xms8m -client -Dcom.sun.jndi.ldap.object.disableEndpointIdentification=true/g' /opt/opendj/config/java.properties
To set the new properties, run the command in the Gluu container.
/opt/opendj/bin/dsjavaproperties
You should recieve an operation successful message:
The operation was successful. The server commands will use the java arguments and java home specified in the properties file located in /opt/opendj/config/java.properties
We need to make all nodes accessible to each other by setting the listening address to 0.0.0.0. In your command you may have to change cn=directory manager to your CN ( by default cn=directory manager unless changed ), and <password> to the password set in the first installation of Gluu on node 1. If the below commands are not connecting, try changing localhost to the nodes' explicit IP addresss, here that would be 159.203.126.10 and 138.197.65.243.
Restart all nodes
Run the following two commands:
/opt/opendj/bin/dsconfig -h localhost -p 4444 -D 'cn=directory manager' -w <password> -n set-administration-connector-prop --set listen-address:0.0.0.0 -X
/opt/opendj/bin/dsconfig -h localhost -p 4444 -D 'cn=directory manager' -w <password> -n set-connection-handler-prop --handler-name 'LDAPS Connection Handler' --set enabled:true --set listen-address:0.0.0.0 -X
This is the end of commands that had to be initiated in all nodes
- Run the commands below in the Gluu container on the first "primary" Gluu server installed, here that would be
159.203.126.10:
Utilize this command inside the Gluu container to enable replication changing <password>'s to the password of your first installed Gluu server. You must add all your nodes to this command, here we only have two
/opt/opendj/bin/dsreplication enable --host1 159.203.126.10 --port1 4444 --bindDN1 "cn=directory manager" --bindPassword1 <password> --replicationPort1 8989 --host2 138.197.65.243 --port2 4444 --bindDN2 "cn=directory manager" --bindPassword2 <password> --replicationPort2 8989 --adminUID admin --adminPassword <password> --baseDN "o=gluu" -X -n
If successful, you'll get a message like this:
Establishing connections ..... Done.
Checking registration information ..... Done.
Configuring Replication port on server 159.203.126.10:4444 ..... Done.
Configuring Replication port on server 138.197.65.243:4444 ..... Done.
Updating replication configuration for baseDN o=gluu on server
159.203.126.10:4444 .....Done.
Updating replication configuration for baseDN o=gluu on server
138.197.65.243:4444 .....Done.
Updating registration configuration on server 159.203.126.10:4444 ..... Done.
Updating registration configuration on server 138.197.65.243:4444 ..... Done.
Updating replication configuration for baseDN cn=schema on server
159.203.126.10:4444 .....Done.
Updating replication configuration for baseDN cn=schema on server
138.197.65.243:4444 .....Done.
Initializing registration information on server 138.197.65.243:4444 with the
contents of server 159.203.126.10:4444 .....Done.
Initializing schema on server 138.197.65.243:4444 with the contents of server
159.203.126.10:4444 .....Done.

Replication has been successfully enabled.  Note that for replication to work
you must initialize the contents of the base DNs that are being replicated
(use dsreplication initialize to do so).


See /tmp/opendj-replication-8219363385622666180.log for a detailed log of this
operation.
Now initialize replication. Change
/opt/opendj/bin/dsreplication initialize --baseDN "o=gluu" --adminUID admin --adminPassword <password> --hostSource 159.203.126.10 --portSource 4444 --hostDestination 138.197.65.243 --portDestination 4444 -X -n
If successful, it'll look like this:
Initializing base DN o=gluu with the contents from 159.203.126.10:4444:
3202 entries processed (23 % complete).
1233321 entries processed (100 % complete).
Base DN initialized successfully.

See /tmp/opendj-replication-7940848656437845148.log for a detailed log of this
operation.
Secure communication to all nodes. Add all nodes to this command:
/opt/opendj/bin/dsconfig -h 159.203.126.10 -p 4444 -D "cn=Directory Manager" -w <password> --trustAll -n set-crypto-manager-prop    --set ssl-encryption:true
/opt/opendj/bin/dsconfig -h 138.197.65.243 -p 4444 -D "cn=Directory Manager" -w <password> --trustAll -n set-crypto-manager-prop --set ssl-encryption:true
Now archive the OpenDJ keystore:
cd /opt/opendj/config

tar -cf opendj_crts.tar keystore keystore.pin truststore
Transfer it to the other nodes. The scp command will most likely not be installed in the Gluu container, so exit out by typing exit. Then transfer opendj_crts.tar to all the other nodes.
scp /opt/gluu-server/opt/opendj/config/opendj_crts.tar myuser@138.197.65.243:/opt/gluu-server/opt/opendj/config/
Note
If you want to check the status of OpenDJ replication run the following command:
/opt/opendj/bin/dsreplication status -n -X -h 159.203.126.10 -p 4444 -I admin -w <password>
This is the end of commands that had to be initiated in the first "primary" node
Run the following commands in all the Gluu container nodes where the archive of OpenDK keystore was sent to:
cd /opt/opendj/config/

tar -xf opendj_crts.tar
Next, install Csync2 for file system replication on all nodes outside the Gluu container.
apt-get install csync2
- On the "primary" node, here
159.203.126.10, do the following:
-Generate the key file:
csync2 -k /etc/csync2.key
- Create an SSL certificate Csync2:
openssl genrsa -out /etc/csync2_ssl_key.pem 1024
openssl req -batch -new -key /etc/csync2_ssl_key.pem -out /etc/csync2_ssl_cert.csr
openssl x509 -req -days 3600 -in /etc/csync2_ssl_cert.csr -signkey /etc/csync2_ssl_key.pem -out /etc/csync2_ssl_cert.pem
- Create a
csyn2.conffile and place all directories to be replicated as in thecsync2.conffile:
vi /etc/csync2.conf
- Add more
host <hostname>entries, according to the number of nodes you have.
csync2.conf
group gluucluster
{
host 159.203.126.10;
host 138.197.65.243;

key /etc/csync2.key;
include /opt/gluu-server/opt/gluu/jetty/identity/conf/shibboleth3/idp/;
include /opt/gluu-server/opt/gluu/jetty/identity/conf/shibboleth3/sp/;
include /opt/gluu-server/opt/shibboleth-idp/conf;
include /opt/gluu-server/opt/shibboleth-idp/metadata/;
include /opt/gluu-server/opt/shibboleth-idp/sp/;
include /opt/gluu-server/opt/shibboleth-idp/temp_metadata/;
include /opt/gluu-server/etc/gluu/conf/;

exclude *~ .*;
}
Copy the contents of csync2.conf into the file csync2.cfg.
cp /etc/csync2.conf /etc/csync2.cfg
Copy the Csync2 configuration file, certifications and keys to the all the other nodes, here only 138.197.65.243. Make sure you have permission to move all the files, especially csync2.cfg
scp /etc/csync2* user@138.197.65.243:/etc/
Restart inetd on all nodes:
/etc/init.d/openbsd-inetd restart
You can test the connection at each node by running:
csync2 -T
-
Run the following on Node 1
primary: -
Force files to win conflicts
csync2 -fr /
- Start the synchronization process :
csync2 -xvvv
-
Run the following on All other nodes :
-
Force files to win conflicts
csync2 -fr /
- Start the synchronization process :
csync2 -xvvv
-
Add a cron on all nodes to sync using
crontab -e: -
Add a regular cron that runs every 5 mins at all nodes like this :
*/5 * * * * csync2 -x
Node 1 “At every 10th minute from 0 through 59.”
0-59/10 * * * * csync2 -x
Node 2 “At every 10th minute from 5 through 59.”
5-59/10 * * * * csync2 -x
Reload cron:
service cron reload
Install NGINX#
If you have your own load balancer, use the following NGINX configuration documentation as a guide for how to proxy with the Gluu Server.
On the load balancer server, install NGINX:
apt-get install nginx -y
- On the NGINX server, create a directory for the httpd
keyandcrt:
mkdir /etc/nginx/ssl/
-
Send the
httpd.crtandhttpd.keycerts from one of the Gluu servers over to the NGINX server. -
From the first Gluu Server installed, do the following:
scp /opt/gluu-server/etc/certs/httpd.key user@loadbalancer.example.org:/etc/nginx/ssl/
scp /opt/gluu-server/etc/certs/httpd.crt user@loadbalancer.example.org:/etc/nginx/ssl/
- On the NGINX server in any editor, open
nginx.confand edit:
vi /etc/nginx/nginx.conf
- The following is a working
nginx.confexample template for a Gluu cluster. Change all marked lines that correspond to your Gluu nodes and NGINX server.
events {
        worker_connections 6500;
}

http {
  upstream backend_id {
  ip_hash;
  server 159.203.126.10:443 max_fails=2 fail_timeout=10s;         ---> Change this
  server 138.197.65.243:443 max_fails=2 fail_timeout=10s;         ---> Change this
  }
  upstream backend {
  server 159.203.126.10:443 max_fails=2 fail_timeout=10s;         ---> Change this
  server 138.197.65.243:443 max_fails=2 fail_timeout=10s;         ---> Change this
  }
  server {
    listen       80;
    server_name  loadbalancer.example.org;                          ---> Change this
    return       301 https://loadbalance.example.org$request_uri;   ---> Change this
   }
  server {
    listen 443;
    server_name loadbalancer.example.org;                           ---> Change this

    ssl on;
    ssl_certificate         /etc/nginx/ssl/httpd.crt;
    ssl_certificate_key     /etc/nginx/ssl/httpd.key;

    location ~ ^(/)$ {
      proxy_pass https://backend;
      proxy_redirect          off;
      proxy_next_upstream     error timeout invalid_header http_500;
      proxy_connect_timeout   2;
      proxy_set_header        Host            $host;
      proxy_set_header        X-Real-IP       $remote_addr;
      proxy_set_header        X-Forwarded-For $proxy_add_x_forwarded_for;
    }
    location /.well-known {
        proxy_pass https://backend/.well-known;
        proxy_redirect          off;
        proxy_next_upstream     error timeout invalid_header http_500;
        proxy_connect_timeout   2;
        proxy_set_header        Host            $host;
        proxy_set_header        X-Real-IP       $remote_addr;
        proxy_set_header        X-Forwarded-For $proxy_add_x_forwarded_for;
    }
    location /oxauth {
        proxy_pass https://backend/oxauth;
        proxy_redirect          off;
        proxy_next_upstream     error timeout invalid_header http_500;
        proxy_connect_timeout   2;
        proxy_set_header        Host            $host;
        proxy_set_header        X-Real-IP       $remote_addr;
        proxy_set_header        X-Forwarded-For $proxy_add_x_forwarded_for;
    }
    location /identity {
        proxy_pass https://backend_id/identity;
        proxy_redirect          off;
        proxy_next_upstream     error timeout invalid_header http_500;
        proxy_connect_timeout   2;
        proxy_set_header        Host            $host;
        proxy_set_header        X-Real-IP       $remote_addr;
        proxy_set_header        X-Forwarded-For $proxy_add_x_forwarded_for;
    }
    location /cas {
        proxy_pass https://backend/cas;
        proxy_redirect          off;
        proxy_next_upstream     error timeout invalid_header http_500;
        proxy_connect_timeout   2;
        proxy_set_header        Host            $host;
        proxy_set_header        X-Real-IP       $remote_addr;
        proxy_set_header        X-Forwarded-For $proxy_add_x_forwarded_for;
    }
    location /passport {
        proxy_pass https://backend/passport;
        proxy_redirect          off;
        proxy_next_upstream     error timeout invalid_header http_500;
        proxy_connect_timeout   2;
        proxy_set_header        Host            $host;
        proxy_set_header        X-Real-IP       $remote_addr;
        proxy_set_header        X-Forwarded-For $proxy_add_x_forwarded_for;
    }

  }
}
Install and configure Redis on a separate Ubuntu 18.04 server#
Warning
This cannot be configured on your NGINX server, or you'll get routing issues when attempting to cache
Redis-server is a memory caching solution created by redis-labs. It's ideal for clustering solutions but needs additional encryption.
-
Now install and configure redis-server on a separate Ubuntu 18.04 server .You can set up a Redis cluster model and have them installed on all nodes.
-
On the Redis server, here
197.122.32.421 redis.example.org (Redis Server), do the following :
apt-get update
apt-get install redis-server
- Edit the Redis binding IP to the localhost IP of the Redis server , that is
127.0.0.1:
vi /etc/redis/redis.conf
# ~~~ WARNING ~~~ If the computer running Redis is directly exposed to the
# internet, binding to all the interfaces is dangerous and will expose the
# instance to everybody on the internet. So by default we uncomment the
# following bind directive, that will force Redis to listen only into
# the IPv4 lookback interface address (this means Redis will be able to
# accept connections only from clients running into the same computer it
# is running).
#
# IF YOU ARE SURE YOU WANT YOUR INSTANCE TO LISTEN TO ALL THE INTERFACES
# JUST COMMENT THE FOLLOWING LINE.
# ~~~~~~~~~~~~~~~~~~~~~~~~~~~~~~~~~~~~~~~~~~~~~~~~~~~~~~~~~~~~~~~~~~~~~~~~
bind 127.0.0.1 ::1
- While editing the Redis configuration file, add your
passwordfor more secure communication to the server. Uncommentrequirepassand place your password:
requirepass chooseyourpasswordcarefully
- Now restart redis-server:
/etc/init.d/redis-server restart
- Check Redis status:
/etc/init.d/redis-server status
The status should be running :
redis-server.service - Advanced key-value store
Loaded: loaded (/lib/systemd/system/redis-server.service; enabled; vendor preset: enabled)
Active: active (running) since Wed 2018-06-27 18:48:52 UTC; 12s ago
  Docs: http://redis.io/documentation,
        man:redis-server(1)
- Install stunnel to encrypt the redis communications:
apt-get update

apt-get install stunnel4
- Start the stunnel service by changing
ENABLED=0toENABLED=1in the/etc/default/stunnel4file :
vi /etc/default/stunnel4
- Create a certificate that will be used across all nodes and Redis server:
openssl genrsa -out /etc/stunnel/key.pem 1024
openssl req -new -x509 -key /etc/stunnel/key.pem -out /etc/stunnel/cert.pem -days 365
- Combine
key.pemandcert.peminto one filesecureredis.pem:
cat /etc/stunnel/key.pem /etc/stunnel/cert.pem > /etc/stunnel/secureredis.pem
- For security, change the file permissions:
chmod 640 /etc/stunnel/key.pem /etc/stunnel/cert.pem /etc/stunnel/secureredis.pem
- Configure the stunnel redis server configuration file, we will create files for the nodes later:
vi /etc/stunnel/redis-server.conf
Place the configuration inside this file. accept from your external IP and connect to the binding IP you placed in the redis.conf file. Here we are unifying the connections inside the Redis server, accepting from the external IP and connecting to the localhost. This is important for the nodes to easily communicate to the Redis server. **It's a good time to check all servers, ensuring that the /etc/hosts file has all the IPs and hostnames as described in the beginning of this file. Remember for the nodes, it's the /etc/hosts file outside your Gluu container.
cert = /etc/stunnel/secureredis.pem
pid = /var/run/stunnel.pid
[redis]
accept = 197.122.32.421:16379
connect = 127.0.0.1:6379
- Start Stunnel service :
/etc/init.d/stunnel4 start
This is the end of the commands that had to be done inside the redis server
-
On Node 1 and Node 2, here
159.203.126.10and138.197.65.243do the following : -
Install `redis-tools :
apt-get install redis-tools
- Install Stunnel to encrypt the redis communications to the server:
apt-get update

apt-get install stunnel4
- Start the Stunnel service by changing
ENABLED=0toENABLED=1in/etc/default/stunnel4file:
vi /etc/default/stunnel4
- Copy the
secureredis.pemcreated in the redis server to the nodes. From your redis server:
scp /etc/stunnel/secureredis.pem root@159.203.126.10 /etc/stunnel/

scp /etc/stunnel/secureredis.pem root@138.197.65.243 /etc/stunnel/
- For security, change the file permissions:
chmod 640 /etc/stunnel/secureredis.pem
- Configure the Stunnel redis client configuration file:
vi /etc/stunnel/redis-client.conf
- Place the configuration files inside this file.
acceptfrom your external IP andconnectto the redis server IP.
Node 1
cert = /etc/stunnel/secureredis.pem
pid = /var/run/stunnel.pid
[redis]
accept = 159.203.126.10:16379
connect = 197.122.32.421:16379
Node 2
cert = /etc/stunnel/secureredis.pem
pid = /var/run/stunnel.pid
[redis]
accept = 138.197.65.243:16379
connect = 197.122.32.421:16379
- Start the Stunnel service:
/etc/init.d/stunnel4 start
- Test that the server is talking to the clients and vice versa:
redis-cli -h <hostname> -a <password>
In the <hostname>, both IP (197.122.32.421) and hostname (redis.example.org) have to be working on all clients and the main redis server. Try to Ping, and you should get a PONG.
This is the end of the commands that had to be done on both nodes
Info
For more information or if you're having trouble, please see this redis how-to guide.
Note
Redis can also be configured for HA and failover with multiple methods, utilizing Sentinel or Redis-cluster
Modify JSON Entries#
Use JXplorer (or a similar LDAP browser) to modify some of the JSON entries in LDAP for handling accessible caching and multiple authorization servers.
- In JXplorer, you can connect to your LDAP server using your credentials you configured with setup.py. For example:

-
Open "Gluu" -> "appliances" -> the first inum here will be where all the attributes needing modification will be
-
Modify the "oxCacheConfig" attribute to include the redis-server FQDN. Here, I installed redis-server outside of one of my Gluu chroots

-
Change "cacheProviderType" from "IN_MEMORY" to "REDIS". After that, in the "redisConfiguration" portion of "servers", I added "cluster.example.org:16379" which is the server I installed redis-server.
-
Make sure that all LDAP servers are utilized for authorization by modifying the "oxIDPAuthentication" attribute.

- Here, change the servers from localhost:1636 to the FQDNs of my servers
"servers\": [\"cluster.example.org:1636\"],
- Click
Submiton the bottom after all changes
Transfer Certificates#
Transfer certificates from the first server to the other servers. To do so:
-
Copy certificates from the primary server Gluu is installed on and replace the certificates in
/etc/certs/on the other servers. -
From the primary server:
scp /opt/gluu-server/etc/certs/* root@138.197.65.243:/opt/gluu-server/etc/certs/
-
Change ownership of the certificates to Gluu, with the exception of
oxauth-keys.j*which need to be owned by Jetty -
On the server, the certificates were just transferred to:
Gluu.Root # cd /etc/certs/
Gluu.Root # chown .gluu *
Gluu.Root # chown jetty.jetty oxauth-keys.j*
-
Next, update the keystores in all Gluu instances, including the primary server
-
Download this script to every server, which automatically removes and adds the necessary certificates to the keystore:
Gluu.Root # wget https://raw.githubusercontent.com/GluuFederation/cluster-mgr/master/manual_install/keystore_Config.py
- Modify the
hostnameto the NGINX/Load-balancer's FQDN
import os.path
import subprocess

cmd_keytool = '/opt/jre/bin/keytool'
hostname = "loadbalancer.example.org"
- Run the script:
Gluu.Root # python keystore_Config.py
-
Restart the identity and oxauth services on all servers,
-
Log out and restart all your Gluu servers
logout
service gluu-server restart
- Now, the administrator web UI and oxAuth have some failover redundancy. There is obviously more configuration necessary on the network layer of the topology for true HA failover, but that is outside of the scope of this documentation.
Support#
Clustering is outside the scope of free community support. For more details about supported options for HA, schedule a call.