mod_auth_openidc RP Integration#
Attention
The official support end-of-life (EOL) date for Gluu Server 2.4.4 is December 31, 2018. Starting January 1, 2019, no further security updates or bug-fixes will be provided for Gluu Server 2.X. We strongly recommend upgrading to the newest version.
Basic Web Server Installation#
Before you can install mod_auth_openidc, you need to have an Apache HTTPD server running with SSL enabled.
Apache Web Server#
It is assumed that all the hostnames will be dns resolvable. If not,
then add the entries in /etc/hosts file on both the web server
and Gluu Server.
If you don't have the Apache HTTPD server installed, use apt-get to install the Ubuntu standard distribution:
# apt-get install apache2
# service apache2 start
SSL Configuration#
The SSL Module is necessary for the Apache OpenID Connect Module. Please
use the following commands to activate the ssl module.
# a2enmod ssl
The next step is to create a self-signed SSL Certificate.
- Create a directory to put the generate the ssl certificate
# mkdir /etc/apache2/ssl`
# openssl req -x509 -nodes -days 365 -newkey rsa:2048 -keyout /etc/apache2/ssl/apache.key -out /etc/apache2/ssl/apache.crt
- Answer the questions that are asked. A template is given below
    Country Name (2 letter code) [AU]:US
    State or Province Name (full name) [Some-State]:TX
    Organization Name (eg, company) [Internet Widgits Pty Ltd]:Acme Inc.
    Organizational Unit Name (eg, section) []:
    Common Name (e.g. server FQDN or YOUR name) []:www.mydomain.com
    Email Address []:help@mydomain.com
Configure Apache to use SSL#
This section will guide you through the steps to configure apache to use the SSL module
- Open the
default-ssl.conffile
# vim /etc/apache2/sites-available/default-ssl.conf`
-
Update the certificate locations with the newly created certificates
/etc/apache2/ssl/apache.keyand/etc/apache2/ssl/apache.crt -
Activate the SSL Virtual Host and CGI
# a2ensite default-ssl.conf
# a2enmod cgid
# service apache2 restart
At this point, its a good time to test to make sure SSL and CGI are working. Point your browser at https://www.mydomain.com/cgi-bin/printHeaders.cgi You should see a list of current environment variables.
Configuration of mod_auth_openidc#
Installation#
mod_auth_openidc module depends on the Ubuntu package libjansson4:
# apt-get install libjansson
You'll also need the mod_auth_openidc and libjose packages which can be downloaded from the Releases Page.
For example, at this time the current release is 2.1.3, so the command would be:
# wget https://github.com/pingidentity/mod_auth_openidc/releases/download/v2.1.3/libcjose_0.4.1-1ubuntu1.trusty.1_amd64.deb
# wget https://github.com/pingidentity/mod_auth_openidc/releases/download/v2.1.3/libapache2-mod-auth-openidc_2.1.3-1ubuntu1.trusty.1_amd64.deb
# dpkg -i libcjose_0.4.1-1ubuntu1.trusty.1_amd64.deb
# dpkg -i libapache2-mod-auth-openidc_2.1.3-1ubuntu1.trusty.1_amd64.deb
Note
Get the latest packages here: https://github.com/pingidentity/mod_auth_openidc/releases
Note, if you like to build from source, you can clone the project at Github Page
Now you can enable the module
# sudo a2enmod auth_openidc
# sudo service apache2 restart
Client Registration#
There are two methods for client registration:
- Dynamic Client Registration
- Manual Client Registration
For this example, let's create the client manually in the Gluu Server. When you add the client, use the following parameters:
Name: mod_auth_openidc
Client Secret: something-sufficiently-unguessable
Application Type: Web
Pre-Authorization: Enabled
login uri: https://www.mydomain.com/callback
Subject Type: Public
Scopes: openid, profile, email
Response Types: code
Make a note of the client_secret (you won't get to see it again)! You'll
also need the client_id for the next step.
Install CGI script#
This cgi-script makes for a good test page!
# vi /usr/lib/cgi-bin/printHeaders.cgi
Then paste in this code
#!/usr/bin/python

import os

d = os.environ
k = d.keys()
k.sort()

print "Content-type: text/html\n\n"

print "<HTML><Head><TITLE>Print Env Variables</TITLE></Head><BODY>"
print "<h1>Environment Variables</H1>"
for item in k:
    print "<p><B>%s</B>: %s </p>" % (item, d[item])
print "</BODY></HTML>"
Then you'll need to make the script executable by the Apache2
# chown www-data:www-data /usr/lib/cgi-bin/printHeaders.cgi
# chmod ug+x /usr/lib/cgi-bin/printHeaders.cgi
Configuring the Apache VirtualHost#
You are almost done! You'll need to configure mod_auth_openidc to protect your server.
# vi /etc/apache2/sites-available/default-ssl.conf
Add the following right under <VirtualHost _default_:443>
OIDCProviderMetadataURL https://idp.mydomain.com/.well-known/openid-configuration
OIDCClientID (client-id-you-got-back-when-you-added-the-client)
OIDCClientSecret (your-client-secret)
OIDCRedirectURI https://www.mydomain.com/callback
OIDCResponseType code
OIDCScope "openid profile email"
OIDCSSLValidateServer Off
OIDCCryptoPassphrase (a-random-seed-value)
OIDCPassClaimsAs environment
OIDCClaimPrefix USERINFO_
OIDCPassIDTokenAs payload
<Location "/">
    Require valid-user
    AuthType openid-connect
</Location>
Then restart Apache to effect the changes
# service apache2 restart
The most confusing part here is the OIDCRedirectURI--don't set this
to a path used by your server. The apache-filter uses the redirect_uri
to process the response from the OpenID Provider (Gluu Server).
Now you're ready to test. Open your web browser, and point it at
https://www.mydomain.com/cgi-bin/printHeaders.cgi
If you're not logged in already, you should be redirected to
the authentication page. If you are logged in, you should just see
an html page with the REMOTE_USER variable populated. Also
check out the OIDC_id_token_payload and all the claims for
USERINFO_
Installation#
We assume that all the hostnames will be dns resolvable. If not, then
add the according entries in /etc/hosts, please.
Add EPEL Repository#
Run the following command to Add EPEL Repo.
# rpm -ivh http://download.fedoraproject.org/pub/epel/6/x86_64/epel-release-6-8.noarch.rpm
Apache Web Server#
To setup Apache2 SSL, run the following commands:
Note
If the hiredis package is not found by the yum command, please download it manually from this page and install it.
# yum install httpd mod_ssl
# yum install curl hiredis jansson
Configure SSL Module#
This section will guide you to create SSL certificates. Use the following commands to crete a directory and generate the certificates.
# mkdir /etc/httpd/ssl
# openssl req -new -x509 -sha256 -days 365 -nodes -out /etc/httpd/ssl/httpd.pem -keyout /etc/httpd/ssl/httpd.key
You will be prompted to enter some values such as company name, country etc. Please enter them and your certificate will be ready. A template is given below
    Country Name (2 letter code) [XX]:US
    State or Province Name (full name) []:TX
    Locality Name (eg, city) [Default City]:Austin
    Organization Name (eg, company) [Default Company Ltd]:Gluu
    Organizational Unit Name (eg, section) []:
    Common Name (eg, your name or your server's hostname) []:modauth-centos.info
    Email Address []:support@gluu.org
The next step is to configure Apache to use the certificates and use the following command to edit the ssl.conf file.
# vi /etc/httpd/conf.d/ssl.conf
The important part of the configuration is to enter the path to the created SSL certificates. The example is given below.
Note: Please make sure to use the correct server name in the configuration file.
    SSLCertificateFile /etc/httpd/ssl/httpd.pem
    SSLCertificateKeyFile /etc/httpd/ssl/httpd.key
    ServerAdmin support@gluu.org
    ServerName gluu.org
Restart Apache Server and you are done configuring the SSL Module. Use the command below to restart the Apache Server.
# service httpd restart
Authentication Module (mod_auth_openidc)#
Note
The latest version of the apache OpenID Connect module is available from this page
The latest package for the apache module might have multiple dependencies which must be installed first.
Run the following command to install the mod_auth_openidc module:
rpm -ivh https://github.com/pingidentity/mod_auth_openidc/releases/download/v1.8.2/mod_auth_openidc-1.8.2-1.el6.x86_64.rpm
Note
If there are any difficulties installing hiredis and jansson,
try to update the package database of your system using the command below.
# yum upgrade
Load Authentication Module#
Please make sure that the following shared-object file exists by running the following command:
ls -l /usr/lib64/httpd/modules/mod_auth_openidc.so
Install CGI Script#
The test page is made using the cgi-script. Please use the following command to create the script.
# vi /var/www/cgi-bin/printHeaders.cgi
Please paste the following code to prepare the script
#!/usr/bin/python

import os

d = os.environ
k = d.keys()
k.sort()

print "Content-type: text/html\n\n"

print "<HTML><Head><TITLE>Print Env Variables</TITLE></Head><BODY>"
print "<h1>Environment Variables</H1>"
for item in k:
    print "<p><B>%s</B>: %s </p>" % (item, d[item])
    print "</BODY></HTML>"
The next step is to make the script executable by HTTPD
# chown apache:apache /var/www/cgi-bin/printHeaders.cgi
# chmod ug+x /var/www/cgi-bin/printHeaders.cgi
Client Registration#
There are two methods for client registration:
- Dynamic Client Registration
- Manual Client Registration
You can use any of the methods to register the client. For this example, let's create the client manually in the Gluu Server. Please use the following parameters to create the client:
Name: mod_auth_openidc
Client Secret: something-sufficiently-unguessable
Application Type: Web
Pre-Authorization: Enabled
login uri: https://www.mydomain.com/callback
Subject Type: Public
Scopes: openid, profile, email
Response Types: code
Note
The client_secret should be noted after creating the client in Gluu Server as it is used later.
Configure the Apache Virtualhost#
The apache module is confgured in the defautl ssl configuration file. Please use the command below to open the file
# vi /etc/httpd/conf.d/ssl.conf
Please add the following at the bottom of the file
OIDCProviderMetadataURL https://idp.mydomain.com/.well-known/openid-configuration
OIDCClientID (client-id-you-got-back-when-you-added-the-client)
OIDCClientSecret (your-client-secret)
OIDCRedirectURI https://www.mydomain.com/callback
OIDCResponseType code
OIDCScope "openid profile email"
OIDCSSLValidateServer Off
OIDCCryptoPassphrase (a-random-seed-value)
OIDCPassClaimsAs environment
OIDCClaimPrefix USERINFO_
OIDCPassIDTokenAs payload
<Location "/">
    Require valid-user
    AuthType openid-connect
</Location>
Warning
Please remember to populate the OIDCRedirectURI with a value that is not used by the server. The apache-filter uses the redirect_uri to process the response from the OpenID Provider (Gluu Server).
Please restart the HTTPD server for the changes to take effect
# service httpd restart
Now you're ready to test. Open your web browser, and point it at https://www.mydomain.com/cgi-bin/printHeaders.cgi`
oxRay#
LifeRay OpenID Connect plugin to authenticate users using Gluu IdP.
Overview#
The oxAuth LifeRay plugin is used to authenticate and auto-log users from Gluu Server into LifeRay with the same credentials. It is built on top of oxAuth, the OpenID Connect provider by Gluu.
The oxAuth plugin intercepts any attempt to login from anywhere in the LifeRay and redirects the request and the user to an oxAuth server where the identification takes place, actually. If the user has authorized the server to share some of his basic information with the oxAuth plugin, the user will be redirected back to the LifeRay CMS, and logged in, automatically.
The goal of this project is to use the LifeRay CMS as the basis for an organizational personal data store service.
Note: This plugin does not support auto-user creation from information supplied by the oxAuth Plugin. Instead, it can be implemented by extending the plugin.
Deployment#
The plugin is provided in two variants--Maven and Ant. You can either use Maven or the LifeRay plugin SDK to build and deploy this plugin as a standard LifeRay hot deployable WAR file.
Deploying WAR file using Maven#
This requires a prerequisite: make sure that you have Maven installed on your system to build this plugin from source.
-
Checkout the Maven source from the [oxRay Repository][https://github.com/GluuFederation/oxRay/tree/master/6.2.x/maven/gluu-openid-connect-hook].
-
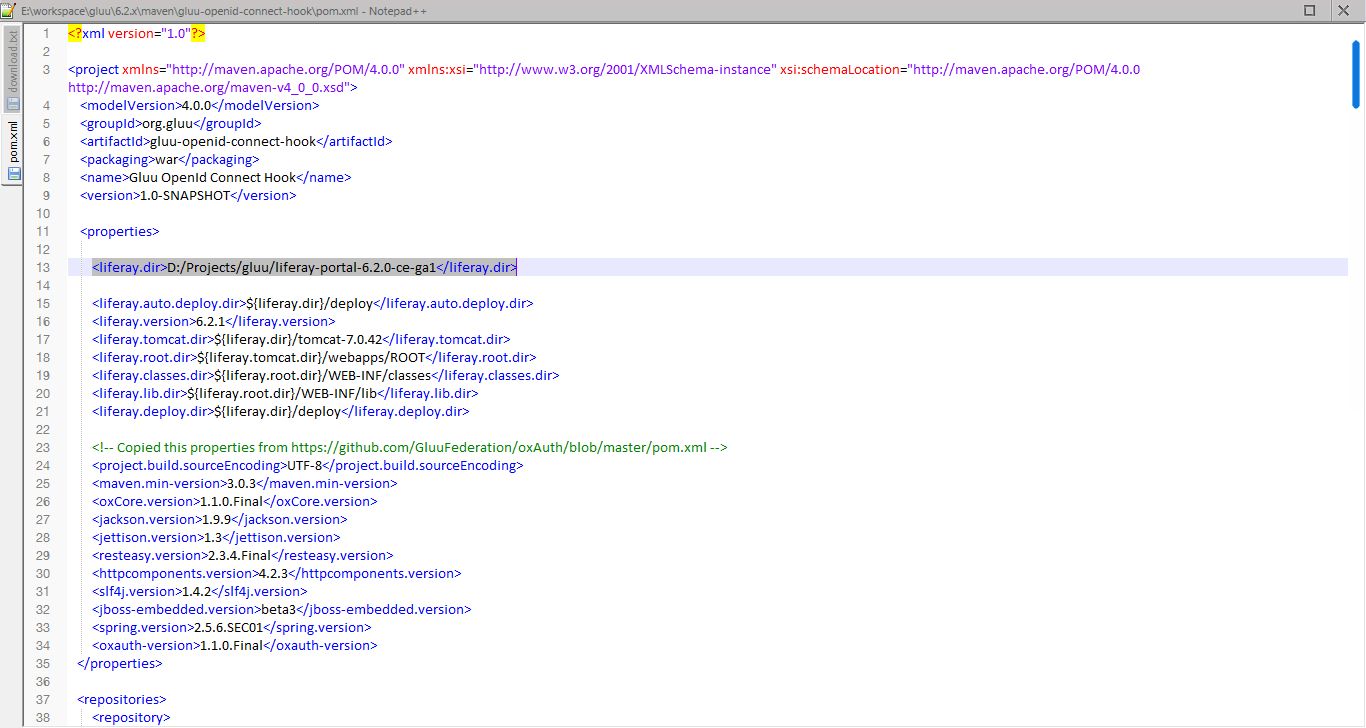
Open the file
pom.xmlingluu-openid-connect-hook, and update your local LifeRay Tomcat bundle path. This is required for building the WAR file and deploying to the LifeRay Tomcat bundle.
- Run the following command in the
gluu/6.2.x/maven/gluu-openid-connect-hookdirectory:
mvn clean install package liferay:deploy
This will take a few seconds to download the dependency jar files, and
generate the LifeRay-compiled deployable WAR file. It will be placed
within your <liferay-bundle-folder>/deploy directory, and the hot
deployable process will start.
Using LifeRay Plugin SDK With Ant#
This requires a prerequisite: we assume that you have the plugin SDK both installed and configured with LifeRay bundle.
-
Checkout the gluu-openid-connect-hook plugin source from the repository, and place these files in your local directory for the plugin SDK. Usually, this is
liferay-plugins-sdk-6.2.0-ce-ga1/hooks. -
Run the following command in the folder
liferay-plugins-sdk-6.2.0-ce-ga1/hooks/gluu-openid-connect-hook:
ant clean deploy
Using Binary From Repository#
You can also download a compiled binary as a standard LifeRay deployable WAR file from the following location:
oxRay LifeRay Deployable War File
Copy this WAR file in your LifeRay bundle. Usually, this is located at
liferay-portal-6.2.0-ce-ga1/deploy.
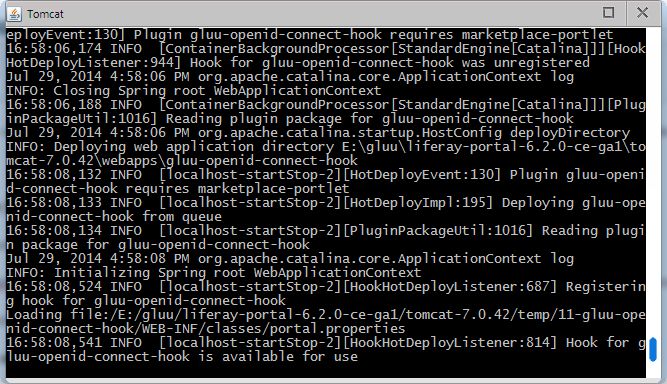
Once the plugin is deployed as a WAR file either using Maven or Ant, you will see the following success message in your LifeRay Tomcat server:
Client Registration#
A LifeRay application needs to be registered with the Authorization server before initiating an authentication request/response with OAuth IdP server.
The following steps are necessary to obtain both a client id and a client secret. These data will be used within the LifeRay portal properties.
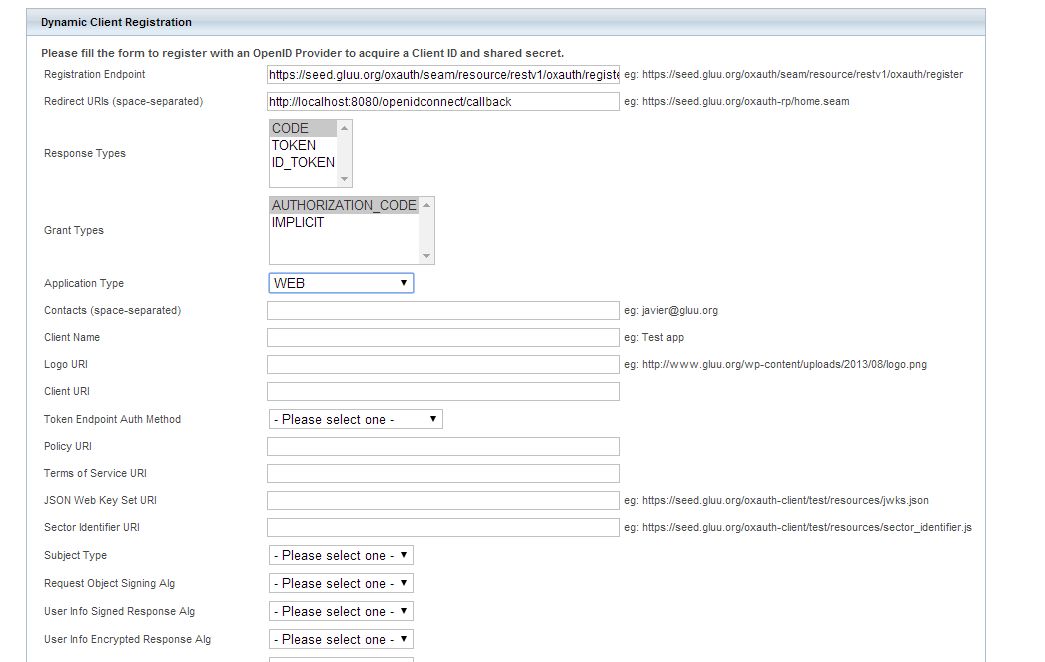
- Go to the location
https://seed.gluu.org/oxauth-rp/home.seam. - You will see the Dynamic Client Registration Section.
- Enter the Registration Endpoint uri, for example
https://idp.example.org/oxauth/seam/resource/restv1/oxauth/authorize.- You can derive this uri from your IdP auto-discovery uri which is
like that:
https://<Your IDP Server Domain>/.well-known/openid-configuration. - You can search for the registration endpoint, and copy that uri here.
- You can derive this uri from your IdP auto-discovery uri which is
like that:
- Enter the redirect uris as
http://localhost:8080/openidconnect/callback:- Replace your domain name with
localhost:8080 - This will be your LifeRay handler for logging a user into LifeRay, automatically, when a redirect comes back from the OAuth server.
- Replace your domain name with
- Select the Response Types: CODE
- Select the Application Type: WEB
- For development purposes use: NATIVE (if you are testing on a local
machine with
localhost:8080domain) - Enter Client Name: LifeRay App (you can choose any name here).
- All other options can be left as they are--please see the attached screenshot:
- Click
Submit, and both the followingRegistration RequestandRegistration Responsewill be displayed:

- Save the Registration Response to your local system. The parameters
client_idandclient_secretare used in LifeRay when configuringportal-ext.properties.
Modifying portal.properties#
It is necessary to modify portal-ext.properties file to reflect oxAuth
server client credentials and server's URL. It can be accomplished by
navigating into the liferay-portal-6.2.0-ce-ga1 folder, where the file
portal-ext.properties is stored.
Note: To either activate or deactivate the oxAuth plugin put the value
true (to activate) or false (to deactivate), respectively.
gluu.openidconnect.auth.enabled=true
- oxAuth client ID and client secret:
gluu.openidconnect.client.id=@!1111!0008!51CE.1E59
gluu.openidconnect.client.secret=65777eb7-87a8-4d60-9dbc-d31d43971f2b
- OAuth server domain
gluu.openidconnect.idp.domain=https://idp.gluu.org`
- OAuth server auto discovery uri
gluu.openidconnect.url.discovery=https://idp.gluu.org/.well-known/openid-configuration
- Your OAuth server logout uri (typically, this will be used to logout a user from OAuth when a user logs out from LifeRay)
gluu.openidconnect.idp.logout=https://idp.gluu.org/identity/logout
- LifeRay server callback uri that will be used as a handling response by the OAuth server after authentication:
- replace the
localhost:8080with your LifeRay domain name:
gluu.openidconnect.client.redirect.url=http://localhost:8080/openidconnect/callback
- Typically, create a LifeRay page with the name
/no-such-user-found, or redirect to the LifeRay registration page uri like that:
gluu.openidconnect.no.such.user.redirect.url=http://localhost:8080/no-such-user-found
Restart the LifeRay server after editing the file
portal-ext.properties.
Login Using the LifeRay Front End#
-
Server Bootup
- Once the LifeRay server is restarted, open your browser and
navigate to the uri
http://localhost:8080.
- Once the LifeRay server is restarted, open your browser and
navigate to the uri
-
Login uri
- Once the LifeRay page successfully loaded navigate to the OpenID
connect page at
http://localhost:8080/openidconnect/login.
- Once the LifeRay page successfully loaded navigate to the OpenID
connect page at
Note: you can edit the theme code, and link to the login uri as
http://localhost:8080/openidconnect/login. In result the user will
always redirect to the OAuth server for authentication.
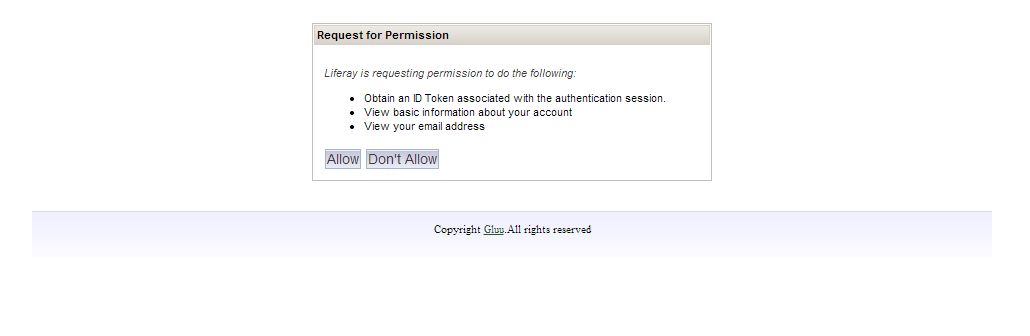
- OAuth authentication
- The LifeRay login uri will redirect users to the OAuth IdP server for user authentication. Internally, passing the oAuth client id as the following screen:

- Request for permission
- This screen can be configured depending upon your OAuth Server implementation.
- OAuth callback (user auto-login to LifeRay)
- After a successful authentication with the OAuth server, IdP will send a callback to LifeRay with a specific code as a parameter:
http://localhost:8080/openidconnect/callback?code=xxx`
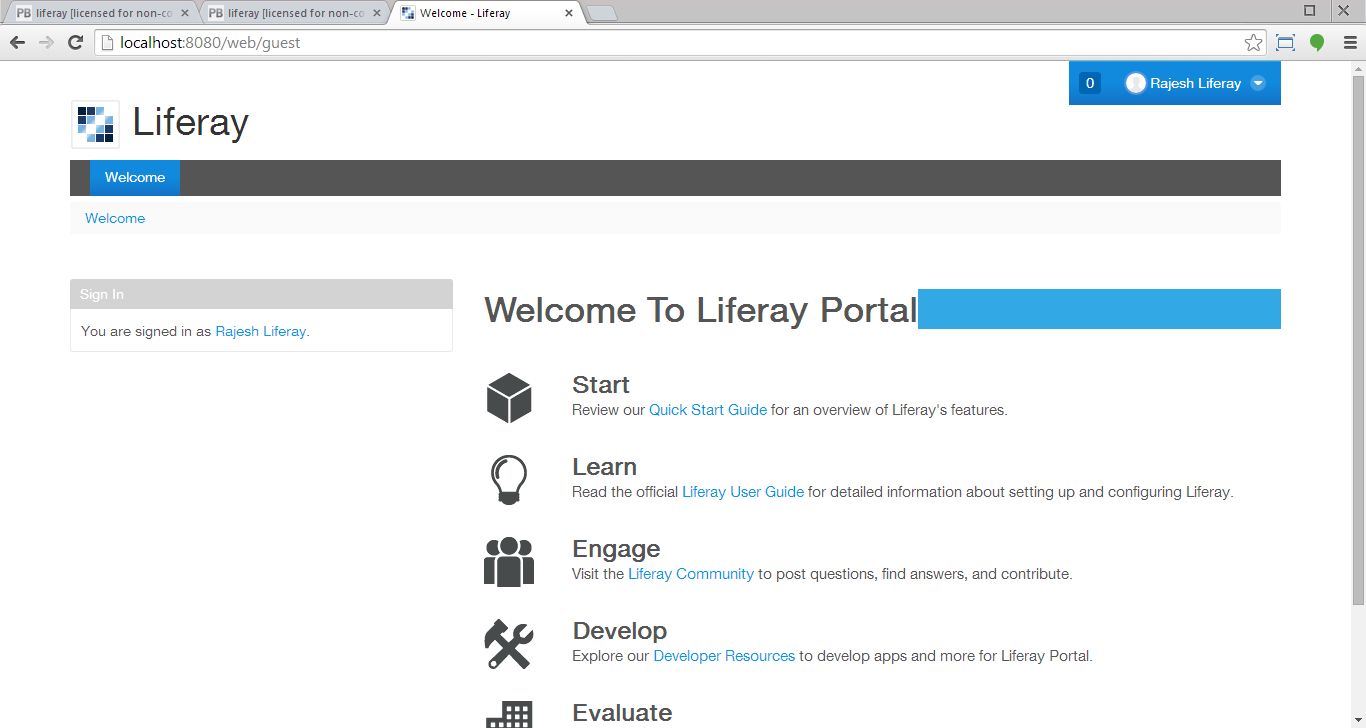
This will be intercepted by our oxAuth LifeRay plugin. Upon validation of the token with the Gluu IdP, it will result in a login of the user to the LifeRay. The user will be redirected to his respective start page.
Using OpenID Connect to authenticate a person in Java#
The OpenID Connect Protocol offers Java developers a way to authenticate a person at any Internet domain that supports the standard. To accomplish this, the domain must provide a way to register clients--the website and mobile applications that use the authentication API offered by the domain.
Discovery#
Discovery is the first step! Luckily, its super-easy! All you have to
do is make a get request to
https://{domain}/.well-known/openid-configuration.
This will return a JSON object, as described in the specification. For example, you can see Gluu's OpenID Connect discovery url.
This will tell you everything you need to know about this OpenID Connect provider, like what are the endpoints (URLs), what crypto is supported, and what user claims can you ask for.
An example of a Discovery Request, using the oxAuth RP library.
Client Registration#
In SAML, the website was called a "Service Provider." In OpenID Connect, the website (or mobile application) is called a "Client". Clients can be registered manually by the OP, but more frequently, clients use the Dynamic Registration API to automate the process.
Obtaining the id_token#
After your client is registered, it is time to get down to business. OpenID Connect offers two common workflows for authentication: basic (where the person is using a browser, and can be re-directed) and implicit where the client sends the credentials, including the secret. There is a useful implements guide for basic and implicit.
Logout#
OpenID Connect defines a mechanism for Session Management. The idea is that JavaScript in a web tab can detect that another tab has logged out. One detection of a logout event, the Web application can cleanup sessions in any backend systems as necessary. It is not 100% effective. If the tab is closed when the logout occurs in another tab, the event may not be detected, and the backend systems are advised to timeout sessions.
Using OpenID Connect from JavaScript#
See OpenID Connect plugin for Passport for further details.